We decorate the personal plot with a swan from plastic bottles. Step-by-step instruction. Do-it-yourself swan from plastic bottles: simple manufacturing techniques How to make swans from plastic bottles
The swan has always been a symbol of beauty, grace and grace. Making a swan out of plastic bottles with your own hands is easy. Although you need to show perseverance, patience and spend a little time, then a beautiful swan made from simple used plastic bottles will be a great decoration for a garden or cottage.
This article will present a master class on crafts, describe two techniques for making a swan with detailed instructions, which are supported by photos and videos.
Here are some photos of what a swan should look like:

The stage of creating a composition
First, it is important to choose a place in the garden or in the country in which the swan will stand. Such an original bird is used as a tub for flowers or other plants. The name of this craft is a cache-pot swan. Amazingly effective and functional item.
First technique
For crafts, you will need materials such as:
- Five-liter large plastic bottles;
- 0.6 millimeters of iron wire;
- Metal mesh to make bird wings;
- putty;
- Putty roller;
- White bandage;
- Tassel.
It is necessary to cut the bottle in half, and bend the wire and give it the appearance of the number two, make a hole in the bottle cap and insert the wire. Strengthen the structure with special glue for ceramics, and in order to make the product stronger inside, fill it with stones or broken bricks. Fill the hole with wet sand.

How it works? Under the pressure of the sand, the bottle should become more rounded and take the shape of the body of a bird.

The workplace for working on crafts should be covered with cellophane. At the next stage of work, it is necessary to make a putty solution. To make it easier to sculpt the swan, you need to make the solution thicker. In order to make the bottom of the product, the first layer of putty must be spread directly on the cellophane.

Put the bottle on top of the solution and gently smooth the layers with a spatula.

The next step is to blind the bird's neck. To do this, you need to start coating the wire with putty. Start from the bottom and do it with wet hands.

Similarly, coat the entire bottle with a spatula, a thick layer of two centimeters.

To make the wings of a bird, you need to bend the mesh into the shape of a wing, attach the bottle to the side and press down, fix it with putty. Wait for the solution to set.

When the putty has set, smear the bird's wing with the solution with your hands.

While the wings are drying, you need to coat the bird's neck.

During the working process, wrap with a wet white bandage.

It is required to form the tail of a bird. To do this, bend part of the grid at an angle of 40 degrees and hold it with a solution. Then hold the head and leave the product to dry for 30 minutes.

From the bottom of the tail, make a roundness at the bottom of the tail.

Make the upper part of the tail in several stages.

View of the tail from above.

Side view of the tail.

When the blank for the swan is ready to dry, you need to plaster it, paint it with white paint and varnish it.

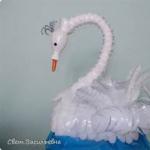
A beautiful swan is ready!

Second way

For crafts you will need the following materials:
- White liter plastic bottles exactly 25 pieces and one bottle of 500 milliliters;
- Five-liter transparent bottle;
- One easy-to-bend plastic bottle, volume five liters;
- Three meters of thick wire;
- Women's elastic tights;
- Sintepon and bottle caps;
- Fishing line and wire;
- small pebbles;
- Red fabric for the beak;
- Scotch;
- Buttons for the eyes.
First you need to prepare the bottles. Remove the neck, corks, rings, peel off the labels. Next, you need to cut the bottles, but before cutting, draw clear lines along which to cut.

Cut a half-liter bottle, remove the neck and cork. Make cuts to the cone of the bottle. Make the first cut along the casting seam. Next, make a beak, melt the ends of the clothespins and pin two holes with an awl. With adhesive tape, collect together the two halves of the clothespin. Make the body of a swan from a 5 liter bottle.
Next, you need to assemble the product. Bend a thick wire into two pieces and pass through the wire in the bird's head. Put a synthetic winterizer in the head and string corks alternately with 6-petal parts on the wire.
This is what the neck should look like:

To strengthen the body, you need to pass the neck part of the wire through the bottom of a five-liter bottle and bring it out through the hole in the lid. To stabilize the product, fill the bottle with stones. Make a tail from the ends of the fishing line. Cut and reinforce the feathers with synthetic thread.
The craft of the majestic swan is ready!
Video on the topic of the article
Easy videos on how to make a beautiful bottle swan.
Good afternoon, dear friends, today you will learn how to make a planter for the garden in the form of swans with your own hands. Any plot, garden or playground can be beautifully decorated, for this you need to attach only a little imagination. After all, you can decorate our site not only with flowers, but also with crafts and garden sculptures. Due to the lack of space, it is not possible to put sculptures and plant flowers on every site, so for such purposes it is best to use a planter with your own hands. After all, you will have crafts and flowers planted. Cache-pots are made different both in shape and size, but most often they are created in the form of a swan. The swan is a very beautiful, graceful bird that does not leave anyone indifferent. Perhaps that is why most often on the site you can meet this charming bird. The swan is made from different materials: tires, plastic bottles, cement, gypsum, foam, etc. If you are interested in how to create, then on the site you can find crafts from these materials. And now let's get back to the topic and consider a detailed master class on making flower pots in the form of a swan that will decorate your yard. The author of this master class is Alla Korobko. Alla showed and told in detail how to create a swan with your own hands.
To make a swan you will need:
* Plastic 5 l. square bottle.
* Iron rod 0.6 mm.
* Bandage.
* Starting putty.
* Small spatula.
* Brush.
* Capacity for mixing the solution.
* Water.
* Sand.
* Adhesive for tiles.
* Polyethylene film.
* Iron mesh.
* Sandpaper.
* Primer.
* Dye.
* Varnish.
How to make a swan with your own hands:
To make a swan, we need such a starting putty, Alla used this one.

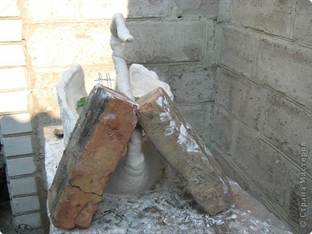
We cut off the top of the plastic bottle as in the photo and pour sand there. But first we take an iron rod and bend it in the form of a two. We make a hole in the cork for the wire and insert a curved iron pond into the hole. From the inside, you need to somehow fix it, for example, you can use broken bricks or stones and seal it with tile glue.

Now we pour sand into it. Alla moistened the sand so that it was wet and then put it into a bottle. Slightly expand with sand at the side of the bottle to give a more natural shape to our planters.

Let's prepare the workplace, take a plastic wrap and cover it. Next, mix a very cool putty solution. We take a spatula and apply a layer of putty on the film with it, this will be the bottom for our planters.

When the layer is smeared, we put a bottle frame on it. We continue to smear putty, but already from the bottom along the edges. We evenly distribute the excess putty and smear along the edges from the bottom up. The spatula during operation must be moistened in water, this is done so that the putty does not stick and it is easy to work.

When everything around is completely missed, we move on to the neck. We wet our hands and take a putty solution from it, form a small ball and coat the base of the rod together with the cork.

Wet the brush with water and smooth the surface with it.


Let's start making wings. We take an iron mesh 15 cm by 30 cm and bend it slightly, give it the shape of a wing and press it a little into the workpiece, as if obliquely.

When the mesh was installed, we immediately fix it with a small amount of putty. When smeared, leave it like that for 15 minutes, you need to wait for the putty to set for about 10-15 minutes. You can go for a rest and drink tea. Under the rear of the wing will need to make some kind of support.

When the wings are grabbed, we proceed to manufacture further. Wet our hands in water and take a little putty solution in them. We smear the putty with the help of our hands on the outer side of the wing, and with the other hand we need to hold it from the inside. We do the same with the second wing. If the putty doesn’t stick very well, try to make the second wing for now, don’t worry, you will definitely succeed. And we will fix all the shortcomings, flaws when the putty dries a little.

When the wings are smeared and it takes time for the putty to grab, we will take care of the neck at this time. With wet hands we form a small roller and fix it on the rod.

When the neck is smeared, we moisten the brush in water and use a wet brush to level the surface.

When we have more or less leveled the surface, we take a bandage, tear off small pieces and moisten them in water. Then we wrap a wet bandage around the neck, squeeze it a little with our hands. So we do the wire to the end, at the end we flatten it in the form of a beak and also wrap everything with a bandage. The neck is all for now, let's go back to the wings, they have dried up during this time and we can even out all the shortcomings.

Also forget about the tail. We take a small piece of mesh and bend it with a cut, about 40-45 degrees. With the help of putty and support we fix the tail.


The head and neck also need to be fixed and given time for everything to grab, you can go for a walk for about 30 minutes.


We smear the very top of the tail in several approaches, alternating it with the manufacture of the second layer of the neck and head.

While the ponytail dries, apply a second layer of putty to the neck with wet hands.


So we reach the head, we do the same. We just try to make the beak stand out and become like it.


Then, using a wet brush, we equalize the edges.

This is what the tail looks like from above.

And so from the side.

That's it, the swan pots are almost ready. Let's examine it from all sides and if there are flaws, we will smooth them out with putty. Then find a place for him so that our planter dries well and he is not afraid of rain. After a few days, our pots should dry well and then with the help of sandpaper we equalize the swan. Next, we need to prime the craft with a primer, and only then we apply paint. If you do not apply a primer, then the paint rolls in lumps. When it dries, paint with regular enamel paint in two layers. Next, paint the beak, eyes. When the paint dries, apply varnish, too, in two layers.

That's all, look what a beautiful swan turned out. Using a drill, make a few holes for water to drain and then paint them to protect the pots from destruction.

It remains to plant flowers in it, I think that dwarf marigolds will look very nice in them, but what would you advise for planting?

Advice from the author: Make the putty in small portions and very thick. You can always wet it.
DO WITH ME, DO LIKE ME, DO BETTER ME! And remember, “Do not forbid yourself to create, even if it sometimes turns out crooked, no one can repeat your ridiculous motives!” as M. Tsvetaeva said. Good luck everyone! With pleasure I will look at the swans-pots in your performance!

Swan planters for the garden

Not much time has passed since Alla's planter in the form of swans gained popularity on the Internet and many creative people also began to create swans for this reason. So Lydia Tkachenko also decided to create these wonderful swans for her garden. This wonderful planter will also decorate your garden and give you a mood. From the usual 5 liters. of a plastic bottle, Lydia made a beautiful planter in the shape of a swan for her garden with her own hands. Let's take a look at that too.
To make a swan, we need:
* Plastic bottle 5 l.
* Bandage.
* Putty knife.
* Brush.
* Sand.
* Iron wire.
How to make a pot:
We take a plastic bottle and cut a hole along the entire length on one side. Then we take the wire and insert one end into the neck and fix it. We give the shape of the neck. It is better to pour sand into the bottle so it will be more convenient to work. We put a film on the workplace and apply a putty solution on it and immediately install our pots on this layer of putty. We start from the bottom to coat our cache-pot with putty, having smeared a little, we pass to the neck.

We also need to make wings, take a mesh or wire and fix them to the base.

Then we gradually make the neck, wrap it with a bandage to keep it better. When the pot is ready, paint it and varnish it.


You can plant flowers in a ready-made planter or just decorate your garden.


Copyright © Attention!. Copying text and photos can only be used with the permission of the site administration and an active link to the site. 2019 All rights reserved.
The swan is a beautiful bird, how often do you see crafts made in this form? What can you make an ordinary swan for children from? The answer is simple, almost anything. Similar crafts decorate many summer cottages, stand in parks, and what aesthetic satisfaction you get by making such a paper swan. Moreover, in the case of origami, such work perfectly develops fine motor skills of the hands.
But you can show your imagination and make such a craft out of almost anything! I think everyone has seen swans from ordinary car tires and you know that a job well done looks very impressive, but rubber is not the only thing you can make a beautiful craft from.

So what's stopping us from learning the same way? Nothing, now you will learn how to turn improvised material into beautiful birds and you will be able to give a master class on how to make a similar swan craft with your own hands to your friends and acquaintances.

Making modular origami
This type of origami is very difficult, it requires diligence and painstaking work. You will have to make many parts out of paper, and then connect them by nesting one into the other, which is why this technique is called modular. However, the result fully justifies all these difficulties. Even the creation process itself is so captivating that you will not notice how time has flown by. However, let's get started.

Actually modules
The first thing you should do is learn how to make modules. To do this, take the A4 format, cut into thirty-two equal parts of a rectangular shape. Done? Great, now we fold each resulting rectangle in half, lengthwise and across.


Now we wrap the edges to the center, turn the resulting product over. You should have a small distance between the corner that you wrapped and the triangle.


We collect crafts
To begin with, we need a sufficient number of elements of various colors, and we need these: 1 red, 136 pink, 90 orange, 60 yellow, 78 green, 39 blue, 36 blue, 19 purple.

We proceed directly to needlework, take three pink elements and place the tips of the other two in the pockets of one of them.

Next, we take two more modules of the same color and attach them to the previous formation by analogy, the tips in the pockets. We continue to do this until we get a ring with an outer and inner row, thirty modules each. In fact, first you get a chain, the ends of which you connect with the last module.

We make the next, third, row already from thirty orange elements that need to be connected in a checkerboard pattern. Similarly, collect the fourth and fifth rows.


The next step, carefully turn the edges of the craft up. Next, we take thirty elements and lay out the sixth row by putting them on top.

And now comes the crucial moment, we make the neck and wings. First, choose where to place the head. We chose, we take two adjacent corners of the elements, here we will make the neck. To the left and right of the head we form layers of twelve yellow modules. As a result, we get twenty-four elements in the seventh row.

We make wings by reducing the number of elements in the next row. We reduce by two, that is, in the eighth row you will have twenty-two modules, in the ninth already twenty.

Next in line is the tail, it is made by analogy with the wings, only we reduce one module at a time. This part will take twelve green and three blue elements.

The neck is made quite simply, we take one module and insert it into the pockets of another, that's all. It remains only to insert seven purple and 6 elements of blue, blue, yellow, green into the red module. We form the neck and attach to the body between the wings.


The last thing to do is the base of the bird. It will consist of two rings, in the first there are thirty-six modules, in the second forty. We connect them by analogy with the neck.

Our beautiful bird is ready, you can put it in the living room or your room. She will delight your eyes for a long time.

Classic origami swan
Next, we will analyze step-by-step instructions on how to make a much simpler and more understandable swan, which can be created from such improvised material as paper, but from that it will be no less beautiful.


Maybe someone will like it even more than our previous version. All you need is a piece of paper and a pair of your wonderful hands. Let's not make long prefaces, let's get started.

The first thing you do is take a square piece of paper and fold it nicely diagonally and unfold it. Next, bend the sheet on one side so that the corners meet in the middle, as if you are making an airplane. Now you need to slightly bend the corners, which are connected in the center, to an equal distance.


The next step is to turn our craft over and bend it. You should get a certain triangle, something similar to an airplane.

We take the nose of the “airplane” and bend it up in a place that cuts off about one third of the nose of our craft. And finally, we bend the tip a little to make a beak.

Our beautiful bird is ready. The swan is a very complex figure and it may happen that you do not quite understand the manufacturing process. To do this, below we attach a photo instruction for making a swan craft.

Photo crafts swans


Swans for the garden with their own hands from plastic bottles will add grace and beauty to any palisade. Today, there are many ways to decorate the garden, but the most unusual decorations can be made at home. Such decoration will not require large expenses, but you can use your imagination to enliven the exterior. And it is rare that someone refuses a small flock of beautiful swans in their own garden.
There are several ways to make such swans, they differ only in appearance and time used to create such masterpieces.
The first method just does not require much time, but the result will certainly please the eye.
To make a swan for the garden, you will need the following materials and tools:
- 5 l plastic bottle;
- milk bottles 800 ml;
- hard wire hose;
- wire;
- scissors;
- marker;
- candle;
- dye.
decoration process
A 5 liter bottle is taken. It is necessary to mark the lines with a marker along which it will need to be cut in two, the upper part is removed. Only the neck remains, which is necessary for fixing the neck. The hose, which plays the role of the neck, must be threaded into the neck and secured with wire to the base. Next, you need to do the "feathers". Blanks are cut out of white bottles (more often these are from under milk), get rid of the neck and bottom. The cut blanks need to be held above the candle from the outside, it is advisable to cut a small fringe on the sides of the blanks for a more realistic look. Then you need to collect 2 feathers and connect with wire to each other.
The design of the neck also uses bottles with a cut off bottom, according to the number of bottles used, you can choose the length of the neck. Now it's time to start creating the beak.
In the place where the hose and the last bottle end, you need to make holes and connect everything with wire. Close the base of the beak with a lid. The beak itself will be made from a cap, most commonly used for chemical bottles. You need to cut the cover in the shape of "M", then paint and install the beak. If desired, you can plant flowers for the garden in a flowerpot, and then an ordinary flower bed will become a work of art.
Unusual decision
There is 1 more way to create a swan for the garden. In this case, unusual solutions are used. So, you will need the following materials:
- tire;
- plastic bottles (70 pieces);
- metal grid;
- hose;
- wire;
- Styrofoam.
At the beginning of work, it is necessary to cut off the inner rings from the tire, and to designate the tail, one side is cut into a triangular shape with special tools. We cut the tire in front for convenience, the edges are connected with bolts. To create a neck, you need to screw the wire to the tire, and leave quite a bit of material at the bottom in order to secure the swan to the ground as a result.
The wing is assembled from feathers made in the same way as in the first version, but this time the "fringe" is optional. On 2 segments of the grid, which will be the "skeleton" of the wings, all the prepared feathers are screwed with wire.

It is necessary to fill several rows with feathers on the inside of the grid, so that the frame is not visible in the finished version.
It is advisable to take a larger mesh so that the wings look more spectacular. But the head is cut out of polystyrene foam, the beak and eyes are decorated with paint. The head is placed on the wire base after the self-tapping hose has been used to create the volume of the neck.
The body, like the head, is painted, and the wings are installed with screws or wire, as soon as the workpiece dries. The swan is ready to decorate the landscape.

The result is worth it
The last option for decorating the garden is more time consuming, but the result is worth the time. For a swan planter you will need the following:
- 5 l plastic bottle;
- iron rod 0.6 mm;
- bandage;
- starting putty;
- small spatula;
- brush and water container;
- solution container;
- sand.
First you need to repeat the already familiar steps with a 5 liter bottle - cut off the top, but leave the neck for the neck. Pour wet sand into the bottle, round the sides. Insert a rod in the form of a “two” into the lid.

Put 5 cm of putty on polyethylene, place a bottle on this layer, smooth the excess putty up the base with a spatula dipped in water. Next is to do the neck. Form a roller of putty and apply to the base of the rod and the cover. Use a damp brush to smear uneven areas. Next, treat the entire surface of the bottle in the same way.
Until the putty has set, it is necessary to take care of the wings.
Press the mesh on both sides of the body at a slight angle. Supporting it from the inside, it is worth starting to apply putty, imitating wings. Next, it is worth sticking around the neck in the same way and forming the head. At the end, wrap it with wet bandages. In this case, you need to fix the neck so that it does not fall under the weight.
Leave for a while and do the tail. A small piece of mesh is installed between the wings, pressing into the putty layer. Next, the tail is formed in the same way as the wings - a putty roller is applied to the mesh, and layers are added, then errors are removed with a wet brush.
The next is to apply 1 more layer of putty on the neck and head. When everything is finished, you need to walk with a wet brush and finally remove the bumps. It is required to leave the swan in the sun for 2 days for final drying. And as soon as the workpiece is ready, it is necessary to sand, paint, decorate the beak, eyes and varnish. And flowers should be planted in the container in the center of the figure, and the swan for the garden is ready.
There are several ways to create beautiful swans for the garden from improvised means. And which option to choose depends on your own imagination and desire, since there is nothing complicated in this. And let every garden find its "swan".
It will become a simple and at the same time elegant decoration of your personal plot. You can make it on your own from improvised materials. The only thing that is needed is a great desire and perseverance. Also, patience will not be superfluous.
Materials and tools
Before you make a swan out of bottles, you need to prepare the materials and tools that you may need during work. Let's start with materials. IN
in this case you will need:
- a large number of white plastic containers;
- a large canister with a capacity of 5 liters (its color does not matter anymore);
- a piece of metal-plastic pipe;
- wire;
- candle;
- paints of red and black colors (buttons can be used instead of the latter, for example).
Materials must include:
- stationery scissors;
- knife;
- marker.
Idea
First, the plastic bottle swan must materialize on paper. That is, there must be a sketch. It can be done independently or taken from special literature. Agree, it is much easier and more convenient to create something when the result of the work is already in front of your eyes.
The basis
A 5-liter container for liquid acts as a frame for the figurine. Neck

it should look at the tail, and the neck should come out of the top of the bottom. The frame for it will be a metal-plastic tube, in which you must first need an appropriate hole. Additional fixation is carried out with a wire. On this basis, from which the swan of plastic bottles will be made, is ready.
Creating the look
Next, let's move on to the head. The beak can be cut out of plastic and painted red, and the head can be built from a 0.5 liter container (white). You should cut it in the middle and install a beak from the side of the neck. Eyes can be painted with paint or buttons can be glued in their place. Then you need to cut a lot of feathers from a white container. After that, you can start gluing the rest of the body. All parts must

Very close to each other. If you need to bend the pen in a special way, then a candle is used for these purposes. The workpiece heats up, bends and then cools down. This design is most often used on the neck. This allows you to give the craft a natural look. But below the feathers are even and fit tightly to each other. After the end of this stage, it is necessary to wait for the time required for the glue to dry. After it has dried, the plastic bottle swan is ready, it can be taken out into the street and installed in the required place. If desired, you can make not one, but a flock of swans. Everything depends only on desire and time.
Conclusion
Swans from plastic bottles are not such a rarity in summer cottages. With their help, you can turn an ordinary garden into a part of a fairy-tale land or a magical pond. There is nothing difficult in making this craft, so a novice master can cope with such a task. The only thing that matters is persistence and desire. Yes, and there should be no problems with materials - they are available in most suburban areas, and if necessary, they can be replaced with something else.
We also recommend
 How to properly use gas
 How to open a private kindergarten from scratch in an apartment or house
 What wood is the duduk made of?
 We decorate the backyard with a swan made of plastic bottles
 Options and performance characteristics of membrane clothing
 Interesting Baobab Facts A tree for all occasions