How to make decoupage on a ceramic mug. Beautiful decoupage of glasses and other tableware: styles, trends and master classes. New Year's decoupage of a clay jug
A real spring reigns in our workshop - we decided to say goodbye to winter, we will drive it away with creative work and beauty!
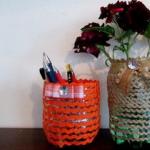
Join us: in this master class we will turn a banal beer mug into a spring-sunny flower vase, which will be useful to you not only during the Easter holidays, but also until the beginning of autumn :)
The glass surface of such a mug is not the easiest choice for decoration.
It is a little more difficult for decorative materials to stay on glass sides than on wooden products. But when it stopped us, we can handle everything :)
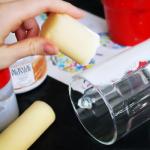
The most important thing when starting to work with a glass surface is to prepare the surface for applying primer. First, try to clean the glass with coarse sandpaper, but not every glass allows such treatment :) Then be sure to degrease the surface: alcohol, glass cleaning liquid, etc. are suitable for this.
We begin to apply primer to the glass prepared for decoration. When working with such surfaces, I prefer multi-layer priming. 
We perform the 1st and 2nd layers with a foam sponge, mix acrylic primer and water-based varnish in a 1:1 ratio. I use Sonnet brand primer and Tikkurila Kiva varnish.
I recommend applying the 3rd layer with a synthetic wide brush and primer without varnish. Important: each layer must dry naturally within a couple of hours.

Our favorite part is choosing a motif that will decorate our mug and create a spring, light mood!
This time we chose (and it was a very difficult one!) on a decoupage card from the new collection from, its name is . The watercolor drawing of this card will be our main element of decor: it is bright and delicate at the same time, the main thing here is not to interrupt, but to emphasize its elegance.
It's nice to know that these maps were drawn especially for you and me with live watercolors and the artist’s magical hands.

Carefully tear the motif off the card, leaving as much white space around the picture as possible. So that the paper edge is completely invisible on our future vase, we thin out the paper on the back side.
 This is easy to do using masking tape: glue the tape to the back of the card (only along the edges that need to be thinned), draw it with force and carefully tear off the sticky strip. Carefully! So as not to tear the picture :)

If your decor uses two colorful motifs, like mine, do the same with the other picture. Next step: gluing the decoupage card to the mug. Soak the card in water at room temperature for 3-5 minutes.

Apply glue for decoupage of dense images to the surface of the mug.
Having gotten a little wet, we put the card in its proper place and glue it again. Be careful not to tear the thin paper with the brush.

Main- expel all air bubbles and smooth out wrinkles. I advise you to play it safe, and after the glue has dried, apply another layer of it: then we won’t be afraid to sand the edges :)

Yes, yes: we will sand our precious surface. We sand only the edges of the picture, comparing them with the ground surface, using fine sandpaper. We do the same with the other picture.

Now that the card is glued and prepared for further work, it’s time to think about how to harmoniously complement it with decor. I added a few touches using granite paste and a palette knife. This step is optional, but nice) Finally, it’s time to get the paints that will highlight the beauty of our card!

The first layer is titanium white. Apply paint over the entire surface of the mug. I start painting the background with a round bristle brush, picking up quite a lot of paint each time.

Immediately after this, before the paint has dried, I apply the next layer: I mix titanium white with sky blue. Now I dry the brush so that the paint lays down with a hint of color, and not in a dense layer.

Next layer: I add indigo color to the previous mixture (titanium white and sky blue), just a little. I apply it with a dry brush, randomly.

Next layer: white, light yellow and chromium oxide. The colors are dull, muted, be careful and don’t apply them brightly! The first layer is ready. Let's dry it.

We need the second layer to finally merge the image with the background. Take a clean round bristle brush and titanium white. And again, using the same pokes, we begin to apply paint, drying the brush a little from the paint.

There is no need to completely cover the background with white, the background should be light and translucent. Our watercolor motif looks organic and easy on it!

It's time to add a little coquetry to our vase :) Let's take out our favorite masking tape! We glue it in vertical stripes to the surface; they can be of different thicknesses. And now we again take whitewash and a round bristle brush, and fill the resulting stripes with paint, this time very tightly!

Where the strip will overlap the motif, carefully move the brush towards the picture. Immediately after applying the paint, peel off the tape.

We decorate the bottom and upper part in the same way: wrap it with tape and paint it in a spring, yellow-green shade: mix light yellow and chromium oxide with a drop of white.

I painted the handle of the mug in a mixture of white and indigo, and got a little crazy by adding white stripes to it)
Add some splashes to your mug! Let's have fun)) To do this, I mixed white with specks and diluted it with water to the consistency of cream. This color is on the decoupage card, so it emphasized it favorably. But spray without fanaticism!
With the same color I added stripes to the bottom and top parts using a thin synthetic brush. 

After drying thoroughly, we coat all our work with a final protective water-based varnish using a soft synthetic brush. I use Tikkurila Kiva and cover the vase three times.
Well, then our favorite moment - we begin the finishing touches, decorate with lace, ribbons, flowers, rhinestones, pendants. Don’t limit yourself to anything, but don’t forget about a sense of proportion) 
Decoupage is an amazing and very exciting technique of modern needlework, with which you can create beautiful and original things with your own hands that decorate not only the interior of your home, but also items necessary in everyday life. The main materials used to decorate various items are decoupage napkins, rice and mulberry papers, as well as decoupage cards. Even with the help of individual elements or scenes, you can decorate any item. For example,
you can create key holders, boards, plates, cups, clocks, trays and much more. These things are also considered unique gifts that you can present to your family and friends.
So, today we will look at detailed decoupage of a glass mug with a step-by-step description and photographs.
Materials for work:
- A small glass cup is the basis for decoration;
- Napkin for decoupage with an autumn motif and with the image of a hedgehog and a squirrel;
- Gold acrylic paint;
- White acrylic paint;
- Scissors and two brushes, one of them is for decoupage in the shape of a fan, and the other is artificial, with the help of which we will apply gold paint;
- PVA glue;
- One is glass and the other is ceramic bowls;
- Acrylic glossy varnish;
- Foam sponge and garbage bag.

Pour white paint into a glass plate, take a sponge, dip it in the paint and paint the entire surface of the cup.


We applied the first layer of paint, but did not paint the bottom. We try to paint carefully so as not to stain the handle and bottom with paint. Place the cup and let the paint dry (about an hour). After an hour, check if the paint is dry. Now we can continue.


Apply a second coat of paint. It will just take a little longer for the paint to dry. Carefully turn the cup upside down and dry the product. You can also lightly blow dry it, but don't overdo it.


We apply another third layer of paint to completely paint over all areas and spots. For a wooden base, two layers of paint are enough, but for a glass base, three is better. Leave the product until completely dry.


While the cup is drying, we will prepare a napkin.


Unfold the napkin and cut it into 2 equal halves.


Carefully remove the top layer. Don’t be upset if the napkin accidentally breaks; everything can always be fixed and glued back together, which is what’s so good about decoupage.

Apply the top layer to the cup, as in the photo.

Take a second ceramic plate and dilute water with PVA glue in equal proportions and mix thoroughly. This is an adhesive mixture. We take a decoupage brush and start from the center of the cup by gluing the napkin with the adhesive mixture, first one side and then the other.
We completely cover the cup, leaving the bottom and the rim near it transparent. Carefully place the product on a napkin and let the glue dry.


When the mug is completely dry, apply a layer of acrylic varnish to the surface of the cup. Wait for the varnish to dry completely, then apply a second layer of varnish. A total of 5-7 layers of varnish are applied to the cup. Gloss varnish adds shine to the surface.

When the cup is completely dry, all we have to do is apply gold paint along the edge of the cup. Again you need to let the paint dry. It doesn't take much time, about 10 minutes.
All that remains is to paint the base of the cup, as in the photo.


Our cup is ready! Thank you for your attention! I wish you creative success!

Decoupage lessons
Part 3
Hello to all needlewomen!
You already know how to do
Glass is a very fragile material.Working with him is difficult, but interesting.
If desired, in addition to shaped bottles and glued dishes, you can decorate Christmas tree balls and even windows. Ordinary glass mugs and plates after decoupage become an exquisite and original gift for friends and loved ones. And if you find it on the Internet beautiful congratulations, print them out and put them on a mug or plate, then the gift will also bring a lot of positive emotions!
Decoupage technique on glass requires compliance with several simple rules.

◦ Be sure to degrease the surface before work.
◦ Work being careful not to leave fingerprints on the glass.
◦ The glass is transparent and therefore all imperfections are visible on it. Do your work carefully and accurately.
◦ If you plan to use decorated dishes for their intended purpose, perform decoupage with special varnishes and adhesives.
For decoupage on glass, you can use napkins, rice paper, decoupage cards, and printouts.

You can create it with regular acrylic paint, paint for painting on glass, a stained glass outline, a glass marker, or rice paper. For transparency, you can add a medium to acrylic paint (creates the effect dilution and clarity).
Decoupage on a glass surface is divided into:
Direct and
Back.
For direct, the motif is glued to the front (outer) side of the glass; for reverse, it is glued to the inner surface.

At direct decoupage The motif is pasted on the outside (on the front side of the product). Mostly they use the thinnest material – napkins.
The motif on a thin napkin is very transparent, and after impregnation with paint varnish it also turns pale.
Before gluing the motif to the work surface, spray it on the inside with spray paint and let it dry. You can first glue the rice paper and then glue the napkin motif directly onto it.
Don't forget to degrease the surface!

At reverse decoupage The motif is glued to the glass surface with the front side.
Degrease the surface. Typically, a glass surface primer is then applied. But this is optional. The motif can be glued with PVA glue, acrylic glue, egg white or special decoupage glue for glass surfaces.

Place the napkin motif (regardless of the type of decoupage) on the glass, grease it with PVA glue or other adhesive. Spread the motif with your fingers or a brush dipped in glue. Remove excess glue with a cotton swab. Dry the work and paint it without going beyond the contours of the motif. Decoupage cards are glued in the same way as napkins.
If you want to use decorated dishes for their intended purpose, stick the motif with a special glue for glass or porcelain. Apply it on top of the napkin. Dry the work overnight and bake it in the oven. The baking temperature is indicated on the glue label. After turning off the oven, leave the oven until it cools completely.
These dishes can be washed in the dishwasher.
You can completely cover the glass surface with rice paper, a whole sheet or small pieces. Apply glue on top. Once dry, coat the surface with 2-3 layers of acrylic varnish or glass spray varnish.
Before gluing the design to the front side of the glass surface, mark the location of the motifs with a marker or regular felt-tip pen. This will prevent the pattern on the work surface from shifting. After work, traces of a marker or felt-tip pen can be easily removed with alcohol.
You have become acquainted with the technique of decoupage on glass. ru
Many homes use a variety of trays and cups - glass, metal, plain, decorated, decorated, trays with or without legs. In any case, the tray should not only be beautiful, but also practical.
But is it possible to decorate a tray and porcelain cups with your own hands, and then use them in everyday life? Will the varnish stick? Will he turn white? Will we damage the products after the first use? In this lesson we will tell you how to decoupage a tray and porcelain cups. A master class, photos and step-by-step instructions will help you create them.
The so-called liquid glass will help us. This product consists of two components that must be mixed in equal proportions. It creates a clear glass surface and, most importantly, will protect products from moisture, heat, chemicals and cuts.
Use it to make trays, tabletops, decorations, and to decorate other surfaces. You can put it on a photo - this is a great way to create something that reminds you of fun, funny, important moments.
If you want, add stones, beads, gold dust, etc. You will learn how to work with liquid glass in this article. We also suggest adding porcelain cups - and you will have a wonderful set that you can use for their intended purpose or give as a gift to your loved ones.
Necessary materials for DIY decoupage of a tray and porcelain cups:
Tray and porcelain cups.
. Acrylic paints of silver-metallic color.
. Light acrylic paints.
. Paper napkin.
. Glass glue.
. Universal glue for decoupage.
. One-component product to create the effect of aging.
. Contour paints on glass in silver and black colors.
. Jar for liquid glass.
. Wooden stick.
. Sponge.
. Brush.
. Scissors.
Decorating the tray
So, in order for the decoupage master class on making a tray and cups to turn out great, first of all, paint the surface of the tray silver.
While the paint is drying, prepare a design - a decoupage napkin. It is best to choose a napkin with a romantic, barely noticeable sketch motif and tear off the desired fragments of the ornament. Separate the top layer with the pattern.
Place the motifs at the bottom of the tray and spread a one-component varnish around them for an aging effect (craquelure varnish). Apply it in places to the walls of the tray. Let dry.

Using a sponge, cover the entire tray with light paint.
When the light paint has dried, glue the napkin fragments with universal decoupage glue. Apply glue to the surface of the napkins. Leave to dry. If you also pasted the drawings onto the walls of the tray, do not forget to varnish them.

Working with liquid glass
Now fill the bottom of the tray with liquid glass. First, pour the first and second components into the jar. There should be an equal amount of them, so if you are decorating small objects (for example, jewelry) and will not use the entire amount of glass at once, you can measure it with a medical syringe.
Using a stick, mix both components until you get a homogeneous mass.
Pour the mixture onto a tray.

Using a stick or brush, spread the glass evenly over the entire bottom and leave to harden. While it is liquid, you can eliminate any air bubbles that have formed. Leave it to harden (it will harden in about four hours, and will be completely hardened after 24 hours). At this time, work on the porcelain cups. Wash them and remove fat with alcohol.
Decorating porcelain cups
Now we will tell you how to decoupage porcelain cups. Decorate the cups with the same motifs from the napkin, just do not tear them off, but carefully cut them out. Separate the white layers and glue the design with glass glue, which does not need to be fired in the oven.

Bring your drawing to life with contour paints on glass. First, highlight some areas with silver paints.
Emphasize the design with black tones. Once the outline paints have dried, coat it again with glass glue. By the way, this work can be used to participate in a beauty contest in the Miss Creativity category. You can find out more on the official website http://miss-instaforex-asia.com of the Miss Insta Asia beauty contest on the Internet.

Use a wooden stick to scrape off any visible glue residue so your work will look neater. So you got original decoupage, and a master class of a tray and cups with photos, we hope, helped you in creating it.

You can also look at the article on how to make other porcelain cups, but using only paints and templates.
We wish you success!
Before the cutting and gluing process, we will thoroughly prepare the base. We have two options:
Leave the background color white;
Paint the background any other color.
In the first case, before gluing the applications, you should thoroughly rinse the base with dishwashing liquid (if the surface is oily). After this, wipe dry with a cloth that does not leave hairs on the surface.
Gluing
Technique decoupage plates, and other ceramic products can be difficult to make for several reasons.
For example, objects often have a concave shape, as well as curves in several areas. Take, for example, a soup plate - it has both horizontal and vertical bends. But cylindrical circles have only a horizontal bend.

This is where the difficulty arises: the paper appliqué has a flat surface, but the object to be decorated has curves in more than one direction.
To cover a three-dimensional object with a sheet of paper that is known to be two-dimensional, you need to somehow bend the paper. And if we glue the applique onto the surface of a concave shape, then we will get folds.
To avoid this, you will need to make perpendicular cuts along the sides of the appliqué. It will be even better if you make these cuts along the lines of the drawing. For example, if we have as an application for decoupage plates or the image of a flower is used in circles, then cuts should be made along the lines of the petals. This way we will be able to hide the cuts we made.
In the enlarged photo, the lines that close the shape of the petals are indicated in white, along which the necessary cuts are made. This way, the edges of the cuts will slightly cover the adjacent edges and there will be no folds.

The next difficulty that may arise is that the ceramic surface is too slippery. The application does not stick well to such a surface and slides strongly over the applied layer of glue. In this case, it is recommended to wait until the glue dries slightly and thickens before gluing.
If the background remains white, then after gluing the appliqués, you should remove any remaining glue that has protruded beyond the edges. This can be done by blotting (without rubbing) the application with a tightly wrung out, damp paper towel.
Applying varnish
When the surface is completely dry, then you can apply varnish. If you want the ceramic to remain shiny, you should use a water-based, wax-free varnish. Water-based parquet varnish may also be suitable, but it is better to use special varnishes that imitate the shine of ceramics. As with regular paint, several layers of varnish should be applied.
Note: To give the surface a smooth finish, do not use steel wool, which will stain the surface. Better use sandpaper.
We also recommend
 DIY products from plastic bottles and caps
 Pumpkin for Halloween - original decor ideas How to make a candle holder from a pumpkin
 Beautiful decoupage of glasses and other tableware: styles, trends and master classes
 Step-by-step diagram: do-it-yourself electrical wiring in an apartment
 Fireproof tiles for a stove – how to uniquely decorate the structure?
 How to build a warm chicken coop with your own hands - step-by-step instructions