Wood turning: types and methods of artistic processing. Basic techniques for working with the machine. Turning products. Segment turning. Wooden products so that the front planes of the cams, when clamped, rest against the cylinder body - a condition necessary for reliable
All photos from the article
Wood is not only a material for making beams, boards and other building elements, it is also a space for creativity, since this material is quite easy to process, so anyone can try themselves as a sculptor. Artistic processing of wood allows you to get a real masterpiece even from a piece of wood that seems ordinary at first glance.

Methods of artistic wood processing
Turning is far from the only way to process wood.
In addition to this, we can highlight:
- inlay - in this case, pieces of other wood are inserted into a wooden base to form a pattern;

- pyrography – ordinary wood burning. If you work carefully with a device with a thin tip, you can achieve outstanding results;

- turning - in order to make turned wood products you will need a lathe and at least minimal skills in working with it;
- hand carving – you can’t do without skills in working with cutters; it’s difficult for even experienced craftsmen to work with hard wood. But handmade work is very highly valued;
- also include methods of artistic processing. Painting is often combined, for example, with carving.
Note! Using a machine greatly increases the speed of work compared, for example, with manual carving. All turned products offered at retail are obtained by processing the workpiece on a machine.
Turning on a machine can also be carried out using several technologies. For example, segment turning involves gluing a workpiece from individual fragments of wood and then processing it on a machine. By combining different types of wood, interesting effects can be achieved.

As for the list of what can be made on a lathe, it is quite large. You can start with simple turned handles for tools (the same chisel), and end with massive long products. Also, utensils and other useful household items can be made from wood.
Types of turning
If we try to describe the process in dry technical language, we can say that the turning process consists of obtaining a part from a workpiece that has the shape of a body of rotation. Since in the case of wood our goal is also to make this part look attractive, the aesthetic component is achieved by changing the diameter of the workpiece, combining different shapes, etc.

As for classification, turning on a wood lathe can be divided into the following types:
- longitudinal - in this case, the workpiece rotates around its axis, and the cutter gradually moves towards it parallel to the axis of rotation;
- transverse - differs from longitudinal in that the cutter moves in a plane perpendicular to the axis of rotation of the workpiece;
- angular (tangential) – in this case the cutter moves at an arbitrary angle to the axis of rotation.
The classification can also be based on the purity of processing. Thus, during roughing, the tolerances are very large, but the rate of removal of excess material is high. Finishing involves finishing the workpiece and removing a thin layer of material.
Subtleties of choice
If working with wood is just a pleasant hobby and you don’t have a whole workshop with a full arsenal of all the tools at your disposal, then the choice of machine is critically important. There are a number of parameters, paying attention to which, the likelihood of an unsuccessful choice will decrease significantly.
What to look for when choosing
Most often, very compact devices, tabletop lathes, are purchased to satisfy the creative itch. Of course, in terms of accuracy and engine power, they cannot be compared with powerful industrial analogues, but the price of such devices is reasonable.
When choosing, you should pay attention to such machine parameters as:
- maximum permissible dimensions of the workpiece being processed. The documentation for the machine must indicate the turning diameter (the maximum size of the workpiece in the transverse direction) and the length of the bed (the maximum permissible length of the workpiece);
Vases can be sharpened as if the wood fibers were arranged longitudinally in workpieces, and in transverse. I have already carved a number of vases from various types of wood (see the “Galleries” section on this site) and all of them were turned transversely, which is explained by my pursuit of the maximum beauty of the wood material, which is most often revealed precisely during transverse turning. Most often, but apparently not always. It was interesting to try longitudinal turning, which I had done very little before. In addition, vases with transverse fibers require blanks of a fairly large diameter for their production - at least 250 mm, which is difficult to find in the nature of central Russia, especially the most desirable fruit trees with hard and attractive wood. With a lengthwise arrangement of the trunk, even on my small Jet JML-1014VS lathe, you can turn a vase slightly shorter than 300 mm in height. The length of the machine guides no longer allows, but this, it seems to me, is usually quite enough. Now, when I am editing this article for publication on my website (January 2015), my city workshop already has a recently purchased, more advanced Jet JML-1221VS lathe, the operation of which will be described in my next posts.
The first operation is cross-cutting the harvested tree trunk into logs, usually performed with an electric chain saw, since using a noisy chainsaw in a garden plot surrounded by neighbors would not be entirely convenient. Most often I use the Interskol PC 16/2000 electric saw, although I also carefully preserve the already dying lightweight Ranchero E35 saw (1400 W), purchased abroad more than 25 years ago, and which is extremely convenient for sawing the crown of trees at height. Until now, I was content with sawing trunks directly on the ground or on some random stands or pads, which was very inconvenient and sometimes dangerous. More than once I touched the chain to all sorts of metal objects, which forced me to immediately start sharpening its teeth. Finally got around to creating a special stand for cutting trunks into logs for turning, i.e. goats. They
are shown in photo 1 and are made mainly from the material at hand - chipboard
Soviet production is still not of very high quality, i.e. density. But, perhaps, high quality is not particularly necessary here, since during work you often hit the sawhorses with the saw chain, damaging them. At least not too bad. On sawhorses you can also round logs, i.e. cut off the corners, while holding the wood with a rubber band, which clings to the side metal brackets, bent from nails and hammered in a row on the sides of the trestle. You can also turn the sawhorse upside down and saw a vertical log along the grain. I felt comfortable.
The next operation is sharpening the roughing chisel (reyer in the old terminology), which will be used to rough-process the workpiece and partially form the outer profile of the vase (photo 2). It should be emphasized that this
The chisel is used exclusively for longitudinal turning and in no case for transverse turning. Sharpening this chisel is very simple at approximately 45 0 and I do it by eye directly on weight, i.e. without resting on the platform of the tool rest, since I am too lazy to install it instead of a device permanently attached to the sharpener for frequent sharpening of deep-grooved chisels. Without pressure, I literally remove microns of steel (carbon in this case), focusing on the appearance of small sparks on the outer side of the chisel tip, i.e. directed towards me. A simple (compared to, for example, some sophisticated Tormek) sharpening machine Diold ET-200U with a high-speed wheel diameter of 150 mm has served me faithfully for more than six years, at a cost then of only one and a half thousand rubles. Inexpensive spare wheels made of white electrocorundum (based on aluminum oxide - 25A60K-LV) are sold in a tool store near my house. The explanation of the markings of grinding wheels can be found here (http://tool-land.ru/markirovka-shlifovalnykh-krugov.php). The grains of such a wheel are colored during operation, which prevents it from becoming salty, as well as from annealing the hardened steel, which is especially important for carbon steel chisels, which, fortunately, I don’t have many of and they are far from the most important. Most of my homemade chisels are made of high-speed steel, which is practically resistant to annealing on a sharpening wheel. From time to time I level the working surface of the circle with a diamond cutter. The second low-speed abrasive wheel on my electric sharpener provides additional wet sharpening capabilities.
Photo 3 shows the rough processing (rounding) of the surface of a section of a freshly cut apple tree trunk with a length of 250 and a diameter of about 130 mm
using a sharpened chisel. Further photographs will show the use of other types of wood for vases, such as rowan, bird cherry and birch souvel. Having roughly leveled the cylinder, using a thick cutting chisel (7 mm) at one end of the workpiece, I form a protruding bottom for subsequent gripping in an Axminster chuck with large G-type jaws (photo 4). The depth of the jaws is 16 mm, so the bottom
should protrude no more than 15 mm,
so that the front planes of the cams, when clamped, rest against the body of the cylinder - a condition necessary for reliable fixation of the workpiece, especially long ones. To ensure this, when turning the key in the chuck, supporting the workpiece with the tailstock is also important.
The formation of the outer profile of the vase is carried out using both a roughing and finely grooved chisel. Moreover, with the help of the latter, smaller parts are turned, such as shoulders and grooves (photo 5). A fine-groove chisel, unlike a deep-groove chisel, differs more
has an abrupt character and you need to carefully monitor the pressing of its chamfer to the wood, otherwise it is easy to spoil the finished profile of the product when burying the chisel in the wood. In general, the sliding of the chamfer of turning chisels along wood is reminiscent of the sliding of the sole of a plane along it during planing. It is difficult to imagine the sole of the plane being torn off from the plane being planed, which equally applies to the condition of safe cutting of wood with almost any turning chisel, with the exception of scrapers, the chamfer of which is not pressed against the wood during turning, but they do not cut, but scrape the wood, finally leveling its surface after cutting with other chisels. The second important condition for safe cutting with a finely grooved chisel is the requirement to always point it down the slope, i.e. to a smaller diameter. Sharpening a fine-grooved chisel, usually at 30 0, is very convenient to do using a special device that I made for sharpening deep-grooved chisels, slightly changing its setting. The chamfer turns out perfectly smooth without edges. The device will be described later in another article. It should be said that instead of a shallow-grooved chisel, to form the profile of a vase, you can also use a deep-grooved chisel with a less jerky character, which is what I often do.
Photo 6 shows the finishing scraping of the turned outer surface of the vase with the “wings” of a finely grooved chisel, which is held at 45 degrees to the surface. The final leveling of the surface of a product with a longitudinal arrangement of wood fibers can also be done using a jamb chisel, as shown in photo 7. It has a very rough character and
It even poses a danger, since when buried it can fly out of the hands and injure the turner. At the same time, in the hands of an experienced turner, it is a universal tool that can be used to turn almost anything, but only if the wood fibers are arranged in proportions, i.e. It is absolutely not applicable for cross turning. Its blade must be sharpened at 25 degrees on the platform of the electric sharpener tool.
Having completed the formation of the external profile of the vase and leveled its surface, as well as applying small decorative beads and grooves with a finely grooved chisel (photo 8), I
I wet sand the product with P220 grit sandpaper, for which I dip the sandpaper in a plate of water and spray the surface with a sprayer. This sanding is preliminary in nature and later, after drying the product, final sanding will be required. Next, I cut off the supporting protrusion on the bottom of the vase with a thin cutting chisel (photo 9) and clamp the bottom in
chuck with support of the product by the tailstock (photo 10) for a tight fit of the front plane of the jaws to the bottom of the vase. The next step is to drill a deep hole in the neck of the vase. Since the vase is long, for reliability I decided to additionally fix the neck in the lunette (photo 11). Using a steady rest
usually when turning vases.
Steady rests for small lathes are not sold and you have to make them yourself. My three-wheeled steady rest (there are two- and four-wheeled ones) is made of 40 mm thick plywood with a hole diameter of 220 mm for the workpiece. Roller skate wheels with precision bearings create relative noiselessness when operating the steady rest. I had just installed the steady when my wife called me for lunch. To take a break, I had to take a roll of cling film and wrap it around the vase (photo 12), otherwise the product would be made of
damp apple wood (an extremely “crackling” species) would certainly crack during my absence. I also use this film to wrap semi-finished bowls made of weak, heavily rotten wood to prevent them from flying into pieces when boring their internal cavity. Later, for greater convenience, I cut a roll of cling film in half on a band saw.
The vase I conceived had to be universal, i.e. Suitable for both artificial and fresh flowers. In the latter case, the water should be poured into some small container of water placed in a vase, for example, a glass test tube. A test tube with a length of 200 and a diameter of 20 mm, which can be bought here http://http://rushim.ru/product_info.php?products_id=4416, is shown in photo 13. I didn’t have time
prepare for work at the dacha some suitable effective drill with an extension for making a hole in the neck of a vase, for example, a screw (spiral), Forstner or an Irwin feather drill with grooves for removing chips. Only upon returning to Moscow in the fall did I manage to buy a drill for the future Irwin (http://www.shuruping.ru/catalog/706) and a separate extension cord for it. I had to fit a simple flat percussion 22 mm wide from their Soviet-era set onto a long (300 mm) steel rod with a diameter of 10 mm and clamp it in a powerful drill chuck with a Morse taper (photo 14). The very short base of my machine did not allow me to insert the cartridge into
his tailstock quill. The thickness of the rod of the created perk did not allow it to be fixed in the chuck of my Soviet drill (9 mm), so in order to drill a deep hole in the neck of a rotating vase, I had to simply hold the chuck in my hand with great effort, resting the rod on a tool rest. Photos 15 and 16 show the initial and final
stages of this process. For ease of subsequent handling of the test tube, it should protrude 3-5 mm from the neck of the vase.
For final processing of the bottom, i.e. To remove dents from the cartridge jaws and level the end, it was necessary to unroll the almost finished vase on the machine. Previously, I machined a support faceplate with a recess to match the diameter of the neck (photo 17), placed
I supported it back and forth on the bottom with a crown center, into which I inserted an additional homemade narrow nozzle. When I later turned other vases of approximately the same shape, I simply carefully clamped the neck in the small jaws of the chuck (Jaws F), placing under them a strip of plastic more than 1 mm thick (cut from some container). You can also use a piece of coaxial (television) cable as a softening pad, which I have already done more than once. Photo 18 shows the search for the center on the bottom when for some reason it was not planned
or disappeared. A black felt-tip pen marks the beating, followed by tapping the mark with a mallet and moving it to the desired center on the bottom. After this, the bottom is processed, which can be done using both deep-grooved and fine-grooved chisels (photo 19).
Having completely completed turning the vase, it is necessary to dry it without cracking.
In air, the formation of cracks is almost inevitable, which is aggravated by the large thickness of the vase in the lower part. The thinner the walls of the product, the higher the chance of avoiding cracks, as well as some warping. I dry my products turned from raw wood in different ways: either I put them in a Kraft paper bag filled with wet shavings of the same product (photo 20), or I fill them with these
shavings the product itself, which I then wrap in two layers of newspaper and place on a shelf in the barn. The latter method is especially convenient and effective for bowls and plates with a wall thickness of usually about 4-8 mm, which dry in the summer without cracking or warping in about two weeks.
Cracks in the thick lower part of the apple tree vase could not be avoided even after drying for two months in a craft bag, and circumstances did not allow longer drying. I had to seal them by gluing in thin plates of the same material, cut on a band saw and then processed using a Proxxon mini-angle grinder (with a carbide blade) and a Black & Decker electric file. The inlays turned out to be almost invisible, but this additional work forced me to reconsider the technique of turning the vases in order to hollow out their lower parts to reduce the likelihood of cracking. I must say that from the very beginning I was nagged by doubts about the legitimacy of the simplified approach, limited to simply drilling a narrow channel in the neck, which can be seen in a number of videos on Youtube. I used to bore cavities in the bottom of vases, but always experienced various difficulties. However, I rarely sharpened vases. Last summer I made a series of vases of a similar shape and it was necessary to solve the problem radically. From the very beginning, a protrusion is machined at both ends of the cylindrical blank. Having formed the external profile of the lower part of the vase, you should immediately begin boring its cavity using a steady rest, holding the workpiece in the chuck by the protrusion in place of the neck. Using a deep- or shallow-grooved chisel, a hole with a diameter of about 50 mm is bored, through which one can then insert any of the curved chisels: hinged, with a carbide nozzle, or with a cutter nozzle (photo 21). Remaining wall thickness
controlled during boring using calipers. Upon completion of the boring process, it is necessary to separately grind a plug of a suitable diameter from the same wood material and glue it into the hole of the protrusion (bottom). Here you should estimate the depth of protrusion of the plug into the cavity so that the test tube, which will later rest on it, protrudes outward by the required 5 mm. If it falls into the neck, there will be an additional hassle with gluing a piece of wood to the bottom of the vase through a narrow channel. I cut off the part of the glued plug that protrudes outward on a band saw. Next, the bottom will be finally processed in the manner described above.
Vases can be carved into other shapes with a much wider neck, and a test tube will not work here as a vessel with water. What to do? The solution came quite quickly when I was tempted by a half-rotten birch suvel with a bright texture, harvested a couple of years ago in the forest, and carved from it a vase with a neck with a diameter of 35 mm for a vessel with water of a suitable diameter. Next, I pulled out from my inexhaustible supply of various materials a two-meter bright green plastic tube with a diameter of 32 mm and cut a piece about 160 mm long from it on a band saw, deciding to turn it into the required vessel. First, using a gas microburner, I made sure that this plastic was not thermoplastic and it would not be possible to weld a vessel from it. Then I went the gluing route. I sawed off another small piece from the original tube and made an additional split cut on it. Using an industrial hair dryer, I heated the piece until soft, turned it flat and put it under the press. After the leveled plastic piece has cooled, using a compass, I drew on it the outline of a circle, which will play the role of the bottom in a tube vessel. I roughly sawed it out and brought its size quite accurately by eye to the required internal diameter of the tube (28 mm) using a Black & Decker electric file (photo 22). I drove the circle into the tube to a depth of approximately 3-5 mm and filled the outside with thick
a layer of fairly universal waterproof superglue “Master” based on vinyl acetate copolymers, which I have had for almost ten years (photo 23). The vulgar color of the vessel, noticeable in the vase, seemed unacceptable to me, so I painted it with brown quick-drying nitrocellulose enamel. Subsequent month-long exposure to water showed the tightness of the manufactured vessel, and the general aesthetic properties of the turned vase can be assessed in photo 24 along with
Photo 25. Vases made of various types of wood, turned according to the described method.
live goldenrod branch. Stores sell a wide variety of plastic water pipes, from which you can easily make any vessels for fresh flowers that can be placed in vases turned from wood. Photo 25 shows a number of vases that I turned last summer from various types of wood using the method described above.
Folk craftsman Mihai Apostol is the only one in Moldova who makes wooden products using segment turning. This is a special technology in which small pieces of different types of wood are glued together in a sequence specified by the master, then processed and polished “into a mirror.” As a result of many hours of labor, a marvelously beautiful wooden mosaic product is obtained, which, while meeting the high requirements of decorative and applied art, can also serve daily utilitarian purposes due to its durability. Once you see wooden vases, jugs, cups, boxes, and dishes made using the “segment turning” technique, you can no longer forget them.
Generally speaking, there is debate about the concept of “segment turning” (or turning a workpiece assembled from segments to produce decorative interior items or furniture parts), as well as about the origin of the technology itself. Some believe that segment turning was born in the second half of the 20th century, after the advent of modern adhesives, band saws and belt sanders. At the same time, in the Kingdom of Bhutan, which is located between India and China, the tradition of wood turning has existed since time immemorial. There, a person who has learned the secrets and art of artistic woodworking “Shag zo” is called “Shagzopa”, or “master of wood turning”.
 Moldavian resident Mihai Apostol came to segment turning only a year ago, thanks to the Internet. “I saw it, became interested, wanted to try it, and did it. Now I’m carried away with my head,” he says to himself.
In his main specialty, Mihai Apostol IT - programmer. Apparently, the penchant for precision, solving complex problems, building systems, as well as the inner desire to work with such a “spiritualized” material as wood, did not coincidentally intersect in his life. Now that he has become a national master (which is well deserved), Mihai Apostol can no longer determine for himself which of the works is more important. Over the course of a year, he not only independently mastered segment turning technology and developed a range of products, but also, being IT -programmer, made an online calculator for calculating segments, which he posted on the Internet for free use by other enthusiastic craftsmen.
 Currently, at capital fairs, he surprises and delights visitors with his exclusive products, offering vases, jugs, dishes, boxes of various sizes and shapes. The products are made of oak, walnut, amaranth, ash, paduk, wenge. Many are decorated with ethnic (Greek, Indian, Moldavian) patterns. For example, to make the “Elephant” vase (height 26 cm), Mihai used 2,811 segments of walnut, ash, padauk and wenge. The master says that he did not want to “lose” the beauty of the wood; for this purpose, he tried to make the details for the elephants as small as possible, so that the result would be “a real artistic picture, and not a geometric pattern.” In total, the vase took 60 hours of work. But that’s something else! In the Apostle's collection there is a real masterpiece - a tall vase with Moldavian ornaments, in which, just imagine, 12 thousand details! “I wanted to make a vase with a folk Moldavian pattern, the kind that is embroidered on national blouses. I set the task and assembled it over the winter,” he said for Mybussiness. md . What can I say, the work is amazing, but what about prices and demand for similar products in M
 Moldova?
“The complexity of segment turning is high (you need to select parts, cut them accurately, adjust the contacting surfaces) - that’s it. For my work I use expensive types of wood – that’s two. Well, the time labor costs are also large - under such conditions, the finished product, by definition, cannot be cheap. I sell a vase with 12 thousand small parts in Moldova for 600 euros, while abroad it would cost many times more. But within Moldova, I cannot ask for more - purchasing power is very low, and there is still no understanding of the value of such a thing,” says Mihai Apostol. According to him, products made using the segment turning technique are highly valued by foreigners who come here and are very surprised when they hear the amount requested for such work. However, they are not in a hurry to buy “cheaply”; they are stopped by the fact that they will have to pay extra for excess luggage - wood products (especially vases) are weighty and voluminous. If you try to work with foreign buyers through websites, then another problem arises - the high cost of postal transportation from Moldova. Even if prices are significantly reduced in comparison with similar works by American masters, foreign buyers are not willing to pay an unreasonably large sum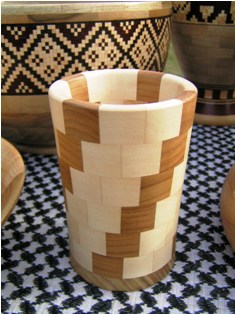 mmm for shipping.
As for visitors to Chisinau fairs, according to Mihai, people come up and admire, but some “don’t understand why” when you can buy plastic or ceramic utensils. “The main buyer showed up right under my nose. Increasingly, relatives, work colleagues, acquaintances and acquaintances of acquaintances began to order products from me as gifts or for home decor. Mostly they order products no more expensive than 50 euros. I also met a seller of trinkets at the local Arbat; they sell various small items and household utensils, the price of which does not exceed 10 euros. Therefore, unfortunately, we have to “lower” and simplify the level of work. At the same time, as a master, I encountered the fact that I did not have time to combine the execution of complex and simple products.
So far it has not been possible to make the segment market a profitable business in Moldova. I can’t ask more for my products; all that remains is to hone and optimize the process itself. Of course, I never forget about quality under any circumstances. Without this there is no chance of success,” said Mihai Apostol.
Material prepared
The entire process of segmental turning on a lathe has long been known to those who are interested in it, and has been worked out. But nevertheless, I want to talk about it.
Having seen enough on foreign sites how the local craftsmen create all sorts of turning-segmental miracles, I decided to create something similar. To tell the truth, we have enough of the same craftsmen, but unfortunately, not all of them share their skills. there is not enough time, or desire, or desire, or maybe they are embarrassed. But I (even though I am a shy person by nature) decided to show how I did it.
To produce this type of product, and for segmental turning in general, you need tree species that are contrasting in color. In our northern regions, the choice of such trees is not rich. Birch, bird cherry, aspen, alder, conifers. But I had dry birch suvel, as well as one die of the overseas chocolate tree Che, and supplies of veneer of different types of wood. I immediately excluded spruce, pine and larch from the list due to the coarseness of the layers and inexpressive color. Alder, too, because of its softness. What remains are bird cherry, birch, suvel, veneer and Che wood. Well, this Che has very hard and heavy wood!.. But how beautiful!
Straight chocolate.
And so, I decided to make a vase with Greek ornaments from all this “wealth”. Having drawn a design for the future vase and using one wonderful program, which on one of the sites was kindly provided for free use by one wonderful Moldavian master Mihai Apostol, calculating the sizes of the segments of the future vases, I got down to business.

First, I cut out the round bottom of the future vase and glued it to a piece of round wood left over from previous turning works. This was so that there would be something to clamp the future product into the lathe chuck.

Having run the material to the size, thickness, on a surface planer and setting the desired angle, using a simple device for a circular saw, I sawed the segments

There were 240 of them!


And many hours of painstaking work began to assemble these “puzzles.”

For the ornament I used birch souvel and the same chocolate tree

Then he began assembling larger segments. To do this, it was necessary to sand the edges of each segment. The appearance of the future product depends on the accuracy of the angles. By the way, when assembling the Greek ornament, each glued pair had to be sanded.

Then all the rings were glued together in positions secured with clamps. Although Titebond is a strong glue, to be on the safe side I left it to dry for a day so that these rings would not fly apart during turning on the machine.

The next stage is grinding again, but this time on planes. Oh, my poor fingers. They got it from the impact of sandpaper (((

Then half of the future “pie” was glued together in a clamp. And again for a day.

And into the machine, for preliminary processing on the outside, and most importantly on the inside, because then it will be difficult to get to the inside. The narrow neck was supposed to be made for the vase.


The next step was to glue the ring with the ornament, right on the machine, pressing it with the tailstock. And again, boring inside, using a homemade steady rest. (For those who don’t know, this is a large metal ring with roller wheels inside). A very necessary device for turning internal cavities, protecting the part rotating in the lathe from flying out of the chuck, and your own body from all sorts of unpleasant and accidents. 
Having turned the ring with the ornament, we glue the second part of the “pie”, pre-glued from the remaining rings, and also grind it first on the outside, and then on the inside. 

This is where the most intense torment begins with internal sampling. You are sharpening, after all, almost blindly! It often happened that this final work, sampling the insides of vases, ruined the whole thing. Wasting all the labor, materials and time. But here a laser pointer aligned with the incisor comes to the rescue. In the photo you can see a red glowing spot on the left side of the neck. This is just from the pointer. Although this does not always save you from failure. My devices, all of them, are entirely homemade and imperfect.

And here it is, this long-awaited miracle!


And the other day, this beauty found its owner, which cannot but make me happy.
There were other works before this, but not with such a large number of details, and they also found their connoisseurs. 
We also recommend
 Review and description of tabletop drilling machines Tabletop drilling machine ns 12 m passport
 What devices can work in “weak” networks?
 Basic techniques for working with the machine
 Correct placement of rooms in the house
 Livestock farming: how to build a chicken coop for ten chickens with your own hands
 How to treat the premises and soil of a greenhouse after winter from pests and diseases