How to make the right birdhouse with your own hands. Do-it-yourself birdhouse made of wood: drawings, materials, decor and installation What to make a birdhouse from
You can take care of birds by throwing them bread crumbs or seeds. Pigeons and sparrows flock with pleasure to such a treat. What else can we do for the birds? In the city and at your dacha? Of course, build them a house to live in - a birdhouse. Why do people build birdhouses? In fact, titmice also build. They are similar to birdhouses, only smaller in size and have a slightly different architecture. But why do we still call birdhouses birdhouses and not use other names? The fact is that not all birds will agree to live in a “house” built by strange creatures on two legs. Clearly, this does not apply to freeloading sparrows. And the starlings are settling in.
Starlings live as a friendly family without noisy sparrow squabbles. They are able to perfectly imitate the singing of other birds, including the famous nightingale trills. And no one better than starlings cleans our squares, parks, forests and garden plots from insects. Do you know how many cockchafers one starling can eat during the nesting period? 8 thousand beetles with larvae! And caterpillars, slugs, snails are simply absorbed by it without counting. Therefore, when building and hanging birdhouses, a person cares not only about birds. A man cares about his future harvest. And you should be happy if a couple of starlings choose your house. This is great luck!
But it’s not enough to build a birdhouse. It must be built correctly and hung correctly.
A few simple rules you need to know
Here are a few rules to follow before you start building a starling house:
- The birdhouse must be checked, otherwise the birds will not be able to live there in the summer. For ventilation, a couple of small gaps between the roof and the walls of the house will be enough. For the same reason, making a birdhouse out of metal is a bad idea.
- It is necessary to organize “drainage” in it. Any water that enters the house must leave immediately. To do this, drill very thin holes in the floor, and to protect the entrance hole, install a small canopy over it.
- The best time to hang a new birdhouse is in early April. And in the old one, through the removable roof, carry out “general cleaning” at the same time. Birds will not return to a birdhouse if it has not been cleaned for almost a year.
- In rural areas, the optimal height for a birdhouse is about 4 meters. In the city it should be weighed higher. Make sure there are no branches nearby. This way, cats and other starling lovers will have less chance.
- The birdhouse should be covered with foliage from direct sunlight.
- Your creation must be nailed strictly vertically, no Prague “dancing houses”. The entrance should look in the direction from which the wind least often blows.
- Very important! It should be remembered that nailing the birdhouse is not enough. It must be cleaned every spring before new guests arrive.
Classic wooden birdhouse
The best material for making such a house is wood. However, not every tree will do. Boards made of birch, oak and alder work well. Coniferous trees are not suitable because of the resin they produce. Chipboard and fiberboard should not be used for the construction of birdhouses - the chemical components used in their manufacture are harmful to birds. Plywood is not the best option either.
There is a birdhouse standard. The board should be used with a thickness of at least 20 mm, so the house will better retain heat. Do not use a sanded board - this will make it difficult for the chicks to leave the birdhouse. If the board is sanded, you need to scratch the inner side with a knife or nail. Typically, birdhouses are made from 120 to 150 mm wide, 300-350 mm high, and side wall length 150-160 mm. It is important to observe two more dimensions: the diameter of the taphole (inlet) should be 40-50 mm, the distance from the taphole to the bottom of the house should be at least 150 mm.
A larger birdhouse will accommodate more pets, but natural selection will work against your plan in this regard. The parents will not be able to feed all the hatched chicks, and even those that survive will not survive the flight to wintering in warmer climes - they will grow up weak. Trust this question to Nature and try to adhere to standard sizes when building a birdhouse. In this case, out of all the offspring, only a couple of chicks will survive, but they will be strong and strong.
The indicated dimensions are well suited for starlings' homes. The sparrows will happily settle in. And for great tits, the diameter of the entrance will have to be reduced to 35-40 mm; for small tits, an entrance hole with a diameter of 30 mm will be enough.
Of course, you can make changes to the design of the birdhouse and show your imagination, but then you should adjust the given dimensions. Compliance with the basic dimensions is very desirable; the very life of the bird family may depend on them.
Below are several drawings of the simplest birdhouses:


Prepare in advance a ruler with a pencil, a wood saw, a screwdriver, a hammer, self-tapping screws and a drill. We cut the boards to fit the dimensions in the selected drawing and begin assembling the birdhouse (in this photo the birdhouse has a rectangular entrance).

To fasten the elements of our design, we pre-drill holes for self-tapping screws with a thin drill.


We fasten the walls together with self-tapping screws. You can also use nails in your work, but you must watch carefully so that any of them do not accidentally come out. We remember what kind of miniature guests should live in our house.


The perch below the tap hole can be made from a planed stick and then tightly inserted into the prepared hole. The perch may have the shape of a triangular shelf. A perch is especially needed when the house is attached to a pole. After all, the head of the family needs to sit somewhere with food for the younger generation in his beak. You also need it to sing songs at the entrance to your house. The perch is made with a diameter of 10 mm and a length of 40 mm.

We make the entrance round or rectangular. We remember that its diameter should be 50 mm. We drill out the tap hole using a drill or cut it out with a jigsaw.

Unlike the internal walls, we thoroughly sand the edges of the taphole. There are known cases when starlings expressed dissatisfaction with the poor quality work of the owners of the site and demanded that the deficiencies be eliminated. First of all, this concerned the size of the tap hole and its raw edges. I'm not kidding.


The entrance should be located so that the cats cannot reach the chicks from the roof of the birdhouse (see dimensions).


Important! The fixed roof is inconvenient for annual cleaning of the birdhouse. And this must be done every spring before the birds arrive, otherwise you will end up with a “disposable” birdhouse. Converting the roof into a removable one is quite simple. A bushing corresponding in size to the bottom of the house is attached to it from below. The sleeve should fit snugly against the walls and fit into the hole they form with some effort, then the lid will hold well. For reliability, you can screw the lid to the house with wire. In this case, the wind will not blow it away, and the cat will not be able to remove it. And cats and crows will show increased attention to your birdhouse. It is easier to make a pitched roof. It definitely won’t leak (unlike a gable one). Make the roof slope slightly back.

The last stage of our work is attaching the finished house to the tree. It is convenient to attach a long plank to the back wall of the birdhouse in advance with self-tapping screws and then nail or screw this plank to the tree with self-tapping screws. For reliability, we also fasten the house with wire. The height is about 4 meters, in the shade, without direct sunlight, there should be no branches nearby.
The finished birdhouse can be pre-decorated on the outside. Contrary to popular belief, a painted house will not scare away birds, but it will decorate your area. However, be prepared that starlings will not immediately move into their new home; some time will certainly pass. And this may take more than one month.


Birdhouses made of unusual materials
A birdhouse can be made not only from boards, but also from completely unexpected materials.
Birdhouse made of cardboard
In our minds, cardboard is poorly associated with a building material for constructing a home. However, as experience shows, cardboard can quite cope with the task of urgent construction of a birdhouse with a service life of at least one season. Just use not the ordinary cardboard we are used to (it will quickly get wet under the influence of precipitation), but thick corrugated cardboard.

In addition to corrugated cardboard, we will need self-adhesive paper, rope, pencil and starch. And, of course, a tool: scissors, a ruler, a square, a knife and a compass.
We will need to cut out all the elements for assembling the house (roof, walls, bottom) from corrugated cardboard, only in double quantities. Starch is needed to make paste. The paste has a natural smell and, unlike synthetic glue, it will not scare away birds and instill in them the idea that they have chosen an environmentally unfavorable home to live in.

Each pair of parts is glued together with paste, due to this they acquire increased strength. The only problem will be the lack of ventilation in the house. We cut a hole for the tap hole in the front wall. We can make a perch in such a design, but it will not hold very firmly. We need four holes in the back wall through which we will pass the rope. Rope or twine can be replaced with wire. We need them to tie our house to the tree.
We glue the walls end to end, maintaining a right angle.

We should end up with a box like this:

While the paste is still wet, wrap the box with thread. This way it won't lose its shape. After the paste has dried, we will no longer need the threads.
We glue the roof of the house in two parts. The design will be somewhat reminiscent of the roof of a wooden house with a sleeve that we nailed to make the roof removable. When making a house from corrugated cardboard, the smaller part of the roof should be inside the structure, and the larger part, with allowances on all sides, forms a kind of overhang that will protect the house.
We cover the house with laminated paper. It will add density to the entire structure and at the same time serve as a decorative element.

Well, it turned out to be a good house?

House out of a box
An unexpected (albeit temporary) solution would be an empty juice or milk container. Using ready-made containers will allow us to solve the problem that has unexpectedly fallen on our heads even faster. Or rather, an incoming problem.
Quickly empty the container of its contents, wash and dry. While the container is drying after washing, prepare the wire, scissors and awl. A regular taphole is cut into the front wall. We poke holes in the top of the box for the wire - our makeshift house will hang on it. The bottom must be reinforced with cardboard or corrugated cardboard, which is attached to the bottom of the container.
All that remains is to decorate our house with laminated paper or craft paper with a protective layer. We hang the house in a suitable place, wait for the singing guests and tell the neighbors that this is the most fashionable house design that you personally found in the Belgian society of birdhouse building enthusiasts.
Home with panoramic bottle windows
We are used to empty plastic bottles being used as bird feeders. A hole is cut in the bottom of the bottle, into which food is poured, and the bottle is hung. Using the same principle, you can make a bird house out of a plastic bottle. In this case, the taphole hole is cut where it should be - in the upper part of such an unusual building material. We make a couple of holes in the lid for the wire, with the help of which the house will be suspended from the tree. To prevent the life of a starling family from looking like the “Behind the Glass” show, the bottle can be covered with beautiful paper or a decorative design can be applied. Although the starlings themselves, judging by observations, treat the “transparent” walls of their home quite calmly.

As you can see, building housing for starlings is a simple matter. At the same time it is very exciting. And also useful for raising your own offspring. Join us! Just not like in the stupid advertisement about sausage. After all, it’s really a good thing to make birdhouses with your own hands.


Building birdhouses with children in the spring is a long-standing and very useful tradition. Firstly, birds need homes, and secondly, this is an excellent opportunity to engage a child in manual labor, in the age of gadgets and electronics, to introduce him to the basics of carpentry. Pavel Zakharov from the family carpentry workshop “Workshop No. 13” tells in detail how to make a birdhouse with your own hands, gives a drawing of a birdhouse and step-by-step photos.
We will need:
- pine boards 18-20 mm thick and 120, 160 and 200 mm wide
- round stick with a diameter of 15 mm
- jigsaw with a wide blade for long straight cuts and a narrow blade for curved sawing
- electric drill (or drill-driver) with a 4 mm drill (we will also need an 8-10 mm drill, but you can do without it)
- Phillips screwdriver PH2 format or corresponding bit attachment for a screwdriver
- medium grit sandpaper (80-100 grit)
- ruler
- pencil
- self-tapping screws (PH2) 3.5×41 mm - 19 pieces
- nails 1.6×30 - 8 pieces (for attaching the fence)
- hammer
- acrylic paints
- clear nail polish
- synthetic brushes

How to make a birdhouse: step by step photos
For work, we will need pine boards with a thickness of 18-20 mm (for ease of calculations, a thickness of 20 mm will appear in the master class) and a width of 120, 160 and 200 mm. Natural wood is an excellent material for a birdhouse; a wooden house will have optimal thermal insulation properties. I don't recommend using plywood or chipboard.

In addition to the boards, you need a round stick with a diameter of 15 mm for the pole. From a scientific point of view, a pole is a useless thing, but without it the birdhouse looks somehow unusual.

We begin the work by marking the parts. On a board 160 mm wide we mark the contours of the front (A1) and back (A2) walls of the birdhouse. To begin, we measure two rectangular segments 300 mm long. And then, in accordance with the diagram, we draw two lines crosswise so that the angle between them is exactly 90 degrees.

We will make two side walls (B) and the bottom of the birdhouse (C) from a 120 mm wide board.

A 200 mm wide board is intended for roof parts. Our roof consists of two halves - K1 and K2, and part K2 is 20 mm longer (exactly by the thickness of the board), so that when assembled we get a roof with equal slopes.

We cut out all the marked parts using a jigsaw. For curved cuts, a narrow file is more suitable, while straight sawing is best done with a wide one.

If possible, we make decorative elements of the birdhouse design from scraps of boards. We save materials!

We carefully process the edges of all parts with sandpaper.

The next step is marking the mounting holes. Make sure that the centers of the holes are always located at a distance of exactly 10 mm from the edge of the workpiece (half the thickness of the board), so that when assembling the screws hit exactly in the middle of the end of the adjacent part.
The holes in parts A1 and A2 are located identically. Additionally, on the front wall we mark the outline of the future entrance (a round window that will serve as the entrance to the birdhouse). The diameter of the tap hole should be 45-50 mm. Just below you need to make a hole for the pole stick. The entrance should be located at a height of about 200 mm from the bottom of the birdhouse so that the birds have a sufficient safety zone inside (otherwise they will be too accessible to enemies).

In the side walls we mark one hole for attaching the bottom.

We mark the roof parts very carefully, since the holes in the roof must clearly correspond to the dimensions of the birdhouse body. We drill all marked holes using a drill and a drill bit with a diameter of 4 mm.

All that remains is to make a small window in the front wall of A1. To do this, we first drill a hole inside the outline of the tap hole with a thick drill (8-10 mm) so that a jigsaw file can be inserted into it. Then we cut along the contour, after which we process the edges with sandpaper.

Now let's start assembling. We attach a pole stick to the front wall of the birdhouse. To prevent the thin stick from cracking during assembly, you can first drill a hole in it for the self-tapping screw using a thin 2-3 mm drill.

According to the rules for building birdhouses, the inner side of the front wall must be rough. If you use rough, unplaned boards, then this will be the case. And in our case, roughness is applied manually using any sharp tool (knife, self-tapping screw, etc.). These transverse grooves will help the chicks get out of the birdhouse when the time comes.

We assemble the body of the birdhouse by connecting parts A1, A2 and B in any order. For this we will need self-tapping screws and a screwdriver. We orient the side walls so that the hole is at the bottom.

We put the bottom in place and secure it with screws on four sides.

Then we assemble the roof from the two halves, placing the longer part on top of the shorter one and fixing it with two self-tapping screws.

We attach the pipe by inserting a self-tapping screw into the hole from the inside of the roof.

We screw two hinges into the ends of the back wall (if there are no hinges, replace them with ordinary self-tapping screws). Using these rings, the birdhouse will be attached to a tree trunk or the wall of the house.

We put the roof in place so that it slightly overhangs the facade of the birdhouse and is flush with the back wall. We secure the roof to the house with four self-tapping screws.

We nail the decorative fence with nails. For reliability, you can additionally use wood glue.

The birdhouse is almost ready. If you want the birdhouse to not only serve the birds, but also become a stylish decoration for your area (park, square), you can paint it.
Birds respond well to painted birdhouses and happily settle in them. It is only important to remember that you should use acrylic or water-dispersed paints that are odorless. It is with these paints and varnish that we complete all our kits for assembling birdhouses, and from the experience of several years of work we can say that they have proven themselves to be excellent in harsh outdoor conditions.
Birdhouses painted on the outside last much longer than simple wooden ones, and this is an additional plus in their favor.
So, for work we will need acrylic paints, a jar of clear varnish and several brushes of different sizes.

Painting will take place in two stages, and it is better to work with a partially disassembled birdhouse. Thus, it is easier to paint the body itself separately from the roof, and it is also more convenient to paint all decorative elements separately.

After the background color has been applied, draw an outline of the drawing with a pencil and color it. When the paint dries well, cover all surfaces with two layers of clear varnish. We assemble all the parts of the birdhouse into a single whole.
The birdhouse is ready - you can hang it on a tree and wait for the birds.
How to hang a birdhouse correctly
The best time to start hanging birdhouses is late March - early April. But you can do this in advance, then you definitely won’t miss the arrival of the first birds.
We hang birdhouses at a height of 3-4 meters. If it’s noisy around (as happens in cities), then it’s possible to go higher. We orient the entrance hole (hole) to the side opposite to the prevailing winds. If western and northwestern winds prevail in Moscow and its environs, then we try to hang birdhouses with the entrance facing east or southeast, so that the birdhouse does not fry in direct rays in the midday sun. This is not very comfortable for birds.
It is necessary to limit the access of predators to the birdhouse. If it hangs on a tree and there are branches nearby, it is a gift for the cat and other villains. Don't forget about safety!
We orient the birdhouse vertically or with a slight tilt forward (but not back). This way the entrance will be better protected from precipitation, and it will be more convenient for the chicks to climb along the inner wall to the exit.
Once a year, the birdhouse needs preventative cleaning. It will need to be removed, the roof removed and the inside cleaned.
A love for birds or a simple desire to get rid of pests on their property makes many summer residents think about making a birdhouse. Not everyone knows that not only starlings, but also many other birds can live in a birdhouse. For example, small owls can live in a birdhouse and will hunt for small rodents, and if you manage to place singing birds in your dacha, then you will be able to enjoy their beautiful trills throughout the warm season. In addition to practical and aesthetic benefits, making a birdhouse together with your children will help develop their love of nature and work.
How to make a birdhouse with your own hands, and what types of birdhouses there are, you can find out by reading our article.
Materials and tools for manufacturing
Professional ornithologists advise using hardwood boards to build a birdhouse:
- Alders.
- Aspens.
- Birches.
Softwood boards are not recommended because they release resin that can harm birds. There is also no need to make a birdhouse from plywood, because it has poor thermal insulation properties and the birds will be cold in such a house. In addition, plywood does not transmit sounds well, and this negatively affects the reaction of birds when predators appear. You should absolutely not build a birdhouse from chipboard or fiberboard; first of all, such a birdhouse will fall apart after the first heavy rain, and secondly, particle boards are made using toxic substances that can harm the health of birds.
 Larch boards
 In addition to hardwood boards, you will also need:
- Hand saw or electric jigsaw.
- Hammer.
- Drill.
- Chisel.
- Measuring tape and ruler.
- Pencil.
- Nails.
- Wood glue.
- Water-based paint (if you want to paint the birdhouse).
Take into account one more important point: no matter how much you want to build the most beautiful birdhouse, do not under any circumstances treat the surface of the boards with a plane! The boards should not be planed; this is necessary for the chicks to be able to climb up the walls of the birdhouse.
Making a birdhouse
Referring to the drawing below, perform the following procedure:


- Make markings by transferring the dimensions of the parts from the drawing to the boards.
- Using a jigsaw or hacksaw, cut out the parts according to the markings.
- Using a drill or chisel, make a hole with a diameter of 40 millimeters in the front wall of the birdhouse.
- Place the side walls in a vertical position and glue the front wall with the manufactured tap hole to them. It is very important to avoid gaps when gluing.
- After the glue has dried, strengthen the connections of the side and front walls with nails.
- Coat the lower ends of the connected walls with glue and glue the bottom of the birdhouse to them. After the glue has dried, also nail the bottom to the walls.
- Attach the back wall in the same way.
- Make the roof of the birdhouse by connecting the holding spike and the lid.
- Place the roof on the birdhouse. There is no need to nail or glue the roof, since it must be removable so that the birdhouse can be cleaned.
- Additionally, for the convenience of the birds, you can install a bar or pole in front of the hole.
A simple birdhouse made of boards is ready! All that remains is to hang it correctly on a tree or pole.
 Simple birdhouse
 How to make a simple birdhouse, see also in the video:
Birdhouse placement
In order not to harm the trees, you should not nail the birdhouse to a trunk or branch. Many people hang birdhouses on metal wire, but this method also harms the trees, because over time the wire damages the bark and the wood begins to rot. It is best to hang the birdhouse from a thick rope made of organic material or from a wooden crossbar sandwiched between branches.
 Methods for installing a birdhouse
 When placing a birdhouse, take into account the height; if you hang it very low (less than two meters), then wild and domestic predators can easily reach the clutch or chicks.
When hanging a house for birds, take care of their comfort, give the birdhouse a slightly tilted forward position, this will allow the birds to easily move from the bottom to the entrance.
When choosing a place for a birdhouse, do not place it near thick branches, which in windy weather can damage the structure of the house.
 Install a birdhouse with a partner
 Since the work of attaching the birdhouse takes place at a fairly high altitude, be sure to work with a partner who will insure and help you on the ground. It is also advisable that you have a mounting belt tied to the tree.
Birdhouses made from scrap materials
You can make an original birdhouse not only from wood. There are many objects from which wild human imagination can create a house for birds, let's look at some of them:
Birdhouse made from a plastic bottle
You can make both a large and a small birdhouse from a plastic bottle, everything depends on the volume. A plastic birdhouse is not suitable as a permanent home for birds, but as a winter feeder it is quite suitable. 
To make a birdhouse:
- Take a five liter plastic bottle.
- Cut a hole with a diameter of 3-4 centimeters at the bottom of the bottle.
- Cover the edges of the hole with tape or adhesive tape to prevent birds from getting hurt by the sharp edges.
- The fastening of the birdhouse-bottle can be made in the form of a loop protruding from the neck and clamped with a lid.
- Additionally, you can insulate the birdhouse by wrapping it with felt and tape.
- Finally, you can place dry straw at the bottom of the birdhouse or simply sprinkle bird food.
If you are a creative person, you can also paint the bottle or decorate it with decorative elements.

There are many options for feeders and birdhouses made from plastic bottles, but the manufacturing principle is the same for all, this is cutting out a notch, a fastening device and your imagination for the design.
Instructions for making a birdhouse from a plastic bottle are also in the video:
Birdhouse made of cardboard
Despite the absolute lack of resistance of cardboard to water, it is quite possible to make a birdhouse out of it that will last at least a year. Below are a drawing and instructions for making a birdhouse out of cardboard. 
To make a cardboard birdhouse:
- Take a sheet of cardboard or disassemble one or more cardboard boxes. The denser and thicker the cardboard, the longer the birdhouse will last.
- Draw on the sheet the pattern you see in the picture.
- Cut out the drawn parts.
- Bend the pieces along the fold lines.
- Take wide tape and cover the inside and outside of the parts with it. Also, instead of tape, you can use any waterproof material and glue. On the inside of the front wall, under the hole, stick a piece of coarse fabric so that the birds can easily climb from the nest to the entrance.
- Glue the gluing areas with universal glue.
- Reinforce the glued corners by placing strips of tape on them.
- Use scissors to cut a hole for the tap hole.
- Cover the inside of the tap hole with tape.
- Make a hole and insert the pole.
- Paint the birdhouse with paints or decorate it with decorations.
It is worth noting that it is better to glue the roof in such a birdhouse using tape and, as needed for cleaning, cut the tape with a knife and remove the roof.
 Birdhouse made of cardboard
 The birdhouse is made of cardboard and is very light in weight, so if it is not fastened well it can be blown away by the wind.
You can also learn how to make a birdhouse out of cardboard from the video:
Shoebox birdhouse
A birdhouse made from a shoebox is made according to the same principle as a birdhouse made from cardboard. The main task is to make the parts of the birdhouse absolutely waterproof. This can be achieved either by gluing a waterproof film, or by coating the parts with water-repellent paint. 
Birdhouse made of thick logs
This type of birdhouse is closest to the natural habitat of birds living in tree hollows. To make it you will need:
- A piece of log with a diameter of 20-3 centimeters and a length of 40-50 centimeters.
- Chainsaw or two-handed saw.
- Powerful drill with wide drill bit.
- Large wide chisel.
- Hammer.
- Clamps (for clamping logs during cutting and drilling).
- Nails.
 Leave the walls 3-4 centimeters.
 The technology for making a birdhouse from a log is quite labor-intensive, so it is advisable to carry out this work with a partner.
- Clamp the log with clamps.
- Cut two dies of 4-5 centimeters thick from the log; they will serve as the roof and bottom of the birdhouse.
- Take a drill and start drilling out the inside of the log. When drilling, leave walls 3-4 centimeters thick along the edges of the log.
- If the drill length is not enough for through holes, drill from both sides.
- Using a chisel and hammer, shape the inside walls of the birdhouse into their final, round shape.
- Drill a hole for the tap hole and install a pole or strip underneath it.
- Nail the bottom of the birdhouse.
- The roof of the birdhouse can simply be attached to a few nails so that it can be easily removed if necessary.
 Birdhouse made of logs
 Never make a birdhouse from wet wood, otherwise, after drying, it may crack and fall apart. It is also advisable to treat the bottom, roof and areas of the birdhouse unprotected by bark with water-repellent paint.
You can see another option for making a birdhouse from a log in the video:
Birdhouse made from wine corks
The name of the birdhouse is not entirely correct, since wine corks serve only as decoration. The name would be more correct: a birdhouse decorated with wine corks. In addition to its decorative properties, a wine cork has good thermal insulation characteristics, therefore, birds will be warm in a birdhouse decorated in such an unusual way.
 Birdhouse decorated with wine corks
 If you decide to decorate your birdhouse with wine corks, then prepare the following tools and materials:
- Glue.
- Glue gun.
- Lots of wine corks.
There are three ways to decorate with wine corks:
- The first method involves cutting the cork into several round dies. After which, the dies are glued to the roof and walls of the birdhouse.
- The second method is to cut the cork longitudinally into two semicircular parts and then decorate the walls of the birdhouse with them.
- The third method eliminates cutting. The cork is glued in its entirety.
 Multi-apartment birdhouse decorated with corks
 There is no point in choosing just one way to decorate; the birdhouse will look more beautiful if you decorate it in all three ways. For example: the roof - with dies, the side walls - longitudinally cut, and the front wall - with whole plugs.
Options, design and decorative elements of birdhouses
There are many options for birdhouses of unusual shape and design, we offer you photographs of some of them:

- Birdhouse - “barrel”. It is made from half-bent slats and round blanks glued together. Plastic elements imitating vines and hemp rope were used as decoration. Such a birdhouse is difficult to make and is not recommended for making by people who do not have experience in carpentry.

- The “three-room” birdhouse is made of three sections of different shapes, connected to each other. The peculiarity of the birdhouse is that it uses the front wall as a removable element, and not the roof as in conventional models.

- Birdhouse - “shoe”. A budget option for a birdhouse made from an old shoe. Boards and galvanized iron were used as protection against precipitation.
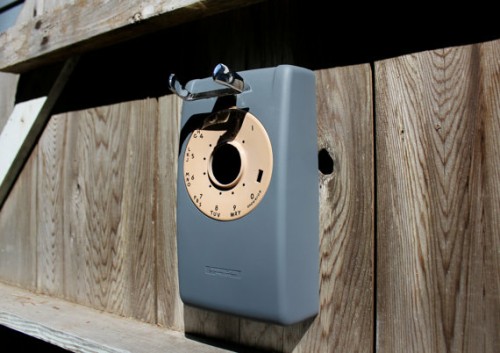
- Birdhouse from the body of an old rotary telephone. The birdhouse is not environmentally safe, since substances harmful to birds can be released from the plastic body when heated in salt licks.

- Birdhouse from an old canister. A successful design solution, but the use of metal products for nesting birds is not recommended by ornithologists, because in the summer it is hot in such birdhouses, and in the cold season the birds can freeze.

- Birdhouses decorated with stones. A beautiful option for birdhouses, but a significant drawback can be the weight of the product, especially when installed at a height.

- The birdhouse - “hut”, is made of laminated veneer lumber, folded together from a rustic log house. A beautiful birdhouse, but very difficult to make.
Thanks to human imagination, houses for birds will always be replenished with new options; it may turn out that you will become one of the authors of the new birdhouse design!
Feeders and birdhouses are successfully used to attract birds to the site; with their help, you don’t have to worry about the safety of the future harvest. Almost all types of birds live in such houses. In cold weather they eat wintering caterpillars, and in summer they eat pest larvae.

You can make a birdhouse with your own hands without spending money out of your pocket. After all, it is not necessary to buy new building materials; it is enough to use your imagination using improvised means.
Everyday materials
One of the simplest options is a birdhouse out of a box. To make it, a juice box is used, it is thoroughly washed and dried. The advantages of this solution are considered to be: cost-effectiveness, original appearance and ease of execution. Materials you will need:
- clean box;
- thin wooden planks;
- acrylic paint;
- rope;
- glue.
It is worth preparing the following tools:
- scissors;
- brush.
Work begins with making a tap hole; it should have a diameter of 5-6 cm, and be located at an average height from the bottom of the box. A regular or stationery knife will help you cut the hole. Next, the birdhouse is coated with paint and left to dry.
You can use an ice cream stick to make a perch for the birds to sit on. It is glued to the base under the taphole.
The interior space in the birdhouse should also be comfortable for birds, so the front wall on the inside should be made rough. Therefore, a board made of untreated wood is fixed there; a piece of tree bark is also suitable. The outer walls are also covered with ice cream sticks - this will add aesthetics and allow the birds to cling to them with their paws.
To hang a birdhouse on a tree, make a hole at the top and pass a rope through it. To attract birds, just sprinkle a little food, then a family of birds will definitely settle in the house.
You can use a large plastic container as the base of the birdhouse. When making a birdhouse from a bottle, the process will remain virtually unchanged, you just have to make drainage holes at the bottom.
Cardboard is a practical option
To accommodate the largest number of birds, it is worth making a birdhouse from cardboard - this is the most affordable material. The resulting house can serve as a decorative element of the garden or be used for its intended purpose. The execution process is very simple and does not take much time. During the work you will need:
- two A4 cardboard sheets;
- colored paper or paints;
- compass;
- scissors;
- rope;
- small stick.
As a blank, look at the drawing or make it according to simple recommendations.
The basis of the future design is a sheet glued into a roll; you can take the remainder of paper towels. Using a compass, draw a circle with a diameter of 4-5 cm on it and cut out a hole. Next, the bottom is covered with a circle of the appropriate size - the base of the birdhouse is ready. To attract attention, it can be decorated, covered with colored paper or painted.
Making the roof begins by cutting out a semicircle, then gluing the straight edge. A thin rope is glued to the top of the dome and connected to the base. All that remains is to glue the stick near the entrance and pour in the food. Such a feeder can receive guests for a long time or simply decorate the garden.
Wood - standard production
There is a traditional option for making a birdhouse from wood. In the process they use:
- boards (20 mm thick);
- nails;
- hacksaw;
- hammer;
- drill;
- pencil and ruler.
The wood materials chosen are unplaned boards with a thickness of at least 20 mm. This ensures heat retention inside the house. As for the species, birch or oak would be better; the smell of pine needles greatly repels birds. The use of pressed or laminated wood is undesirable - it is not a practical option and has a toxic odor.
After choosing the material, the dimensions of the structure are determined. Based on the parameters of the natural hollow (120x120 mm), it is worth making the bottom of the birdhouse 120x120 mm, the height should be 250-350 mm. These sizes allow you to accommodate a family with 5 chicks. With a larger number of offspring, adults cannot provide them with proper care. The size of the entrance is also taken into account; a hole of 40-50 mm is made for the starling, and 30 mm for the tit. The tap hole is placed at a height of 200 mm from the bottom level.
A perch is fixed in front of the entrance to the house, sometimes a small platform made of boards is installed instead. The roof can be gable or single-pitch, but it is worth considering one point - the board must protrude beyond the level of the facade by at least 50 mm. For the convenience of annual cleaning, the roof is made removable, then it is fixed with screws or wire. All dimensions of the elements can be seen in the drawings.
Before you make a birdhouse with your own hands, you should carefully consider the diagram, then cut the boards according to the parameters in the image. Process progress:
To make a good birdhouse from wood, you should follow the recommendations:
- To seal and retain heat inside the structure, all cracks should be coated with clay or sealed with tow;
- the surface of the wood should not have large burrs that could injure birds;
- you need to use short nails or screws so that they do not stick out;
- It is better to treat it with drying oil as a protective coating. But for decoration you can use gray or red oil paints.
Making your own bird house is not at all difficult; if you use your imagination, the result will become a real decoration of the garden. In the process of making a birdhouse from scrap materials, the most unpredictable base options can be used: pumpkin, stone, coffee pot, shoe.
House installation
In addition to manufacturing, the installation process of the birdhouse is important, so it is worth knowing the recommendations for its placement:
You can make a birdhouse at any time of the year, but it should hang on a tree in late March - early April. Then a family of birds will definitely settle in it.
When the house for the owners of the site is built, it’s time to think about the other inhabitants of the surrounding area. Our helpers, birds, also need housing. What it will be depends on the type of birds that need to be attracted to the garden.
"Building standards" for a birdhouse
When choosing housing, birds are guided not by the beauty and elegance of the structure, but by its safety and functionality. Birds are guaranteed to settle in the garden if a number of conditions are met:
- the birdhouse is made of hardwood;
- the thickness of the walls of the house is at least 2 cm;
- During assembly, no glue or materials based on it were used: plywood, fiberboard, OSB.
Fresh wood from coniferous trees is unsuitable because it releases resin that glues the feathers together. In addition, birds do not accept strong odors, so nails or screws are used instead of glue to hold parts together.
You can make a birdhouse from an old pine board without resin pockets
The parameters of the house determine which species of birds will choose it. Most birds recognize their future home by the size of the entrance hole. Taphole diameter:
- for starlings - 4.5–5 cm;
- for redstarts - 3.5 cm;
- for tits - 2.8–3.5 cm.
If you cut the entrance too wide, the nest will be easily accessible to predators. There is also a high chance that squirrels or large birds will settle there.
Squirrels are funny neighbors if the owners of the property don’t mind treating them to their berries and nuts
Try not to exceed the standard birdhouse dimensions:
- height - 30–35 cm;
- bottom inside - 12–17 cm.
Otherwise, the birds will hatch too many chicks, some of which will die due to underfeeding. Let the parents better raise 2-3 healthy cubs.
Birdhouses are home to not only starlings, but also sparrows, flycatchers, swifts, all types of tits and redstarts.
Every bird has a favorite house design
It is not necessary to make a perch on the birdhouse. Magpies can sit on it and destroy the nest. The thresholds on the house also do not attract birds. Due to the structure of their paws, it is uncomfortable for them to stand on a plane.
Birds do not need thresholds on birdhouses
Gallery: drawings and diagrams of birdhouses
Restless sparrows are the most common inhabitants of gardens A birdhouse with a flat roof can be made in a few hours A birdhouse with a raised roof is not the safest option for birds A house with a bottom of 12x12 cm is suitable for tits  A birdhouse with a hole diameter of 3 to 4 cm is suitable for the smallest birds. After cutting out the birdhouse parts, sand the cut areas. The simplest birdhouse for redstarts is with a square hole. Wagtails and flycatchers often nest in houses with a hole the full width of the wall.
Birdhouse decoration
The less attention the home attracts, the better for the birds. It is advisable not to paint it or add bright details. A house made of untreated wood is the best option. As a last resort, use odorless paint to match the color of tree bark - gray, brown or dark burgundy.
Birdhouses made of thin plywood that are too brightly colored are used only for decorative purposes - to decorate the garden, birds are unlikely to settle in them
Another thing is decor with natural materials. Pieces of bark, twigs, and moss will decorate and camouflage the nesting area.
Bark and branches hide the home from the watchful eye of predators
Gallery: birdhouse decor
A birdhouse decorated with pebbles may scare away birds due to glare  Small tree cuts decorate the house and do not irritate the birds
  A birdhouse in the shape of Baba Yaga's house will decorate any tree. Wine corks will additionally insulate the walls of the house. The gift birdhouse is covered with carvings. Birds are unlikely to live in a birdhouse made of branches due to the numerous cracks. By gluing the planks onto a birdhouse painted white, we get a half-timbered house
  By gluing the birdhouse with saw cuts, the cracks are sealed with moss. You can stylize the birdhouse as a country house. When making a birdhouse with children, draw cartoon characters on the walls. Birdhouses are often stylized as a fairy-tale house. An interesting solution is to use a water tap instead of a perch. Sometimes bird houses are made in the form of animal heads
  The decor in the form of a tree trunk on the facade really decorates the birdhouse. Garden designers have figured out how to combine a flowerpot and a birdhouse. If you don’t know how to draw, draw a birdhouse with lines using a ruler and paint it
Birdhouse made of wooden planks with a flat roof
Spring is coming soon again and my husband and I decided to make the right birdhouse for our winged friends. Our last house was chosen by squirrels and turned into a nut warehouse; it turned out to be too big for the birds.
Now the choice fell on the simplest design of a birdhouse with a pitched roof.
Tools:
- hammer;
- screwdriver;
- drill and drill bits;
- jigsaw or saw.
Materials:
- meter board 10 cm wide - 1 pc.;
- meter board 15 cm wide - 1 pc.;
- nails and screws.
Step-by-step instruction:
1. Mark the boards according to the drawing.
The drawing is needed so that all the details of the birdhouse fit together
2. We cut out all the parts except the bottom and the roof tenon. Using a chisel, we make notches on the inside of the facade so that the chicks can climb to the exit.
When cutting the board, press it firmly against the surface so that it vibrates less.
3. We get 2 sides of the birdhouse measuring 10x30 cm, the front and back are 15x30 cm, the roof is 15x25 cm. We deliberately increase the roof overhang to protect against predators.
There is no need to sand the surfaces of the boards
4. On the front wall, with a pencil and a ruler, we mark an entrance with a diameter of 3 to 5 cm, depending on the type of birds expected in the garden.
Measure the middle of the bottom and sides of the facade, draw lines and mark the entrance at their intersection
5. Drill a hole inside the tap hole circle.
First, a hole for the jigsaw knife is drilled in the facade
6. We insert a jigsaw knife into it and cut out the tap hole.
Move the jigsaw slowly to prevent the knife from flying off
7. We hammer nails into the outer walls at the fastening points so that the points stick out a little.
If you hammer the nails in early, they are less likely to bend.
8. We assemble the body from the 4 walls of the birdhouse in the following order: facade, side walls, back.
The nails are hammered into the walls slowly so as not to bend
9. Take a board 10 cm wide, apply it to the place where the bottom of the birdhouse will be and mark the cut line. We do the same with the roof spike.
Do not cut out the bottom in advance, first assemble the body and measure the actual dimensions
10. Saw off the listed parts. We insert the bottom into the body and fix it with nails.
11. We nail the tenon to the roof from the back side.
The roof spike protects the birdhouse from precipitation getting inside
12. Place the roof so that a canopy is formed over the entrance. We drill holes for the screws and screw the roof on.
After a year, the roof can be unscrewed to clean the birdhouse
13. The birdhouse is ready.
A birdhouse made from untreated boards will merge with the tree bark and will not attract the attention of predators
Master class on making a birdhouse - video
Duplyanka
Birds include birdhouses made of logs into the category of luxury housing. To make a nest box, the middle of a log 30–50 cm long and 30–35 cm in diameter is hollowed out with a chisel. After drilling the tap hole, boards or saw cuts are nailed to the bottom and top of the body.
Starlings and tits happily settle in nest boxes
Making a nest - video
Birdhouse made of plywood with a gable roof
If you have scraps of moisture-resistant wood-laminated board, you can make a birdhouse from it. However, due to toxic fumes from plywood, most likely, the house will only be a decoration in the garden.
Tools:
- screwdriver;
- drill;
- the drill is slightly smaller than the diameter of the screws;
- core drill with a diameter of 50 mm;
- saw or jigsaw.
Materials:
- plywood;
- self-tapping screws
Step-by-step instruction:
1. Draw a drawing.
A birdhouse with a gable roof is still better made from boards
2. Mark the plywood and cut it.
3. Drill a taphole hole on the façade using a crown. Drill a hole for the perch 4 cm below it. Make holes for self-tapping screws on all parts.
The house is assembled in the following sequence: facade, side walls, bottom, back wall, roof, perch, plank
4. Assemble the case without the back wall.
5. Place the structure with the tap hole down, install the bottom and back wall, and fasten it together.
6. Assemble the roof.
Holes for self-tapping screws are drilled in advance so as not to split the plywood when screwing them in
7. Insert a perch on the facade.
8. If desired, glue the decor and paint.
Birdhouses are painted with odorless products
How to make a birdhouse with a gable roof - video
Gallery: interesting birdhouse ideas
Any birdhouse will be transformed if you cover the roof with tiles. A birdhouse in the form of a barn with a sloping roof will decorate the lawn if you install it on a pole. Making multi-apartment housing for birds is a great temptation, but they will not be able to live together. Old license plates often cover roofs abroad. A birdhouse looks stylish with an irregularly shaped roof Eco-friendly tiles for a birdhouse can be made from wood The shape of the birdhouse does not have to be strictly rectangular Birds love round houses, as they follow the shape of the nest To make an unusual birdhouse, change the shape of the roof Modern birdhouses have strict geometric shapes It cannot be guaranteed that in two families will live in a double birdhouse Birdhouses with a gable roof leak, so it’s better to cover the ridge with tin A plot with a modern house will be decorated with a birdhouse with a sharp roof You can try to scare away cats by placing a plywood specimen on the birdhouse An unusual solution - a roof made of two cuts A rectangular entrance is also suitable for birds Sometimes decorative birdhouses are shaped like “dancing” houses  A modern birdhouse can be very convenient for birds. A wicker birdhouse is very beautiful, but cold due to the cracks
Where and how to hang a birdhouse
The bird house is placed on a tree with a slight forward tilt to make it convenient for the chicks to get out of the nest. The entrance is oriented to the south side so that cold winds do not blow inside. The hanging height is not lower than 4 m above the ground. To prevent cats from getting to the chicks, increase the roof overhang by 5 cm from that indicated in the drawings.
Birds need to be protected from their natural enemies - cats
To protect against feathered predators:
- cover the entrance with tin;
- do not mount a perch on the birdhouse;
- make an entrance under the roof itself.
A long overhang and the absence of a perch are necessary protection measures against predators
To properly secure the birdhouse to the support, strips are screwed to the back wall. For them, the house is tied to the trunk with wire or synthetic cord.
To prevent the harness from growing into the bark, place a wooden or rubber pad under it.
You should not nail a birdhouse to a living tree. This causes great harm to it, especially during sap flow.
We also recommend
 New Year's topiary “Berries on the Snow”: master class, photos and videos Making topiary for the New Year
 What crafts can you make from clothespins with your own hands?
 How to make a night light with your own hands: the best ideas for handmade
 DIY pumpkin crafts for kindergarten and school
 Review and description of tabletop drilling machines Tabletop drilling machine ns 12 m passport
 What devices can work in “weak” networks?