Universal lists - use for easily adding elements with moderation. Automation of business processes Flexible configuration of any business processes
Lists- a convenient tool for storing information with its own structure and fields. In addition, lists can be automatically processed using business processes.
Only an administrator can create lists.
Go to page Lists and press Create new.
Settings

In the tab Settings indicate the name of the list and its description.
Enter a sort value. The lower it is, the higher the list ranks among the rest. Add a picture for your listing.
If you plan to use business processes to work with lists, then activate the option Enable business process support.
Signatures

On the bookmark Signatures You can set your own names for elements and sections of the list. For example, if you are creating a list of Suppliers, then you should replace the word element with supplier, and the word section with group of suppliers, etc.
Access

Using a button Add select the desired group or specific user for whom you want to change access rights and set them.
- No access- the list will not even be visible.
- Reading- allows you to only view the list.
- View in panel- viewing list items.
- Addition- you can add elements to the list.
- Adding to panels- you can add items to the list and view them.
- Change- it is allowed to add elements and change the list, as well as launch business processes based on the list elements.
- Change with restrictions- It is prohibited to add or remove sections of elements. Otherwise, all the same actions as for the rights to Change.
- Full access- the full level of access rights to the list is set.
The “Universal Lists” module simplifies the presentation of any structured information on the website in the form of lists. Create lists on your website, such as frequently asked questions, directly from the “public” - without going into the administrative panel! The visual universal list editor will help you quickly design and configure storage for any type of information.
https://site/moduli-cms-1s-bitriks/universal_lists/"
Module "Universal lists"
Grids + Information blocks
Creating a list interface
Setting up lists
Lists + Business Processes
Examples of using lists
Module "Universal lists"
The main feature of the module is that it allows you to create all kinds of lists directly from the public part site. Without going to the “admin panel”, you will create your own directories, lists, registers, etc. and fill them with data. To do this is to create an interface and configureModule capabilities:
- construction of arbitrary object storages;
- all functionality is available from the site pages;
- everything works on the basis of the Information Blocks module and all its capabilities are available: filters and sorting, cards and lists with customizable columns and fields, group editing, access rights, etc.;
- Any object storage hierarchy is possible;
- as application options: FAQs, reference books and knowledge bases, lists of contractors, structured archives, libraries, file storages and more.
Grids + Information blocks
The module is an add-on for Infoblocks, organized as a public complex component and uses standard capabilities Gridov. This allows you to create a unified interface - with the same user settings and functionality. Such a universal interface allows you to solve many problems related to maintaining data in a public section.The module works with the specified type of Information blocks, and by default in the component settings this type is called "List". This means that all InfoBlocks that you create in this component will be added to this type that you specify. Also in the component parameters, in addition to the type of information blocks in which the lists will be stored, the addresses of all pages of the universal lists interface are specified.
Creating a list interface
To start working with lists, you need to create Info block type, with which the “Universal Lists” component will work (for example, “Lists”), create a page on the site; place this complex component on the page, select the created type of information block (“Lists”) in it and start working on filling them. In the module settings for the created type of Infoblocks, it is necessary to specify groups of users who will be able to work and manage our universal lists. Let's say you can set for the Administrator that he can change and add sections and list items. And in the same way, you can grant one of these rights to other user groups, for example, company employees.
After these simple steps, you get a full-fledged interface for working with lists, and all further work with them is done entirely in the public section.
Setting up lists
You will create and edit lists, its sections, elements and properties in the public section of the site. On the page where the “Universal Lists” complex component is located and configured, you can immediately add new lists and immediately begin filling them out. In essence, you create the same Information blocks, only now not in the “admin panel”, but directly on the site, and you immediately see them on the page. For example, when adding a new “Partners” list in the public section, you add a new Infoblock with the same name.In this list-information block you can configure signatures, labels for elements and sections of the list. For example, if we are talking about a list of partners, then “Add element” should be renamed to “Add partner”. As the owner of the list, you can immediately determine access to your list: some group - reading, some - changing elements. Thus, the order of collective work with the created lists will be immediately determined and configured.
In addition to signatures and rights in lists, you can customize fields. You will do this in the same way as you did before in the administrative section - in Infoblocks. At the same time, you will be able to add not only standard fields - such as “Name”, “Activity date”, but also Infoblock properties - such as “Number”, “Date”, “File”, “Binding to Infoblock elements”. Default values are also set and Infoblock sections are used.
This way you can customize your list very flexibly, adding only those fields that you need. And you will immediately begin to maintain this list on the website, say, a register of some documents. The “Universal Lists” module uses standard Grid capabilities - this means that it supports sorting and filtering of elements, a form for editing elements, and group modification/deletion.
Lists + Business Processes
The Universal Lists module supports built-in Business processes. In order for this opportunity - to launch Business Processes - to appear in your lists, you must enable it. This connection is made in the administrative section - in the properties of the Infoblock with which your lists work.Using business processes, you can organize serious and well-coordinated team work on a specific project using lists. As an example, use the Counter property in the register of incoming documents, which will allow you to automatically number all documents. And it will be possible to open a business process that will send, say, the final document to a performer who will somehow react to this document.
Examples of using lists
The “Universal Lists” module is included in 2 senior editions of “1C-Bitrix: Site Management” - “Business” and “Web Cluster”. Of course, you can use their functionality to maintain lists of some kind of internal order. Perhaps these will be lists of contacts with clients. Your lists will be used, for example, to create private sections for business partners. In this case, partners will be able to conduct their confidential lists. That is, you can organize additional services for different groups of users of your site.Let's say you have a need to organize accepting web forms on the website from business partners. At the same time, you, of course, do not want to give access to the administrative part to unauthorized users. The ready-made mechanism of “Universal Lists” allows you to present an existing Information Block with a large amount of accumulated data in the “public” and give partners the opportunity to search through it and filter information. That is, partners will only work with list data and add entries to them.
The Universal Lists module is a practical solution "Grids + Infoblocks". With this solution, you can configure your website to work with a wide variety of lists - with any data, with any source. The Grid technology used in the module successfully allows you to do this - create FAQs, reference books and knowledge bases, lists of contractors, structured archives, libraries, file storages and more.
Module "Universal Lists"
The main feature of the module is that it allows you to create all kinds of lists directly from the public part site. Without going to the “admin panel”, you will create your own directories, lists, registers, etc. and fill them with data. To do this is to create an interface and configure
appearance of the lists you will use convenient visual tools. And, by enabling support in the module settings Business processes, you will organize and streamline collective work with lists.

| Module capabilities:
|
Grids + Information blocks
Module"Universal lists" is an add-on for InfoBlocks, organized as a public complex component and uses standard features Gridov. This allows you to create a unified interface - with the same user settings and functionality. Such a universal interface allows you to solve many problems related to maintaining data in a public section.

The module works with the specified type of Information blocks, and by default in the component settings this type is called "List". This means that all InfoBlocks that you create in this component will be added to this type that you specify. Also in the component parameters, in addition to the type of information blocks in which the lists will be stored, the addresses of all pages of the universal lists interface are specified.
Creating a list interface
To start working with lists, you need to create Info block type, with which the “Universal Lists” component will work (for example, “Lists”), create a page on the site; place this complex component on the page, select the created type of information block (“Lists”) in it and start working on filling them.

In the module settings "Universal lists" for the created type of Infoblocks, it is necessary to specify groups of users who will be able to work and manage our universal lists. Let's say you can set for the Administrator that he can change and add sections and list items. And in the same way, you can grant one of these rights to other user groups, for example, company employees.

After these simple steps you get a full-fledged interface for working with lists, and all further work with them is performed entirely in the public section.
Setting up lists
You will create and edit lists, its sections, elements and properties in the public section of the site. On the page where the “Universal Lists” complex component is located and configured, you can immediately add new lists and immediately begin filling them out. In essence, you create the same Information blocks, only now not in the “admin panel”, but directly on the site, and you immediately see them on the page. For example, when adding a new “Partners” list in the public section, you add a new Infoblock with the same name.

In this list-information block you can configure signatures, labels for elements and sections of the list. For example, if we are talking about a list of partners, then “Add element” should be renamed to “Add partner”. As the owner of the list, you can immediately determine access to your list: some group - reading, some - changing elements. Thus, the order of collective work with the created lists will be immediately determined and configured.

In addition to signatures and rights in lists, you can customize fields. You will do this in the same way as you did before in the administrative section - in Infoblocks. At the same time, you will be able to add not only standard fields - such as “Name”, “Activity date”, but also Infoblock properties - such as “Number”, “Date”, “File”, “Binding to Infoblock elements”. Default values are also set and Infoblock sections are used.

This way you can customize your list very flexibly, adding only those fields that you need. And you will immediately begin to maintain this list on the website, say, a register of some documents. The “Universal Lists” module uses standard Grid capabilities - this means that it supports sorting and filtering of elements, a form for editing elements, and group modification/deletion.
Lists + Business Processes
The Universal Lists module supports built-in Business processes. In order for this opportunity - to launch Business Processes - to appear in your lists, you must enable it. This connection is made in the administrative section - in the properties of the Infoblock with which your lists work.

Enabling Business Processes
Using business processes, you can organize serious and well-coordinated team work on a specific project using lists. As an example, use the Counter property in the register of incoming documents, which will allow you to automatically number all documents. And it will be possible to open a business process that will send, say, the final document to a performer who will somehow react to this document.

Examples of using lists
The “Universal Lists” module is included in 2 senior editions of “1C-Bitrix: Site Management” - “Business” and “Web Cluster”. Of course, you can use their functionality to maintain lists of some kind of internal order. Perhaps these will be lists of contacts with clients. Your lists will be used, for example, to create private sections for business partners. In this case, partners will be able to conduct their confidential lists. That is, you can organize additional services for different groups of users of your site.Let's say you have a need to organize accepting web forms on the website from business partners. At the same time, you, of course, do not want to give access to the administrative part to unauthorized users. The ready-made mechanism of “Universal Lists” allows you to present an existing Information Block with a large amount of accumulated data in the “public” and give partners the opportunity to search through it and filter information. That is, partners will only work with list data and add entries to them.
The Universal Lists module is a practical solution "Grids + Infoblocks". With this solution, you can configure your website to work with a wide variety of lists - with any data, with any source. The Grid technology used in the module successfully allows you to do this - create FAQ, directories and knowledge bases, lists of contractors, structured archives, libraries, file storages and more.
In order to explore additional possibilities of business processes, we will analyze the situation when your company receives a commercial proposal (CP) from a supplier, partner or any other counterparty.
First of all, we need to understand what to do with this document. To do this, we send it for approval to a competent employee (expert), who will make a decision on the future fate of the CP: it is either deleted, or saved to disk and entered into the register for further work, or, if the CP is considered useful, a deal is immediately created and work begins.
To automate this business process, you need to be able to work with lists.
IN There are 2 types of lists:
- “Live Feed” lists (you can access them through “Processes in the Feed” or through “Live Feed”, the “More” button, then “Settings”).

- universal lists (section “Company”, item “Lists”)

*The main difference between universal lists and lists from the “Live Feed” is that the latter are focused on active work and discussion directly in the “Live Feed”. The necessary actions with the list can be performed directly from there.
We start working on the BP by creating two different lists:
- "Coordination of CP"
the “Live Tape” list, which will be used to coordinate the commercial proposal (CP).
- "KP Register"
Information is saved here in order to return to editing it later.
The difference between the first list “Approval of CP” is that an employee can quickly send a commercial proposal to the right expert for approval. Here you only need to set the necessary fields, namely:
- KP name;
- Responsible – to whom we send the business process;
- Company name;
- Date – filled in automatically upon creation;
- KP file;
- Comments;
- Telephone;
- Email;
- Status is an auxiliary field where the result of a business process is displayed.

In the second list “KP Register” there are additional fields that allow you to save information that may be useful in the future:
- The title is taken from the live tape;
- Date of creation;
- Responsible;
- Transaction ID;
- ID of the company we created;
- Transaction amount.

Work with business processes is carried out through the “activity” option. Here we create a list element: in the “Document Type” field, select any of the lists that are on the portal. As a result, we see the fields that were specified in these lists. You can start filling them with data.

All files we work with are stored on Bitrix Disk.
* Bitrix Disk is the same data storage as disks on a PC. Accordingly, working with them is similar to what happens with disks on a PC, in Explorer.
What disks exist in :
- Shared disk (section “Company”, item “Shared disk”) - available to all employees. It makes sense to store documents there that any employee may need (letter forms, contracts, etc.). The files here are visible to everyone;
- Employee’s personal drive (section “Favorites”, item “My Drive”). In addition to the files that the employee downloaded to the PC, you can also see files that are accessible from other places (for example, from the “Shared Drive” section). Files are only visible to you unless you set permissions for someone else;
- A group disk is a separate storage area in which you discuss specific issues. In other words, you can upload files to this disk, create documents, but they will only be visible to those who are members of this group.

Let's consider working with CP (2 development scenarios):
- We go to the “Processes in the Ribbon” section, find the “CP Approval” list, the “Business Processes” button, go to the business process editor and create a sequential business process, which we will call: “CP Approval”. It will start automatically when the checkpoint appears (for this reason, we leave only the first checkmark at the top).
- To find out what to do with the CP, it must be looked at by an expert. That is, in the document field we select the person responsible. We name the document “Choose what to do.” In the Description you can indicate the name of the CP, the date of creation and the necessary comments. Then we create a list of answer options for the expert:
- Reject;
- Think;
- Create a deal.

To request a file from a person, before sending the CP somewhere else, add a request for additional information in the “File” type field in the “activity” settings. Let's call it “Additional File” and select the “File” type. Click the “Save” button. In the same way, we find out the transaction amount: in the “activity” settings, select the necessary elements, fill in the fields, give the field name “Specify the transaction amount”, click the “Save” button.
- Based on the expert’s answer, we set the condition: “What to do.” Then the options are: “Reject” - this action will be performed if the “What to do” variable is equal to the expert’s answer “Reject”. Here you can set the status “Rejected” in the list element to understand that the proposal was reviewed and found to be useless. Another option is "Think", that is, the value of the variable "What to do" is equal to "Think". So that all documents are in one place, we save them in a folder ("Activity" "Disk" section). Select “Download to Disk”, then “Save”.
- We will transfer the information that is already in the live feed to the “KP Register” list, which we will supplement. Go to “Create Disk Items” in the “Document Processing” section, find “Activities”, open and select documents. Bitrix 24 immediately provides the necessary fields to fill out. We fill them out in the same way as we considered earlier (date, person responsible, etc.). Click the “Save” button.
Business processes and CRM
To work in CRM You will need the following sections (they can be found in the menu on the left):
- Ribbon,
- The main 4 entities: leads, contacts, companies, deals.
There are several “activities” for CRM that allow you to create entities and track the stages of a transaction. When we work with business processes in a live feed, lists, on disks, we can only create some kind of CRM entity. If you need to work with data that will be stored in this entity, then business processes on the CRM itself are used. They are located in the “More”, “Settings” section, then “BP Automation”, that is, the same business process editor from where we will receive all the information that is available in a lead, deal, contact, company.
Let’s create an algorithm for the business process if the CP turns out to be useful and the company will enter into an agreement:

We go to the BP editor, “Processes in the feed”, “CP approval”, “Business process” and add one more condition - “Create a deal”.
The deal will be created with some company, for this we are creating a company. Go to CRM and select “Create a new company.” We fill in all fields.
After this, you can create a new deal. Fill in the same way: name, company, responsible, comments. Don't forget to save. In the list of business processes we indicate that the status has changed to “In progress”.

Now that the BP is completed, it will appear in CRM as a new deal.

We go into the created transaction and see: the company that we created, the amount of the transaction and the person responsible - all the data that we indicated. The power supply is working correctly.

The "Universal Lists" module is quite powerful and functional. It can be successfully used to provide site users with the opportunity to add and edit their information elements in the public part. However, the principle of working with it is very different from what we are used to when working, for example, with the “Adding information block elements” component. First of all, this concerns setting access rights. In this article, I will tell you how to configure a module to perform a task similar to the one that was previously solved using the “Adding information block elements” component, i.e. so that the user can add information block elements and edit elements, but only those added by him, with the possibility of moderation by the site editor.
1. Create an information block type
Because The complex component "Universal lists" (bitrix:lists) does not work with individual information blocks, so we create the "Companies" information block type.
2. Configure the information block type to work with universal lists
To do this, go to the settings of the "Universal Lists" module (Settings > Product Settings > Module Settings > Universal Lists) and on the "Access Rights" tab, allow the "Administrators" group to manage lists in our created "Companies" information block type.
This step is required because... Without it, when placing a component, our infoblock type will not appear in the drop-down list in the component parameters.
3. Place the component
We create a section on the site and place the “Universal Lists” component in it.

In the component parameters, select our information block type and enable CNC support (in non-CNC mode, I personally could not get the component to work).

Adding an information block (list)
After placing the component, we will see a panel on the page with one “Add” button. With its help we can add an information block.
Click the "Add" button. The form for adding an information block will open.

On the "Access" tab, set the "Add" right for the "Registered Users" group, and the "Edit" right for the "Author" user category. The latter will allow the user to edit their elements. If you set the “Edit” right for the “Registered Users” group, the user will be able to edit all elements of the information block, and not just his own. Instead of the "Registered Users" group, you can also use the "All Authorized Users" category.

Note: an information block can also be added through the administrative part of Bitrix if you enable extended access rights.
After completing these steps, users of the "Registered Users" group will see the following on the main page of the section:
When selecting the “Company” information block (list), the user will have access to a list of its elements.

When you click the "Add company" button, an editing form will open:

Adding fields
The interface for adding fields is the same for the fields themselves and the properties of the infoblock. In this case, you can set your own name for any field, as in the “Adding information block elements” component.

Sending notifications and approval
Sending notifications to the site administrator and approving documents when working with universal lists is usually carried out using business processes. Because Using standard business processes in this case does not seem convenient, you will have to create your own business process. You can also use the “Document Flow” module instead of business processes, but you will have to configure the information block to work with document flow through the administrative part of Bitrix, because This feature is not available in the "Universal Lists" component).
To use business processes with a list (infoblock), the "Enable business process support" checkbox must be checked in the list settings. Then the “Business Processes” button will appear in the list toolbar for the administrator.
After clicking the button we will see a list of business process templates.

Click the "Create a sequential business process" button. The business process template editing page will open.
This is a slightly modified standard "Approval on First Vote" business process. Because It was not possible to use the standard publishing mechanism - when unpublishing, the elements are not displayed in the list (even as an admin), instead of the “Publish”/“Unpublish a document” blocks, I used “Change a document” blocks with simple activation/deactivation. Also, instead of email messages, I used social media messages.
In the template parameters, check the "Automatically run when added" checkbox.

If you check the "Automatically run when changed" checkbox, the process will be launched by the user when the element changes. Or you can create a separate business process for this, which will function according to a different scenario, for example, not deactivating the element, but simply sending a notification to the site editors.
Note: keep in mind that if a user group does not have at least “Reading” access to the list (infoblock), then this group will not appear in the user group selection dialog in the business process designer, and you will not be able, for example, to program the sending of a notification this group.
Editing a Component Template
Editing the component template in our case will mainly come down to simplification and disabling unnecessary functionality.
For example, to change the default appearance of the list (by default, all field columns are displayed, the color scheme is blue), add the following code to the lists.list component template in the result_modifier.php file:
|
$aOptions = CUserOptions::GetOption("main.interface.grid" , $arResult[ "GRID_ID" ], array()); $aOptions ) ( $aOptions = array ( "views" => array ( "default" => array ( "name" => "<Представление по умолчанию>" , "columns" => "NAME,BIZPROC" , "sort_by" => "NAME" , "sort_order" => "asc" , "page_size" => "20" , "saved_filter" => "" , ), ), "filters" => array ( ), "current_view" => "default" , "filter_rows" => "list_section_id" , "theme" => "grey" , ); CUserOptions::SetOption("main.interface.grid" , $arResult[ "GRID_ID" ], $aOptions ); |
This code will set the output only to the columns “Title”, “Business Processes”, gray color scheme, etc. If the user has already selected columns or something else, his selection will not be changed.
In the same result_modifier.php file, remove the link to the business process in the list, leaving only the name. We change the name of the “Business Processes” column to “Status”. Thus, this column will display the status of the business process, for example, we can set the statuses “Under moderation”, “Published”, “Rejected” in the business process itself.
To remove the ability to launch a business process from the context menu, insert the code in the same file:
|
foreach($arResult [ "ELEMENTS_ROWS" ] as $i => $arRow ) ( $arActions = Array(); $arRow [ "actions" ] as $a => $arAction ) if(! $arAction [ "MENU" ]) $arActions = $arAction ; $arResult [ "ELEMENTS_ROWS" ][ $i ][ "actions" ] = $arActions ; |
Now we edit the component template lists.element.edit - we completely remove the “Business Processes” and “Sections” tabs. For the first, just find the CModule::IncludeModule("bizproc") construction in the template.php file and insert " && false" next to it; for the second, find and comment out the line:
| array("id" => "tab_se" , "name" => $arResult [ "IBLOCK" ][ "SECTION_NAME" ], "icon" => "" , "fields" => $arTabSection ), |
Bottom line
In general, using the "Universal Lists" module to solve this simple task is not justified or even convenient (we had to perform too many actions, including editing the component template). The “Adding information block elements” component is much better suited for this, if not for one thing - this component is no longer supported by 1C-Bitrix, and the simplest things have to be modified almost from scratch. Therefore, in many cases the described method may have advantages.
We also recommend
 Online calculator for calculating cable cross-section by power
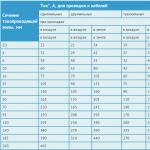 Calculation of wire cross-section by power and current density: rules, algorithm, electrical details
 Making a long-burning stove from a gas cylinder
 Connecting wires in a junction box - everything is possible if you know the rules
 Delicious potatoes “Gypsy”: description of the variety and photo of the beauty in purple
 Black potatoes: composition, beneficial properties, varieties, yield and other features