1c creation of an external component. External component technology (). Payload. Methods and properties of the component object
- Tutorial
Introduction
This article gives an idea of how external components work in the 1C: Enterprise system.The process of developing an external component for the 1C: Enterprise system version 8.2, running under Windows OS with a file mode of operation, will be shown. This option is used in most solutions designed for small businesses. VK will be implemented in the C++ programming language.
External components "1C: Enterprise"
"1C: Enterprise" is an extensible system. To expand the functionality of the system, external components (EC) are used. From the developer’s point of view, a VC is an external object that has properties and methods, and can also generate events for processing by the 1C: Enterprise system.External components can be used to solve a class of problems that are difficult or even impossible to implement in the programming language built into 1C: Enterprise. In particular, this class includes tasks that require low-level interaction with the operating system, for example, to work with specific equipment.
The 1C: Enterprise system uses two technologies for creating external components:
- using Native API
- using COM technology
VK structure
The external component of the 1C: Enterprise system is presented in the form of a DLL library. The library code describes the descendant class IComponentBase. The created class must define methods responsible for implementing the functions of the external component. The overridden methods will be described in more detail below as the material is presented.Launching a demo VK
Task:- Assemble an external component supplied with an ITS subscription and intended to demonstrate the main capabilities of the external component mechanism in 1C
- Connect the demo component to the 1C configuration
- Make sure the declared functions work correctly
Compilation
The demo VK is located on the ITS subscription disk in the “/VNCOMP82/example/NativeAPI” directory.To build the demo VC we will use Microsoft Visual Studio 2008. Other versions of this product do not support the Visual Studio project format used.

Open the AddInNative project. In the project settings, we include the directory with the header files necessary to build the project. By default, they are located on the ITS disk in the directory /VNCOMP82/include.
The result of the build is the file /bind/AddInNative.dll. This is the compiled library for connecting to the 1C configuration.
Connecting VK to 1C configuration
Let's create an empty 1C configuration.Below is the code for the managed application module.
variable DemoComp; Procedure When System Starts() Connect External Component("...\bind\AddInNative.dll", "DemoVK", External Component Type.Native); DemoComp = New("AddIn.DemoVK.AddInNativeExtension"); End of Procedure
If no error was reported when starting the 1C configuration, then the VK was successfully connected.
As a result of executing the above code, an object appears in the global visibility of the configuration DemoComp, which has properties and methods that are defined in the code of the external component.
Demonstration of the built-in functionality
Let's check the functionality of the demo VK. To do this, let's try to set and read some properties, call some VK methods, and also receive and process the VK message.The documentation supplied on the ITS disk states the following functionality of the demo VC:
- Managing Component Object State
Methods: Turn on, Switch off
Properties: Included - Timer management
Every second the component sends a message to the 1C: Enterprise system with parameters Component, Timer and a system clock counter line.
Methods: StartTimer, StopTimer
Properties: There is a Timer - Method ShowInStatusLine, which displays the text passed to the method as parameters in the status bar
- Method UploadPicture. Loads an image from the specified file and transfers it to the 1C: Enterprise system in the form of binary data.
variable DemoComp; Procedure When System Starts() ConnectExternalComponent(...); DemoComp = New("AddIn.DemoVK.AddInNativeExtension"); DemoComp.Disable(); Report(DemoComp.Enabled); DemoComp.Enable(); Report(DemoComp.Enabled); DemoComp.StartTimer(); End of Procedure Procedure External Event Processing(Source, Event, Data) Report(Source + " " + Event + " " + Data); End of Procedure
The result of running the configuration is shown in the image

The “Messages” panel displays the results of method calls DemoComp.Disable() And Demo.Comp.Enable(). Subsequent lines in the same panel contain the results of processing messages received from VK - Source, Event And Data respectively.
Custom external component name
Task: Change the name of the external component to an arbitrary one.The previous section used the identifier AddInNativeExtension, the meaning of which was not explained. In this case AddInNativeExtension- this is the name of the extension.
The VK code defines a method RegisterExtensionAs, returning the name to the 1C: Enterprise system, which is necessary for subsequent registration of the VK in the system. It is recommended to specify an identifier that to some extent reveals the essence of the external component.
Here is the complete code of the method RegisterExtensionAs with the extension name changed:
bool CAddInNative::RegisterExtensionAs(WCHAR_T** wsExtensionName) ( wchar_t *wsExtension = L"SomeName"; int iActualSize = ::wcslen(wsExtension) + 1; WCHAR_T* dest = 0; if (m_iMemory) ( if(m_iMemory->AllocMemory ((void**)wsExtensionName, iActualSize * sizeof(WCHAR_T))) ::convToShortWchar(wsExtensionName, wsExtension, iActualSize); return true; ) return false; )
In the example given, the VK name is changed to SomeName. Then when connecting VK you must specify a new name:
DemoComp = New("AddIn.DemoVK.SomeName");
Expanding the list of VK properties
Task:- Study the implementation of VK properties
- Add a read/write property of string type
- Add a read/write string property that stores the data type of the last property set. No action is taken when setting the property value
To determine the properties of the component being created, the developer must implement the following methods in the AddInNative.cpp library code:
GetNProps
Returns the number of properties of this extension, 0 if there are no properties
FindProp
Returns the serial number of the property whose name is passed in the parameters
GetPropName
Returns the name of the property by its serial number and by the passed language identifier
GetPropVal
Returns the value of the property with the specified ordinal number
SetPropVal
Sets the value of the property with the specified ordinal number
IsPropReadable
Returns the readability flag of the property with the specified sequence number
IsPropWritable
Returns the writability flag of the property with the specified sequence number
Let's consider the implementation of the above class methods CAddInNative.
In the demo VC, 2 properties are defined: Included And There is a Timer (IsEnabled And IsTimerPresent).
In the global scope of the library code, two arrays are defined:
static wchar_t *g_PropNames = (L"IsEnabled", L"IsTimerPresent"); static wchar_t *g_PropNamesRu = (L"Enabled", L"There is a Timer");
which store Russian and English property names. In the header file AddInNative.h the enumeration is defined:
enum Props ( ePropIsEnabled = 0, ePropIsTimerPresent, ePropLast // Always last );
ePropIsEnabled And ePropIsTimerPresent, respectively having the values 0 and 1, are used to replace the serial numbers of properties with meaningful identifiers. ePropLast, which has a value of 2, is used to obtain the number of properties (using the GetNProps method). These names are used only within the component code and are not available from the outside.
The FindProp and GetPropName methods perform array searches g_PropNames And g_PropNamesRu.
To store the values of the fields in the library module, the CAddInNative class has properties that store the value of the component properties. Methods GetPropVal And SetPropVal return and set the value of these properties accordingly.
Methods IsPropReadable And IsPropWritable and return true or false, depending on the passed ordinal number of the property in accordance with the application logic.
In order to add a custom property you need to:
- Add the name of the property being added to arrays g_PropNames And g_PropNamesRu(file AddInNative.cpp)
- To list Props(file AddInNative.h) before ePropLast add a name that uniquely identifies the property being added
- Organize memory for storing property values (create module component fields that store the corresponding values)
- Make changes to methods GetPropVal And SetPropVal to interact with the memory allocated in the previous step
- In accordance with the application logic, make changes to the methods IsPropReadable And IsPropWritable
Let's give names to the test properties Test And Type Check respectively. Then, as a result of step 1, we have:
static wchar_t *g_PropNames = (L"IsEnabled", L"IsTimerPresent", L"Test", L"TestType"); static wchar_t *g_PropNamesRu = (L"Enabled", L"There is a Timer", L"Test", L"Type Check");
Transfer Props will look like:
enum Props ( ePropIsEnabled = 0, ePropIsTimerPresent, ePropTest1, ePropTest2, ePropLast // Always last );
To significantly simplify the code, we will use STL C++. In particular, for working with strings WCHAR, let's connect the library wstring.
To save a method value Test, we define in the class CAddInNative in the scope of a private field:
string test1;
To transfer string parameters between 1C: Enterprise and external components, the 1C: Enterprise memory manager is used. Let's take a closer look at his work. The functions are used to allocate and free memory respectively AllocMemory And FreeMemory defined in the file ImemoryManager.h. If it is necessary to pass a string parameter to the 1C: Enterprise system, the external component must allocate memory for it by calling the function AllocMemory. Its prototype looks like this:
virtual bool ADDIN_API AllocMemory (void** pMemory, unsigned long ulCountByte) = 0;
Where pMemory- the address of the pointer into which the address of the allocated memory area will be placed,
ulCountByte- the size of the allocated memory area.
An example of memory allocation for a string:
WCHAR_T *t1 = NULL, *test = L"TEST_STRING"; int iActualSize = wcslen(test1)+1; m_iMemory->AllocMemory((void**)&t1, iActualSize * sizeof(WCHAR_T)); ::convToShortWchar(&t1, test1, iActualSize);
For convenience of working with string data types, we will describe the function wstring_to_p. It receives a wstring string as a parameter. The result of the function is a filled structure tVariant. Function code:
bool CAddInNative::wstring_to_p(std::wstring str, tVariant* val) ( char* t1; TV_VT(val) = VTYPE_PWSTR; m_iMemory->AllocMemory((void**)&t1, (str.length()+1) * sizeof(WCHAR_T)); memcpy(t1, str.c_str(), (str.length()+1) * sizeof(WCHAR_T)); val -> pstrVal = t1; val -> strLen = str.length(); return true; )
Then the corresponding case section of the switch statement of the method GetPropVal will take the form:
case ePropTest1: wstring_to_p(test1, pvarPropVal); break;
Method SetPropVal:
case ePropTest1: if (TV_VT(varPropVal) != VTYPE_PWSTR) return false; test1 = std::wstring((wchar_t*)(varPropVal -> pstrVal)); break;
To implement the second property, we define a class field CaddInNative
uint8_t last_type;
in which we will save the type of the last transferred value. To do this, add the command to the CaddInNative::SetPropVal method:
last_type = TV_VT(varPropVal);
Now, when requesting to read the value of the second property, we will return the value last_type, what the designated task requires.
Let's check the functionality of the changes made.
To do this, let us present the appearance of the 1C configuration as follows:
variable DemoComp; Procedure When System Starts() Connect External Component("...", "DemoVK", External Component Type.Native); DemoComp = New("AddIn.DemoVK.SomeName"); DemoComp.TypeCheck = 1; Report(String(DemoComp.TypeCheck)); DemoComp.Test = "Vasya"; Report(String(DemoComp.Test)); DemoComp.Test = "Petya"; Report(String(DemoComp.Test)); Report(String(DemoComp.TypeCheck)); End of Procedure
As a result of the launch, we will receive a sequence of messages:
3
Vasya
Peter
22
The second and third messages are the result of reading the property set in the previous step. The first and second messages contain the type code of the last property set. 3 corresponds to an integer value, 22 to a string value. The correspondence of types and their codes is established in the file types.h, which is located on the ITS disk.
Expanding the list of methods
Task:- Extend the functionality of the external component with the following functionality:
- Explore ways to implement external component methods
- Add a function method Function1, which takes two strings (“Parameter1” and “Parameter2”) as a parameter. The result is a string like: “Checking. Parameter1, Parameter2"
- Make sure the changes you make work.
To define the methods of the component being created, the developer must implement the following methods in the AddInNative library code:
GetNMethods, FindMethod, GetMethodName
Designed to obtain the corresponding number of methods, search for the number and name of the method. Similar to the corresponding methods for properties
GetNParams
Returns the number of method parameters with the specified sequence number; if a method with this number is absent or has no parameters, returns 0
GetParamDefValue
Returns the default value of the specified parameter of the specified method
HasRetVal
Returns the flag of whether the method with the specified ordinal return value has a return value: true for methods with a return value and false otherwise
CallAsProc
false, a runtime error occurs and execution of the 1C: Enterprise module is terminated. Memory for the array of parameters is allocated and released by 1C: Enterprise.
CallAsFunc
Executes the method with the specified sequence number. If the method returns false, a runtime error occurs and execution of the 1C: Enterprise module is terminated. Memory for the array of parameters is allocated by 1C: Enterprise. If the return value is a string or binary data type, the component allocates memory with the function AllocMemory memory manager, writes data there and stores this address in the corresponding field of the structure. 1C: The enterprise will free this memory by calling FreeMemory.
A complete description of the methods, including a list of parameters, is described in detail in the documentation supplied on the ITS disk.
Let's consider the implementation of the methods described above.
In the component code, two arrays are defined:
static wchar_t *g_MethodNames = (L"Enable", L"Disable", L"ShowInStatusLine", L"StartTimer", L"StopTimer", L"LoadPicture"); static wchar_t *g_MethodNamesRu = (L"Enable", L"Disable", L"ShowInStatusLine", L"StartTimer", L"StopTimer", L"LoadImage");
and enumeration:
enum Methods ( eMethEnable = 0, eMethDisable, eMethShowInStatusLine, eMethStartTimer, eMethStopTimer, eMethLoadPicture, eMethLast // Always last );
They are used in functions GetNMethods, FindMethod And GetMethodName, by analogy with the description of properties.
Methods GetNParams, GetParamDefValue, HasRetVal implement switch, depending on the passed parameters and application logic, return the required value. Method HasRetVal in its code it has a list of only methods that can return a result. For them he returns true. For all steel methods returns false.
Methods CallAsProc And CallAsFunc contain directly executable code of the method.
To add a method that can only be called as a function, you need to make the following changes to the source code of the external component:
- Add method name to arrays g_MethodNames And g_MethodNamesRu(file AddInNative.cpp)
- Add a meaningful method identifier to the Methods enumeration (file AddInNative.h)
- Make changes to the function code GetNParams according to program logic
- If necessary, make changes to the method code GetParamDefValue, if you want to use the default values of the method parameters.
- Make changes to the function HasRetVal
- Make changes to the logic of functions CallAsProc or CallAsFunc, placing the directly executable code of the method there
static wchar_t *g_MethodNames = (L"Enable", L"Disable", L"ShowInStatusLine", L"StartTimer", L"StopTimer", L"LoadPicture", L"Test"); static wchar_t *g_MethodNamesRu = (L"Enable", L"Disable", L"ShowInStatusLine", L"StartTimer", L"StopTimer", L"LoadPicture", L"Test");
Enum Methods ( eMethEnable = 0, eMethDisable, eMethShowInStatusLine, eMethStartTimer, eMethStopTimer, eMethLoadPicture, eMethTest, eMethLast // Always last );
Let's edit the function GetNProps so that it returns the number of parameters of the “Test” method:
long CAddInNative::GetNParams(const long lMethodNum) ( switch(lMethodNum) ( case eMethShowInStatusLine: return 1; case eMethLoadPicture: return 1; case eMethTest: return 2; default: return 0; ) return 0; )
Let's make changes to the function:
bool CAddInNative::GetParamDefValue(const long lMethodNum, const long lParamNum, tVariant *pvarParamDefValue) ( TV_VT(pvarParamDefValue)= VTYPE_EMPTY; switch(lMethodNum) ( case eMethEnable: case eMethDisable: case eMethShowInStatusLine: case eMethStartTime r: case eMethStopTimer: case eMethTest: / / There are no parameter values by default break; default: return false; ) return false; )
Thanks to the added line
case eMethTest:
if one or more arguments are missing, the corresponding parameters will have an empty value ( VTYPE_EMPTY). If you need a default value for a parameter, you should set it in the section eMethTest function switch statement CAddInNative::GetParamDefValue.
Since the Test method can return a value, you need to make changes to the function code HasRetVal:
bool CAddInNative::HasRetVal(const long lMethodNum) ( switch(lMethodNum) ( case eMethLoadPicture: case eMethTest: return true; default: return false; ) return false; )
And add the executable code of the method to the function CallAsFunc:
bool CAddInNative::CallAsFunc(const long lMethodNum, tVariant* pvarRetValue, tVariant* paParams, const long lSizeArray) ( ... std::wstring s1, s2; switch(lMethodNum) ( case eMethLoadPicture: ... break; case eMethTest: if (!lSizeArray || !paParams) return false; s1 = (paParams) -> pwstrVal; s2 = (paParams+1) -> pwstrVal; wstring_to_p(std::wstring(s1+s2), pvarRetValue); ret = true ; break; ) return ret; )
Let's compile the component and bring the configuration code to the form:
variable DemoComp; Procedure When System Starts() Connect External Component("...", "DemoVK", External Component Type.Native); DemoComp = New("AddIn.DemoVK.SomeName"); lane = DemoComp.Test("Hello," "World!"); Report(per); End of Procedure
After launching the configuration, we will receive the message: “Hello, World!”, which indicates that the method worked successfully.
Timer
Task:- Study the implementation of the timer in the demo VK
- Modify the “StartTimer” method by adding the ability to pass in the parameters the timer response interval (in milliseconds)
- Make sure the changes you make work.
In WinAPI, you can use the message to work with time WM_TIMER. This message will be sent to your program at the time interval that you set when creating the timer.
To create a timer, use the function SetTimer:
UINT SetTimer(HWND hWnd, // window descriptor UINT nIDevent, // timer identifier (number) UINT nElapse, // delay TIMERPROC lpTimerFunc); // pointer to function
The operating system will send a message WM_TIMER into the program with the interval specified in the argument nElapse(in milliseconds). In the last parameter you can specify a function that will be executed each time the timer fires. The header of this function should look like this (the name can be anything):
void __stdcall TimerProc (HWND hwnd, UINT uMsg, UINT_PTR idEvent, DWORD dwTime)
Let's consider the implementation of a timer in the demo VC.
Since we are considering the process of developing an external component for the Windows OS family, we will not consider the implementation of the timer in other operating systems. For GNU/Linux OS, in particular, the implementation will differ in the syntax of the function SetTimer And TimerProc.
The executable code calls the method SetTimer, to which the function is passed MyTimerProc:
m_uiTimer = ::SetTimer(NULL,0,100,(TIMERPROC)MyTimerProc);
The ID of the created timer is placed in a variable m_uiTimer so that it can be disabled later.
Function MyTimerProc as follows:
VOID CALLBACK MyTimerProc(HWND hwnd, // handle of window for timer messages UINT uMsg, // WM_TIMER message UINT idEvent, // timer identifier DWORD dwTime // current system time) ( if (!pAsyncEvent) return; wchar_t *who = L "ComponentNative", *what = L"Timer"; wchar_t *wstime = new wchar_t; if (wstime) ( wmemset(wstime, 0, TIME_LEN); ::_ultow(dwTime, wstime, 10); pAsyncEvent->ExternalEvent(who , what, wstime); delete wstime; ) )
The essence of the function is that the method is called ExternalEvent, which sends a message to the 1C: Enterprise system.
To expand the functionality of the method StartTimer Let's do the following:
Modifying the method code GetNParams so that it is for the method eMethStartTimer returned value 1:
case eMethStartTimer: return 1;
Here is the method code CallAsProc to the form:
case eMethStartTimer: if (!lSizeArray || TV_VT(paParams) != VTYPE_I4 || TV_I4(paParams)<= 0) return false; pAsyncEvent = m_iConnect; #ifndef __linux__ m_uiTimer = ::SetTimer(NULL,0,TV_I4(paParams),(TIMERPROC)MyTimerProc); #else // код для GNU/Linux #endif break;
Now let's check the functionality. To do this, we will write the code in the managed application module of the configuration:
variable DemoComp; Procedure When System Starts() Connect External Component("...", "DemoVK", External Component Type.Native); DemoComp = New("AddIn.DemoVK.SomeName"); DemoComp.StartTimer(2000); End of Procedure
After starting the configuration, the program will receive messages at intervals of 2 seconds, which indicates that the timer is working correctly.
Interaction with the 1C: Enterprise system
To interact between the external component and the 1C: Enterprise system, methods of the IAddInDefBase class, described in the file AddInDefBase.h. We list the most commonly used ones:Generating an Error Message
virtual bool ADDIN_API AddError(unsigned short wcode, const WCHAR_T* source, const WCHAR_T* descr, long scode)
wcode, scode- error codes (a list of error codes with descriptions can be found on the ITS disk)
source- source of error
descr- error description
Sending a message to the 1C: Enterprise system
virtual bool ADDIN_API ExternalEvent(WCHAR_T* wszSource, WCHAR_T* wszMessage, WCHAR_T* wszData) = 0;
wszSource- message source
wszMessage- Message text
wszData- transmitted data
Message interception is carried out by the External Event Processing procedure
Registration of an external component in the 1C: Enterprise system
virtual bool ADDIN_API RegisterProfileAs(WCHAR_T* wszProfileName)
wszProfileName- component name.
These methods are sufficient for full interaction between VK and 1C. To receive data by an external component from the 1C: Enterprise system and vice versa, the external component sends a special message, which in turn is intercepted by the 1C system and, if necessary, calls the methods of the external component to transmit data back.
tVariant data type
When exchanging data between the external component and the 1C: Enterprise system, the tVariant data type is used. It is described in the types.h file, which can be found on the ITS disk:struct _tVariant ( _ANONYMOUS_UNION union ( int8_t i8Val; int16_t shortVal; int32_t lVal; int intVal; unsigned int uintVal; int64_t llVal; uint8_t ui8Val; uint16_t ushortVal; uint32_t ulVal; uint64_t ullV al; int32_t errCode; long hRes; float fltVal; double dblVal; bool bVal; char chVal; wchar_t wchVal; DATE date; IID IDVal; struct _tVariant *pvarVal; struct tm tmVal; _ANONYMOUS_STRUCT struct ( void* pInterfaceVal; IID InterfaceID; ) __VARIANT_NAME_2/*iface*/; _ANONYMOUS_STRUCT struct ( char* pstrVal; u int32_t strLen ; //count of bytes ) __VARIANT_NAME_3/*str*/; _ANONYMOUS_STRUCT struct ( WCHAR_T* pwstrVal; uint32_t wstrLen; //count of symbol ) __VARIANT_NAME_4/*wstr*/; ) __VARIANT_NAME_1; uint32_t cbElements; //Dimension for an one- dimensional array in pvarVal TYPEVAR vt; );
Type tVariant is a structure that includes:
- mixture (union) intended directly for data storage
- data type identifier
- Determining the type of data currently stored in a variable
- Access the corresponding mixture field to directly access the data
Application
The “examples” directory contains examples for the articleexamples/1 - launch the demo component
examples/2 - demonstration of property list expansion
examples/3 - demonstration of expanding the list of methods
Each directory contains a VS 2008 project and a ready-made 1C configuration.
ansmirnov August 22, 2013 at 2:12 pm
External components in 1C 8.2
- Programming,
- C++
- Tutorial
Introduction
This article gives an idea of how external components work in the 1C: Enterprise system.The process of developing an external component for the 1C: Enterprise system version 8.2, running under Windows OS with a file mode of operation, will be shown. This option is used in most solutions designed for small businesses. VK will be implemented in the C++ programming language.
External components "1C: Enterprise"
"1C: Enterprise" is an extensible system. To expand the functionality of the system, external components (EC) are used. From the developer’s point of view, a VC is an external object that has properties and methods, and can also generate events for processing by the 1C: Enterprise system.External components can be used to solve a class of problems that are difficult or even impossible to implement in the programming language built into 1C: Enterprise. In particular, this class includes tasks that require low-level interaction with the operating system, for example, to work with specific equipment.
The 1C: Enterprise system uses two technologies for creating external components:
- using Native API
- using COM technology
VK structure
The external component of the 1C: Enterprise system is presented in the form of a DLL library. The library code describes the descendant class IComponentBase. The created class must define methods responsible for implementing the functions of the external component. The overridden methods will be described in more detail below as the material is presented.Launching a demo VK
Task:- Assemble an external component supplied with an ITS subscription and intended to demonstrate the main capabilities of the external component mechanism in 1C
- Connect the demo component to the 1C configuration
- Make sure the declared functions work correctly
Compilation
The demo VK is located on the ITS subscription disk in the “/VNCOMP82/example/NativeAPI” directory.To build the demo VC we will use Microsoft Visual Studio 2008. Other versions of this product do not support the Visual Studio project format used.
Open the AddInNative project. In the project settings, we include the directory with the header files necessary to build the project. By default, they are located on the ITS disk in the directory /VNCOMP82/include.
The result of the build is the file /bind/AddInNative.dll. This is the compiled library for connecting to the 1C configuration.
Connecting VK to 1C configuration
Let's create an empty 1C configuration.Below is the code for the managed application module.
variable DemoComp; Procedure When System Starts() Connect External Component("...\bind\AddInNative.dll", "DemoVK", External Component Type.Native); DemoComp = New("AddIn.DemoVK.AddInNativeExtension"); End of Procedure
If no error was reported when starting the 1C configuration, then the VK was successfully connected.
As a result of executing the above code, an object appears in the global visibility of the configuration DemoComp, which has properties and methods that are defined in the code of the external component.
Demonstration of the built-in functionality
Let's check the functionality of the demo VK. To do this, let's try to set and read some properties, call some VK methods, and also receive and process the VK message.The documentation supplied on the ITS disk states the following functionality of the demo VC:
- Managing Component Object State
Methods: Turn on, Switch off
Properties: Included - Timer management
Every second the component sends a message to the 1C: Enterprise system with parameters Component, Timer and a system clock counter line.
Methods: StartTimer, StopTimer
Properties: There is a Timer - Method ShowInStatusLine, which displays the text passed to the method as parameters in the status bar
- Method UploadPicture. Loads an image from the specified file and transfers it to the 1C: Enterprise system in the form of binary data.
variable DemoComp; Procedure When System Starts() ConnectExternalComponent(...); DemoComp = New("AddIn.DemoVK.AddInNativeExtension"); DemoComp.Disable(); Report(DemoComp.Enabled); DemoComp.Enable(); Report(DemoComp.Enabled); DemoComp.StartTimer(); End of Procedure Procedure External Event Processing(Source, Event, Data) Report(Source + " " + Event + " " + Data); End of Procedure
The result of running the configuration is shown in the image
The “Messages” panel displays the results of method calls DemoComp.Disable() And Demo.Comp.Enable(). Subsequent lines in the same panel contain the results of processing messages received from VK - Source, Event And Data respectively.
Custom external component name
Task: Change the name of the external component to an arbitrary one.The previous section used the identifier AddInNativeExtension, the meaning of which was not explained. In this case AddInNativeExtension- this is the name of the extension.
The VK code defines a method RegisterExtensionAs, returning the name to the 1C: Enterprise system, which is necessary for subsequent registration of the VK in the system. It is recommended to specify an identifier that to some extent reveals the essence of the external component.
Here is the complete code of the method RegisterExtensionAs with the extension name changed:
bool CAddInNative::RegisterExtensionAs(WCHAR_T** wsExtensionName) ( wchar_t *wsExtension = L"SomeName"; int iActualSize = ::wcslen(wsExtension) + 1; WCHAR_T* dest = 0; if (m_iMemory) ( if(m_iMemory->AllocMemory ((void**)wsExtensionName, iActualSize * sizeof(WCHAR_T))) ::convToShortWchar(wsExtensionName, wsExtension, iActualSize); return true; ) return false; )
In the example given, the VK name is changed to SomeName. Then when connecting VK you must specify a new name:
DemoComp = New("AddIn.DemoVK.SomeName");
Expanding the list of VK properties
Task:- Study the implementation of VK properties
- Add a read/write property of string type
- Add a read/write string property that stores the data type of the last property set. No action is taken when setting the property value
To determine the properties of the component being created, the developer must implement the following methods in the AddInNative.cpp library code:
GetNProps
Returns the number of properties of this extension, 0 if there are no properties
FindProp
Returns the serial number of the property whose name is passed in the parameters
GetPropName
Returns the name of the property by its serial number and by the passed language identifier
GetPropVal
Returns the value of the property with the specified ordinal number
SetPropVal
Sets the value of the property with the specified ordinal number
IsPropReadable
Returns the readability flag of the property with the specified sequence number
IsPropWritable
Returns the writability flag of the property with the specified sequence number
Let's consider the implementation of the above class methods CAddInNative.
In the demo VC, 2 properties are defined: Included And There is a Timer (IsEnabled And IsTimerPresent).
In the global scope of the library code, two arrays are defined:
static wchar_t *g_PropNames = (L"IsEnabled", L"IsTimerPresent"); static wchar_t *g_PropNamesRu = (L"Enabled", L"There is a Timer");
which store Russian and English property names. In the header file AddInNative.h the enumeration is defined:
enum Props ( ePropIsEnabled = 0, ePropIsTimerPresent, ePropLast // Always last );
ePropIsEnabled And ePropIsTimerPresent, respectively having the values 0 and 1, are used to replace the serial numbers of properties with meaningful identifiers. ePropLast, which has a value of 2, is used to obtain the number of properties (using the GetNProps method). These names are used only within the component code and are not available from the outside.
The FindProp and GetPropName methods perform array searches g_PropNames And g_PropNamesRu.
To store the values of the fields in the library module, the CAddInNative class has properties that store the value of the component properties. Methods GetPropVal And SetPropVal return and set the value of these properties accordingly.
Methods IsPropReadable And IsPropWritable and return true or false, depending on the passed ordinal number of the property in accordance with the application logic.
In order to add a custom property you need to:
- Add the name of the property being added to arrays g_PropNames And g_PropNamesRu(file AddInNative.cpp)
- To list Props(file AddInNative.h) before ePropLast add a name that uniquely identifies the property being added
- Organize memory for storing property values (create module component fields that store the corresponding values)
- Make changes to methods GetPropVal And SetPropVal to interact with the memory allocated in the previous step
- In accordance with the application logic, make changes to the methods IsPropReadable And IsPropWritable
Let's give names to the test properties Test And Type Check respectively. Then, as a result of step 1, we have:
static wchar_t *g_PropNames = (L"IsEnabled", L"IsTimerPresent", L"Test", L"TestType"); static wchar_t *g_PropNamesRu = (L"Enabled", L"There is a Timer", L"Test", L"Type Check");
Transfer Props will look like:
enum Props ( ePropIsEnabled = 0, ePropIsTimerPresent, ePropTest1, ePropTest2, ePropLast // Always last );
To significantly simplify the code, we will use STL C++. In particular, for working with strings WCHAR, let's connect the library wstring.
To save a method value Test, we define in the class CAddInNative in the scope of a private field:
string test1;
To transfer string parameters between 1C: Enterprise and external components, the 1C: Enterprise memory manager is used. Let's take a closer look at his work. The functions are used to allocate and free memory respectively AllocMemory And FreeMemory defined in the file ImemoryManager.h. If it is necessary to pass a string parameter to the 1C: Enterprise system, the external component must allocate memory for it by calling the function AllocMemory. Its prototype looks like this:
virtual bool ADDIN_API AllocMemory (void** pMemory, unsigned long ulCountByte) = 0;
Where pMemory- the address of the pointer into which the address of the allocated memory area will be placed,
ulCountByte- the size of the allocated memory area.
An example of memory allocation for a string:
WCHAR_T *t1 = NULL, *test = L"TEST_STRING"; int iActualSize = wcslen(test1)+1; m_iMemory->AllocMemory((void**)&t1, iActualSize * sizeof(WCHAR_T)); ::convToShortWchar(&t1, test1, iActualSize);
For convenience of working with string data types, we will describe the function wstring_to_p. It receives a wstring string as a parameter. The result of the function is a filled structure tVariant. Function code:
bool CAddInNative::wstring_to_p(std::wstring str, tVariant* val) ( char* t1; TV_VT(val) = VTYPE_PWSTR; m_iMemory->AllocMemory((void**)&t1, (str.length()+1) * sizeof(WCHAR_T)); memcpy(t1, str.c_str(), (str.length()+1) * sizeof(WCHAR_T)); val -> pstrVal = t1; val -> strLen = str.length(); return true; )
Then the corresponding case section of the switch statement of the method GetPropVal will take the form:
case ePropTest1: wstring_to_p(test1, pvarPropVal); break;
Method SetPropVal:
case ePropTest1: if (TV_VT(varPropVal) != VTYPE_PWSTR) return false; test1 = std::wstring((wchar_t*)(varPropVal -> pstrVal)); break;
To implement the second property, we define a class field CaddInNative
uint8_t last_type;
in which we will save the type of the last transferred value. To do this, add the command to the CaddInNative::SetPropVal method:
last_type = TV_VT(varPropVal);
Now, when requesting to read the value of the second property, we will return the value last_type, what the designated task requires.
Let's check the functionality of the changes made.
To do this, let us present the appearance of the 1C configuration as follows:
variable DemoComp; Procedure When System Starts() Connect External Component("...", "DemoVK", External Component Type.Native); DemoComp = New("AddIn.DemoVK.SomeName"); DemoComp.TypeCheck = 1; Report(String(DemoComp.TypeCheck)); DemoComp.Test = "Vasya"; Report(String(DemoComp.Test)); DemoComp.Test = "Petya"; Report(String(DemoComp.Test)); Report(String(DemoComp.TypeCheck)); End of Procedure
As a result of the launch, we will receive a sequence of messages:
3
Vasya
Peter
22
The second and third messages are the result of reading the property set in the previous step. The first and second messages contain the type code of the last property set. 3 corresponds to an integer value, 22 to a string value. The correspondence of types and their codes is established in the file types.h, which is located on the ITS disk.
Expanding the list of methods
Task:- Extend the functionality of the external component with the following functionality:
- Explore ways to implement external component methods
- Add a function method Function1, which takes two strings (“Parameter1” and “Parameter2”) as a parameter. The result is a string like: “Checking. Parameter1, Parameter2"
- Make sure the changes you make work.
To define the methods of the component being created, the developer must implement the following methods in the AddInNative library code:
GetNMethods, FindMethod, GetMethodName
Designed to obtain the corresponding number of methods, search for the number and name of the method. Similar to the corresponding methods for properties
GetNParams
Returns the number of method parameters with the specified sequence number; if a method with this number is absent or has no parameters, returns 0
GetParamDefValue
Returns the default value of the specified parameter of the specified method
HasRetVal
Returns the flag of whether the method with the specified ordinal return value has a return value: true for methods with a return value and false otherwise
CallAsProc
false, a runtime error occurs and execution of the 1C: Enterprise module is terminated. Memory for the array of parameters is allocated and released by 1C: Enterprise.
CallAsFunc
Executes the method with the specified sequence number. If the method returns false, a runtime error occurs and execution of the 1C: Enterprise module is terminated. Memory for the array of parameters is allocated by 1C: Enterprise. If the return value is a string or binary data type, the component allocates memory with the function AllocMemory memory manager, writes data there and stores this address in the corresponding field of the structure. 1C: The enterprise will free this memory by calling FreeMemory.
A complete description of the methods, including a list of parameters, is described in detail in the documentation supplied on the ITS disk.
Let's consider the implementation of the methods described above.
In the component code, two arrays are defined:
static wchar_t *g_MethodNames = (L"Enable", L"Disable", L"ShowInStatusLine", L"StartTimer", L"StopTimer", L"LoadPicture"); static wchar_t *g_MethodNamesRu = (L"Enable", L"Disable", L"ShowInStatusLine", L"StartTimer", L"StopTimer", L"LoadImage");
and enumeration:
enum Methods ( eMethEnable = 0, eMethDisable, eMethShowInStatusLine, eMethStartTimer, eMethStopTimer, eMethLoadPicture, eMethLast // Always last );
They are used in functions GetNMethods, FindMethod And GetMethodName, by analogy with the description of properties.
Methods GetNParams, GetParamDefValue, HasRetVal implement switch, depending on the passed parameters and application logic, return the required value. Method HasRetVal in its code it has a list of only methods that can return a result. For them he returns true. For all steel methods returns false.
Methods CallAsProc And CallAsFunc contain directly executable code of the method.
To add a method that can only be called as a function, you need to make the following changes to the source code of the external component:
- Add method name to arrays g_MethodNames And g_MethodNamesRu(file AddInNative.cpp)
- Add a meaningful method identifier to the Methods enumeration (file AddInNative.h)
- Make changes to the function code GetNParams according to program logic
- If necessary, make changes to the method code GetParamDefValue, if you want to use the default values of the method parameters.
- Make changes to the function HasRetVal
- Make changes to the logic of functions CallAsProc or CallAsFunc, placing the directly executable code of the method there
static wchar_t *g_MethodNames = (L"Enable", L"Disable", L"ShowInStatusLine", L"StartTimer", L"StopTimer", L"LoadPicture", L"Test"); static wchar_t *g_MethodNamesRu = (L"Enable", L"Disable", L"ShowInStatusLine", L"StartTimer", L"StopTimer", L"LoadPicture", L"Test");
Enum Methods ( eMethEnable = 0, eMethDisable, eMethShowInStatusLine, eMethStartTimer, eMethStopTimer, eMethLoadPicture, eMethTest, eMethLast // Always last );
Let's edit the function GetNProps so that it returns the number of parameters of the “Test” method:
long CAddInNative::GetNParams(const long lMethodNum) ( switch(lMethodNum) ( case eMethShowInStatusLine: return 1; case eMethLoadPicture: return 1; case eMethTest: return 2; default: return 0; ) return 0; )
Let's make changes to the function:
bool CAddInNative::GetParamDefValue(const long lMethodNum, const long lParamNum, tVariant *pvarParamDefValue) ( TV_VT(pvarParamDefValue)= VTYPE_EMPTY; switch(lMethodNum) ( case eMethEnable: case eMethDisable: case eMethShowInStatusLine: case eMethStartTime r: case eMethStopTimer: case eMethTest: / / There are no parameter values by default break; default: return false; ) return false; )
Thanks to the added line
case eMethTest:
if one or more arguments are missing, the corresponding parameters will have an empty value ( VTYPE_EMPTY). If you need a default value for a parameter, you should set it in the section eMethTest function switch statement CAddInNative::GetParamDefValue.
Since the Test method can return a value, you need to make changes to the function code HasRetVal:
bool CAddInNative::HasRetVal(const long lMethodNum) ( switch(lMethodNum) ( case eMethLoadPicture: case eMethTest: return true; default: return false; ) return false; )
And add the executable code of the method to the function CallAsFunc:
bool CAddInNative::CallAsFunc(const long lMethodNum, tVariant* pvarRetValue, tVariant* paParams, const long lSizeArray) ( ... std::wstring s1, s2; switch(lMethodNum) ( case eMethLoadPicture: ... break; case eMethTest: if (!lSizeArray || !paParams) return false; s1 = (paParams) -> pwstrVal; s2 = (paParams+1) -> pwstrVal; wstring_to_p(std::wstring(s1+s2), pvarRetValue); ret = true ; break; ) return ret; )
Let's compile the component and bring the configuration code to the form:
variable DemoComp; Procedure When System Starts() Connect External Component("...", "DemoVK", External Component Type.Native); DemoComp = New("AddIn.DemoVK.SomeName"); lane = DemoComp.Test("Hello," "World!"); Report(per); End of Procedure
After launching the configuration, we will receive the message: “Hello, World!”, which indicates that the method worked successfully.
Timer
Task:- Study the implementation of the timer in the demo VK
- Modify the “StartTimer” method by adding the ability to pass in the parameters the timer response interval (in milliseconds)
- Make sure the changes you make work.
In WinAPI, you can use the message to work with time WM_TIMER. This message will be sent to your program at the time interval that you set when creating the timer.
To create a timer, use the function SetTimer:
UINT SetTimer(HWND hWnd, // window descriptor UINT nIDevent, // timer identifier (number) UINT nElapse, // delay TIMERPROC lpTimerFunc); // pointer to function
The operating system will send a message WM_TIMER into the program with the interval specified in the argument nElapse(in milliseconds). In the last parameter you can specify a function that will be executed each time the timer fires. The header of this function should look like this (the name can be anything):
void __stdcall TimerProc (HWND hwnd, UINT uMsg, UINT_PTR idEvent, DWORD dwTime)
Let's consider the implementation of a timer in the demo VC.
Since we are considering the process of developing an external component for the Windows OS family, we will not consider the implementation of the timer in other operating systems. For GNU/Linux OS, in particular, the implementation will differ in the syntax of the function SetTimer And TimerProc.
The executable code calls the method SetTimer, to which the function is passed MyTimerProc:
m_uiTimer = ::SetTimer(NULL,0,100,(TIMERPROC)MyTimerProc);
The ID of the created timer is placed in a variable m_uiTimer so that it can be disabled later.
Function MyTimerProc as follows:
VOID CALLBACK MyTimerProc(HWND hwnd, // handle of window for timer messages UINT uMsg, // WM_TIMER message UINT idEvent, // timer identifier DWORD dwTime // current system time) ( if (!pAsyncEvent) return; wchar_t *who = L "ComponentNative", *what = L"Timer"; wchar_t *wstime = new wchar_t; if (wstime) ( wmemset(wstime, 0, TIME_LEN); ::_ultow(dwTime, wstime, 10); pAsyncEvent->ExternalEvent(who , what, wstime); delete wstime; ) )
The essence of the function is that the method is called ExternalEvent, which sends a message to the 1C: Enterprise system.
To expand the functionality of the method StartTimer Let's do the following:
Modifying the method code GetNParams so that it is for the method eMethStartTimer returned value 1:
case eMethStartTimer: return 1;
Here is the method code CallAsProc to the form:
case eMethStartTimer: if (!lSizeArray || TV_VT(paParams) != VTYPE_I4 || TV_I4(paParams)<= 0) return false; pAsyncEvent = m_iConnect; #ifndef __linux__ m_uiTimer = ::SetTimer(NULL,0,TV_I4(paParams),(TIMERPROC)MyTimerProc); #else // код для GNU/Linux #endif break;
Now let's check the functionality. To do this, we will write the code in the managed application module of the configuration:
variable DemoComp; Procedure When System Starts() Connect External Component("...", "DemoVK", External Component Type.Native); DemoComp = New("AddIn.DemoVK.SomeName"); DemoComp.StartTimer(2000); End of Procedure
After starting the configuration, the program will receive messages at intervals of 2 seconds, which indicates that the timer is working correctly.
Interaction with the 1C: Enterprise system
To interact between the external component and the 1C: Enterprise system, methods of the IAddInDefBase class, described in the file AddInDefBase.h. We list the most commonly used ones:Generating an Error Message
virtual bool ADDIN_API AddError(unsigned short wcode, const WCHAR_T* source, const WCHAR_T* descr, long scode)
wcode, scode- error codes (a list of error codes with descriptions can be found on the ITS disk)
source- source of error
descr- error description
Sending a message to the 1C: Enterprise system
virtual bool ADDIN_API ExternalEvent(WCHAR_T* wszSource, WCHAR_T* wszMessage, WCHAR_T* wszData) = 0;
wszSource- message source
wszMessage- Message text
wszData- transmitted data
Message interception is carried out by the External Event Processing procedure
Registration of an external component in the 1C: Enterprise system
virtual bool ADDIN_API RegisterProfileAs(WCHAR_T* wszProfileName)
wszProfileName- component name.
These methods are sufficient for full interaction between VK and 1C. To receive data by an external component from the 1C: Enterprise system and vice versa, the external component sends a special message, which in turn is intercepted by the 1C system and, if necessary, calls the methods of the external component to transmit data back.
tVariant data type
When exchanging data between the external component and the 1C: Enterprise system, the tVariant data type is used. It is described in the types.h file, which can be found on the ITS disk:struct _tVariant ( _ANONYMOUS_UNION union ( int8_t i8Val; int16_t shortVal; int32_t lVal; int intVal; unsigned int uintVal; int64_t llVal; uint8_t ui8Val; uint16_t ushortVal; uint32_t ulVal; uint64_t ullV al; int32_t errCode; long hRes; float fltVal; double dblVal; bool bVal; char chVal; wchar_t wchVal; DATE date; IID IDVal; struct _tVariant *pvarVal; struct tm tmVal; _ANONYMOUS_STRUCT struct ( void* pInterfaceVal; IID InterfaceID; ) __VARIANT_NAME_2/*iface*/; _ANONYMOUS_STRUCT struct ( char* pstrVal; u int32_t strLen ; //count of bytes ) __VARIANT_NAME_3/*str*/; _ANONYMOUS_STRUCT struct ( WCHAR_T* pwstrVal; uint32_t wstrLen; //count of symbol ) __VARIANT_NAME_4/*wstr*/; ) __VARIANT_NAME_1; uint32_t cbElements; //Dimension for an one- dimensional array in pvarVal TYPEVAR vt; );
Type tVariant is a structure that includes:
- mixture (union) intended directly for data storage
- data type identifier
- Determining the type of data currently stored in a variable
- Access the corresponding mixture field to directly access the data
Application
The “examples” directory contains examples for the articleexamples/1 - launch the demo component
examples/2 - demonstration of property list expansion
examples/3 - demonstration of expanding the list of methods
Each directory contains a VS 2008 project and a ready-made 1C configuration.
This article is devoted to working with external components, namely, connecting them. At the moment, to expand the capabilities of 1C Enterprise, two technologies of external components are used:
- 1 Using Native API
- 2 Using COM technology
So, let's get started, from simple to complex:
Excerpt from ITS
1. Let’s say our VK is located in a specific directory on the disk:
Can be used in the "Thick Client (regular application)";
This is the simplest example of working with the Native component. Please note that this type of component does not require registration in the system, which greatly simplifies administration.
2. The example discussed above is not at all realistic. Most often, the component is placed in a layout. The layout must contain a zip archive with component files and a MANIFEST.xml file
Example manifest file:
3. When working in a thin and web client, be sure to use the method.
Quote from ITS:
Explanation:
%APPDATA%\1C\1Cv82\ExtCompT- directory for installing components for Thick and Thin clients.
%APPDATA%\Roaming\Mozilla\Extensions- directory (in my case) extensions for Mozilla FF/
When using the method SetExternalComponent(), depending on the client used, extensions will be unpacked into the appropriate directory.
An example of the external component installation procedure:
InstallExternalComponent- the method should be called only during the initial installation of the component and in the case when it is necessary to update the installed version of the component.
In case of thin and thick clients:
It is enough to re-execute the installation operation of the external component using the method InstallExternalComponent().
In the case of a web client to update a component:
- It is necessary to remove the plugin through the mechanism of working with web browser add-ons (Mozilla FF)
- Use the method InstallExternalComponent
If the component has not been installed, an exception will be thrown.
2. There are cases when a component needs to be installed from temporary storage (the file was received from a third-party source, external processing), in this case, the first parameters in the methods Connect External Component and Install External Component are the address of the archive in temporary storage. Below is a possible example of how it works:
| &OnClient VariableAddressArchiveComponent; &OnClient Variable Component; &OnClient Procedure OnOpen(Failure) // address, contains a string (navigation link to the binary data of the zip archive in // temporary storage) ComponentArchiveAddress = GetArchiveAddressInTemporaryStorage(); EndProcedure // WhenOpen() &OnServer // methods ConnectExternalComponent, SetExternalComponent can take as // as the first parameter a string in the format "navigation link" // (URL to an external component packaged in a ZIP archive, in a format similar to // GetNavigationLink ). Function GetArchiveAddressInTemporaryStorage()ProcessingObject = FormAttributesValue("ProcessingObject"); Archive Link = PlaceInTemporaryStorage(ProcessingObject.GetLayout("MIKO_phone_IP"), New UniqueIdentifier); ReturnLinkToArchive; EndFunction // GetArchiveAddressInTemporaryStorage() &OnClient // The procedure should be called only once, if the component is not yet installed // or needs to be updated Procedure InstallComponent(Command) Attempt to InstallExternalComponent(ArchiveComponentAddress); Exception Report("Failed to install external component."); EndAttempt; End of Procedure // InstallComponent() &OnClient // main procedure for initializing a component Procedure Initialize(Command) Attempt to Connect an External Component(ComponentArchiveAddress,"Comp" ,ExternalComponentType.Native); Component = New("AddIn.Comp.MIKO_phone_IP"); Exception Report("Initialization exception. The component may not have been installed yet."); EndAttempt; End of Procedure |
The title of the article includes the phrase “for dummies.” By teapot I meant, first of all, myself. All my knowledge of C++ remained at the level of 3-4 years of university, when I embarked on the crooked path of 1C. And everything would be fine, but recently a task arose that required writing an external component. I had to recall my memories and dust off my C++ knowledge. It turns out that everything is not so scary. I want to offer you a brief introduction to writing external components.
Template components on ITS
The ITS disk contains complete documentation on the mechanism of external components, supplemented by an example project and a template for your own development. The material is called “External Component Technology”. The documentation is great, but you still need to understand it, and time, as usual, is short. In fact, there are only a few key points that are worth paying attention to, the rest is decay and vanity :)
Necessary materials
To create an external component we will need:
- Material “Technology for creating external components” located on ITS
- Blank external component template included with the material
- MS Visual Studio. The Express version is free and more than sufficient for our needs.
- Having basic knowledge of C++ syntax, namely:
- Ability to distinguish a variable declaration from a loop or condition
- Understanding that strings in their pure form do not exist in C++, there are arrays for which you clearly need to bother with memory
- Well, of course, the ability to implement the task in the specified language is required. At a minimum, the ability to call some third-party library from C++ that will do everything itself.
Let's start digging
The documentation for the Native API is quite detailed. To sum it up, it says the following:
- An external component allows you to extend the built-in language with a new object (or several). Those. we will create a class that we can create using the “New” operator and call the methods of this object from the built-in language.
- In order for our object to work, the platform will “communicate” with it using a certain protocol, which we are obliged to provide.
- The component code itself conventionally consists of two parts: the first is the registration of the component itself in the system, the second is the operation of the new class and its interaction with the platform.
We won’t get into the specifics of implementation, we’re running out of deadlines, and we don’t have enough competence. We need to quickly understand where we need to enter our lines in order for the component to work. To do this, take the component template with ITS and open it in Visual Studio. The template is located in the template folder of the unpacked archive. Let's see what we have here.
We are interested in the AddInNative.cpp file. All realization lies in it. It contains templates for all the necessary methods; you just need to customize them slightly. However, it turned out that it was easier not to use an empty template as a basis, but to deal with a working example. It has several useful bells and whistles that are not included in the blank template. When understanding comes, you will need to take an empty template and refine it with knowledge of the matter. An example of a working component is located in the example\NativeAPI folder, and an empty template is located in the template folder.
Let's open the project from the example folder and in it - the file AddInNative.cpp
At the very beginning of the file there are declarations of constants and auxiliary functions. We are interested in the following lines:

Our object, as a “real” one, will support methods written in both Russian and English. For this purpose, the written names of properties and methods are declared in two languages. The blue frame is for English baths, the red frame is for Russian baths. The picture shows that the example already implements a number of methods and properties. Our task is to remove them and insert our own.
The line in which the class name is declared is highlighted with a green frame. To be honest, I didn’t understand what it meant. If you change it, nothing works. Since they initially made the reservation that I was a “dummy,” I can be forgiven. :)
Thus, if our object contains the “RunCalculation” method and the “Destination” property, then we need to describe this name in the g_MethodNamesRu and g_PropNamesRu arrays, respectively.
Calls from 1C language
So, our object will contain one method and a read-write property.
Let's have the following usage scenario:
OurObject = New(“AddIn. MyComponent. DataSender”); OurObject. Destination = "somemail@server. com";
OurObject. RunCalculation(PaymentAmount, “For utilities”);
There is a string property and a method with a numeric and a string parameter. In order for all this to work, 1C performs approximately the following communication protocol with the component:

The platform calls predefined functions on our object, and it responds to it and executes its commands. The situation is similar with methods, only there, in addition to the method number, the number of parameters, the presence of a return value, and the presence of optional parameters are requested.
Let's go back to our code. To avoid “magic numbers,” two enumerations are declared in the CAddInNative class, which are responsible for determining the numbers of methods and properties. Let's open the file CAddInNative.h and see them at the very beginning:

The empty template does not contain these enumerations, and there is also no example for separating calls in Russian from calls in non-Russian. This approach is optional. It is important to follow the interface, and whether there will be transfers or not is up to you to decide.
Unicode strings
Many people probably know that the platform operates on double-byte characters in the Unicode format. The template declares a special type WCHAR_T for this purpose. This type is a cross-platform wrapper and ensures the same character size on Windows and Linux. The standard wchar_t type may vary in size on different systems. Please also note that all string literals are declared with a prefix of the letter L. This means that such a string is of type wchar_t.
There is a simple rule: internally, string components are processed as wchar_t (on Linux there can be 4 bytes, on Windows - 2), but as soon as we transfer the string to 1C or receive it from there, we need WCHAR_T (strictly 2 bytes on all systems).
To convert one type of string to another, the template provides auxiliary functions:
The first one forms WCHAR_T from standard wchar_t:
uint32_t convToShortWchar(WCHAR_T** Dest, const wchar_t* Source, uint32_t len = 0);
The second is the opposite. Forms wchar_t from WCHAR_T.
uint32_t convFromShortWchar(wchar_t** Dest, const WCHAR_T* Source, uint32_t len = 0);
When interacting with the platform, only WCHAR_T is always used.
Variant type
Another interesting thing is the generic Variant data type. It allows us to interact with the 1C language, which, as you know, is not typed and each variable in it can contain anything. This type is used when exchanging values. We pass two parameters to the RunCalculation method - a number and a string. The component will receive two Variant values. It is our responsibility to check their actual type. No one will prevent you from passing not a number to the component, but, say, a table of values.
Although, it seems I'm wrong. It seems to me that it will still not be possible to transfer the Table of Values to NativeAPI, because... it is not in the list of allowed types, but, nevertheless, you can pass Date instead of String. This is also not good. We must check the real type of the variable that came from 1C.
The Variant type is simple. This is a structure whose properties are values of different types. There are properties like DATE, wchar_t, int and others. The main part of a Variant is the “vt” property, which stores the real type of the variable, and from which you can understand exactly how to interpret this Variant. In addition, a number of auxiliary macros have been declared to simplify working with the Variant type.
Get to the point
It seems that that’s all with the introduction. I propose to consider an example of the implementation of an external component. The TK will be an example of a component from the ITS disk. This example describes the following features:
- Displaying text in the status bar of the main window;
- Sending an external timer event;
- Transferring binary data to 1C:Enterprise;
- Implementation of properties;
- Implementation of procedures;
- Implementation of functions;
The component has the following API:
- Properties:
- Enabled/IsEnabled;
- IsTimer/IsTimerPresent;
- Methods:
- Enable;
- Disable/Disable;
- ShowInStatusLine;
- EnableTimer/StartTimer;
- Turn off Timer/StopTimer;
- LoadPicture/LoadPicture;
An external event occurs according to the timer, which can be subscribed to from the 1C code.
Guided by the knowledge we have, let's look at the component from the very beginning.
Registration components
Our object is implemented as a separate C++ class, in this case CAddInNative. In order for 1C to see our class, the dll library must export 3 functions:
- GetClassObject
- DestroyObject
- GetClassNames
These exports can be seen in the AddInNative.def file in the VisualStudio project tree. Let's look at the code of these functions:

The simplest one - the GetClassNames function - tells the 1C platform what classes are in our component. Let the C++ gurus correct me, it seems to me that here the platform needs to respond with the names of C++ classes so that it can import them. This is exactly what the g_kClassNames array is used for, the one with the green “frame”. I didn’t specifically check it, but if you just need to make the component work, then you should leave everything as it is in the example. It's already working, there's no need to tinker with it for the time being.
So, GetClassNames returns to the platform an array of class names that implement useful objects of the external component. In our example, the component will return to the platform an array of one element with the class name CAddInNative.
Please note that the platform will receive a value of type WCHAR_T, and the class name in the g_kClassNames array is of type wchar_t. Therefore, the cast is performed using the helper function discussed above.
The next function is GetClassObject. Called when we have written “New” in the enterprise code. The platform requires us to create a new instance of the class and return a pointer to the new object.
Again, note that the first parameter the platform tells us is which class to create (from those given to it by the GetClassNames method). Since we only have one class, this name is not checked here at all, an object is simply created via new and returned via the output parameter pInterface.
And the last required export function is DestroyObject. The name speaks for itself. When an object is no longer needed by the platform, it needs to be deleted. We are given a pointer to a previously created object. We free it using delete and reset unnecessary pointers.
The described implementations are quite universal. If our component implements only one class (as in the example), then these functions need to be simply copied to itself. The only condition is to create the correct class in the GetClassObject function, if your name is not CAddInObject, but something else.
Initialization/termination of a component
After creating a class that implements a component, the platform calls methods of this class. Before starting work, the platform will tell us an object of “itself”, with which we can call certain methods of the platform itself. This happens in the Init method. In the example, the platform object is stored in the m_iConnect variable.

Another important method is setMemManager. Allows you to allocate memory blocks that the platform itself will free. It is implemented as follows:

We simply store a pointer to the memory manager that the platform passes to us. Then, with this manager we will allocate memory freed by the platform itself.
And again, as in the case of export functions, the initialization methods are quite universal; you can simply copy them to yourself and not worry about “finishing” them until it becomes really necessary.
Payload. Methods and properties of the component object
Registration
Well, of course, we created the component not for the sake of its initialization, but for the sake of some useful functionality. It's time to look at how it's being implemented.
First, we must register an object that can be created and called from the 1C language. This object is registered in the RegisterExtensionAs method.

In this method, we inform the platform the name of our class, as it will be visible from the 1C language. It is by this name that we will create it through “New”. In this case, the object creation will be performed with the following code:
ConnectExternalComponent(File, "MyComponent", ExternalComponentType. Native);
ObjectComponents = New( "AddIn.MyComponent.AddInNativeExtension");
According to the documentation, memory for the string with the class name is allocated by the memory manager, and the name is written to this address - “AddInNativeExtension”. Here you can painlessly write your name. Please note that again there is a conversion from wchar_t to platform WCHAR_T.
Usage
As I wrote above, the platform queries the component for various language features. Does the specified property exist, is it writable, does the function parameter have a default value, does it have a return value, etc. If we take the example code given earlier:
OurObject = New( "AddIn.MyComponent.DataSender");
// DataSender is the name from the RegisterExtensionAs function (discussed below).
OurObject. Addressee = " [email protected]"
;
OurObject. Execute Calculation(Payment Amount, "For utilities");
then the following poll will be performed:
- Is there a "Destination" property?
- Does it support recording?
- Is there a method called RunCalculation?
- How many parameters does it have?
- Does it have a return value
- What are the defaults for optional parameters (if any)
Here it is most useful to look at an example and check the documentation. The implementation of all these surveys is fairly straightforward. A whole zoo of methods is responsible for interaction. I won’t go through everything, they are pretty well documented, and besides, they are simple to implement. Only the most significant moments will be considered, into which we, as dummies, will need to get our hands on them :). The basic approach is as follows: the first time a property or method is mentioned, the platform will ask us to search for it by name. We will have to respond with the unique number of this property (method). All further communication will take place only by numbers. This is where the mentioned enumerations that store these numbers will help.
Properties
The first thing to consider is the property infrastructure. The platform requests the existence of a property using the FindProp method

The platform passes us the name of the property we are looking for in the form WCHAR_T. It is converted to wchar_t using an auxiliary method, and this text is searched first in English-language terms, and then in Russian-language ones. We must return the property number. Note that the findName helper function is involved here. Its implementation is in the example, but the component is not in the empty template. It seems appropriate to drag it towards you if you plan to have bilingual terms in your component.
Next, the GetPropName method performs the inverse task, getting the property name by its number. The name string is also allocated through the enterprise memory manager. I suspect that the GetPropName method together with GetNProps is used when we expand the properties of an object with a plus sign in the debugger. Then the platform will receive the total number of properties and ask for a name for each of them.
The next pair of methods is IsPropReadable/IsPropWritable. Everything is simple here, for the specified property number we must say whether it can be read/written.
Receiving and writing values are performed using the GetPropVal/SetPropVal methods. It’s worth going into more detail here. We are starting to work with 1C:Enterprise types, which means Variant is coming onto the scene.

The component template defines a set of auxiliary macros to simplify working with Variant. The first one is value type checking. For example, the macro TV_VT allows you to check/set the type of a value. Named constants are also defined for each of the supported types. These constants and their correspondence to 1C:Enterprise types are listed in the documentation.
The TV_BOOL macro receives a Boolean value from the variant that you can work with. By analogy, integer values (TV_INT), strings (TV_WSTR) and others are obtained. The exact values are in the code, you can always see them.
An important point is that it is not enough to assign a value to a variant; you must also assign a real type. Pay attention to GetPropVal. In addition to the TV_BOOL = true assignment, there is a type assignment: TV_VT = VTYPE_BOOL. If the type is not assigned, the platform will not know what type of value was returned to it. Of course, you can mess up and set the wrong type. This is often accompanied by the platform falling.
Let's summarize the above:
We get the value from the option:
bool someVariable = TV_BOOL(pVariant);
Write the value to the option:
TV_VT(pVariant) = VTYPE_BOOL; // valid data type
TV_BOOL(pVariant) = someBooleanVariable; // set the value itself
And now - hunchback methods!
Methods are a little more complicated, but in general they are similar to properties. Firstly, there is exactly the same function of searching for a method by name, getting the total number of methods, getting the name by number. However, in addition to the above, the following features are added:
- If a method can return a value, then it can be used in “Calculate” and written to the right of the assignment operation in the 1C language. If not, then it's a procedure and things like that will throw a "Using a procedure as a function" exception
- The method has parameters. The platform must know their number. If the call specifies more arguments than are specified in the method signature, the error “Too many parameters” occurs.
- If not enough arguments are passed to a method, then some of them may be optional, and if there are no optional parameters, then an "Insufficient parameters" error occurs.
- When called, if it is a procedure, then there cannot be a return value. If it is a function, then there is a return value. It also needs to be processed.
There are a number of simple methods, the purpose of which is clear from their names and from the documentation. These include HasRetVal, GetNParams, GetParamDefValue. I propose not to consider them; an example is more than enough. Our interest will be directed towards the direct implementation of the payload. It is implemented in the CallAsProc and CallAsFunc methods. The first one is responsible for calling procedures, the second one is responsible for calling functions. They differ in that CallAsFunc has an additional output parameter, in which we will pass the return value of the function to the platform.
The call is carried out as follows: the platform passes us the number of the called method, an array of actual parameters and their number. We must parse the method number and feed it the passed parameters. In the case of a function, we must also write something into the return value.

In the example, the method number is analyzed in switch/case and, depending on the number, the method logic is executed. For Enable/Disable methods, simply select a checkbox. The ShowInStatusLine method is interesting. It shows what was passed to it in the status bar of the 1C:Enterprise window. To do this, we use the m_iConnect platform connection object, the one that was “issued” to us when registering the component. A full list of its capabilities is described in the documentation.
Interesting point. Here, in the example, the type of the value arriving from 1C is not checked, but SetStatusLine is simply called with the string part Variant. I suspect that if you call the component method from the 1C language, passing a number or date there (instead of a string), then nothing will work... Again, let the gurus correct, but it seems that the pwstrVal pointer will point to God knows where if it came from the enterprise let's say a number, not an honest string. When calling SetStatusLine, the platform will try to read a line from an unknown address and, most likely, will crash. It's better to always check the expected type. You never know.
The LoadImage function in the example is implemented in a more interesting way; it considers the possibility of exchanging strings and binary data with the platform.

First, the number of parameters passed is checked here. If they are not present, then the call is considered unsuccessful. Returns false, which is interpreted by the platform as a call error.
Next, the type of the passed parameter is checked here. If this is a narrow string (VTYPE_PSTR), then the char part of the variant is used. The example says paParam->pstrVal, but you can use the TV_STR macro, it will be the same, but the uniformity of working with the option will also be maintained.
If it is a wide string (VTYPE_PWSTR), then the conversion is done first to wchar_t and then to char. The fact is that the path to the file is passed from the 1C language to this method, which is then used in the fopen(char*) function. This function requires a char* type as input, and WCHAR_T will be sent to us from the platform. For correct operation, string conversions are performed.
And lastly, if this is not a string at all, then the call is considered unsuccessful and false is returned.

We allocate memory for binary data using a memory manager. This is logical; binary data will become a full-fledged object within the platform, and it must be managed by it. Memory is allocated for the pvarRetValue variant, which is the return value of the external component function.
The entire file is read into the allocated buffer; in addition, Necessarily the byte size is specified in the strLen option property and the data type of the VTYPE_BLOB option. If the memory is allocated successfully, then we return true as a sign of a successful call to the entire function.
Thus, when in the 1C language it is written:
BinaryData = Component. UploadPicture("C:\pic.jpg");
The CallAsFunc method of the component object will be called, passing the path and returning binary data as described above.
If successful, the BinaryData variable will contain a full-fledged 1C language object. When it goes out of scope, all the memory it occupied will be freed by the platform. That is why it was allocated through the memory manager.
Conclusion
The story was written by a teapot for dummies, therefore, most likely, it is replete with terminological inaccuracies. However, the purpose of this article is to provide a quick introduction to external components. If you need to quickly make a component in a short time, without unnecessary hassles, without lengthy discussions, then I hope that this article will help you. If any of my mistakes make you feel bad, as a C++ guru, please let me know in the comments and we will correct them.
Thank you for your attention.
We also recommend
 Expansion and glazing of an external balcony without permission
 The best projects of one-story houses and cottages Projects for 1
 Automation of business processes Flexible configuration of any business processes
 Sauna in an apartment Open a sauna in an apartment building
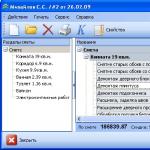 Construction automation
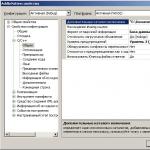 External Component Technology ()