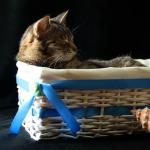
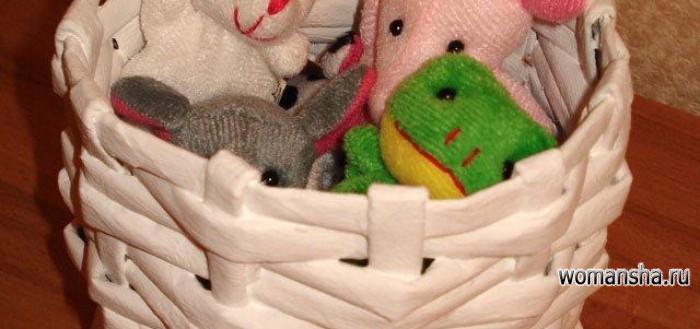
Step by step weaving from newspaper tubes for beginners. Mimosa bouquet for the spring holiday. Weaving newspapers. The basics of craftsmanship.
Every woman wants to make her home beautiful and cozy, and in the view of many, cosiness is inextricably linked with various cute little things-vases, caskets, baskets, flower pots and many others. But such gizmos are not cheap, what to do if the family budget is limited? The way out is this weaving from newspaper tubes, products made in this technique are almost indistinguishable from purchased items made of twigs or rattan. Today we will tell you about weaving newspaper tubes for beginners, the main points, how to do it step by step, show tutorial videos and tell about the famous masters of this direction of creativity.
Newspaper weaving for beginners
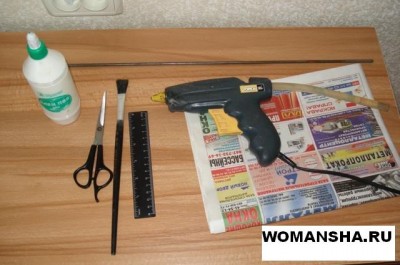
First of all, in order to weave from newspaper tubes you need to prepare everything you need — these are newspapers, the more the better, a knitting needle (it is needed to make the tubes themselves), a brush and paint for painting the finished product. Some paint tubes at the very beginning, others, on the contrary, already at the end. If you don’t have a suitable paint, don’t worry, the product even from ordinary sheets of newspapers also looks spectacular and unusual. We suggest watching video weaving from newspaper tubes video tutorials, which explain in detail how weaving newspaper tubes for beginners is performed:
Master Class
There are recognized masters of weaving newspaper tubes. Among them, it is worth highlighting Natalia Sorokina. She has been working in this technique for a long time, has her own blog on the Internet and has even published several books on this topic. In them you will find answers to all your questions, and you can also choose new schemes and ideas for yourself. Now we suggest you look at newspaper tubes weaving a master class from Natalia Sorokina:
I would also like to lead Elena Tishchenko as a master of weaving from newspaper tubes. At her you can also watch a large number of weaving from newspaper tubes of video lessons, where her various works are presented. Newspaper tubes weaving a master class from Elena Tishchenko will be useful for both beginner needlewomen and those who already have sufficient experience. They also tell about the initial stages of weaving, and present unusual items from newspaper tubes. We offer several to your attention:
Newspaper weaving step by step
In mastering the technique of weaving newspaper tubes, there are several key points that are very important. Firstly, this ability to twist these very ducts correctly, then painting finished tubes is followed, after you learn how to make different shapes of the bottom, for your future product, then the process of weaving the thing itself, if it is a basket or a chest, a lid for them is woven separately, after that if the tubes were not painted in advance, the whole finished thing should be painted. This is the weaving of newspaper tubes step by step. Learning to do all this correctly will help weaving newspaper tubes video tutorials:
Today you met with this type of needlework as weaving from newspaper tubes. Having mastered it, you will decorate your home, save the family budget, in addition, woven products can be a great gift to your friends and relatives. Perhaps you are so captivated by a new hobby that you will do similar things for sale, in this way any activity will also turn into a source of income. Weaving from tubules has a large number of advantages, but probably the most important thing is that all the necessary materials are at hand. And as practice shows from the unnecessary newspapers that we throw away, you can do beautiful and useful things, it remains only to begin.
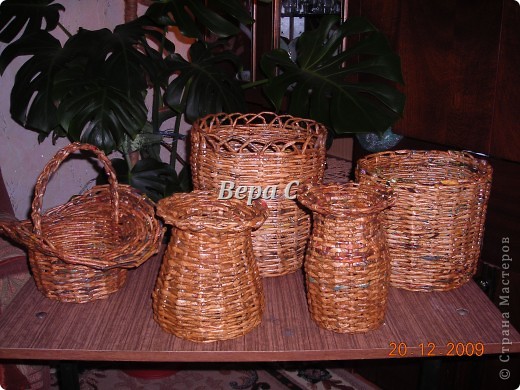
Weaving newspaper tubes is a creative process in which the master creates amazing articles from newspapers that are almost indistinguishable in appearance from ordinary rattan wickers. It can be beautiful boxes, vases, caskets, flowerpots, various coasters and many more interesting and unexpected things.
If you've never tried to create beauty before, then this article is especially for you. We will talk about making newspaper tubes for weaving and how to make them durable and well bent, and also show how to create a beautiful box for storing things.
Materials and Tools
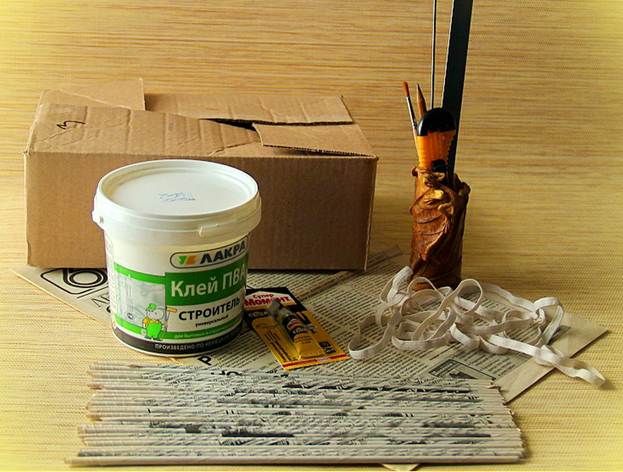
For the manufacture of newspaper tubes
- newspapers
- 1.5 mm thick knitting needle or wooden skewer
- glue for paper
- tassel
- pencil
- ruler
- stationery knife or scissors
To create a wicker box
- box to braid
- elastic, clothespins or paper clips for fixing the tubes
- glue
- tweezers
- decoration items - paints, varnish, fabrics, ribbons (For ideas on decoration, see the article “Decorating Newspaper Boxes”)
Working process
The process of making tubes
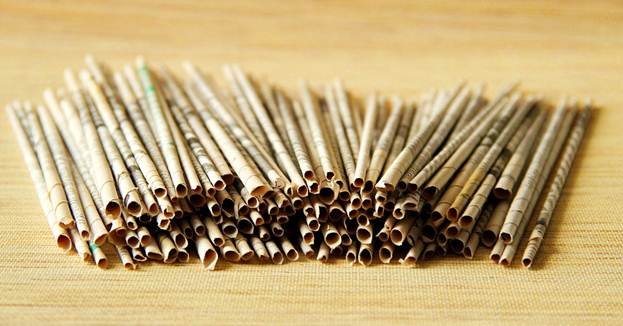
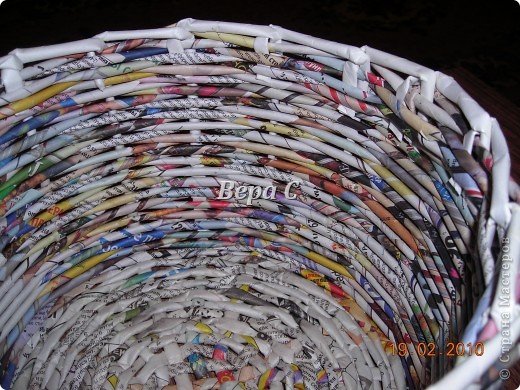
The creation of any product begins with the preparation of materials. In the newspaper weaving technique, work is carried out in tubes or paper vines.
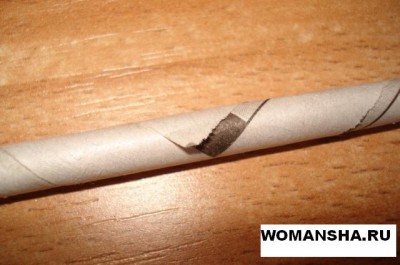
A tube is a material obtained by winding a newspaper strip over a knitting needle or other similar tool. The tube is a round, spiral-bound strip of paper.
A paper vine is a flattened tube that resembles a ribbon or a vine.
Products from tubules and vines come out very different. Weaving is a little easier from the vine, but the products from the tubes look more elegant and neat.
Making tubes is a simple but painstaking process.
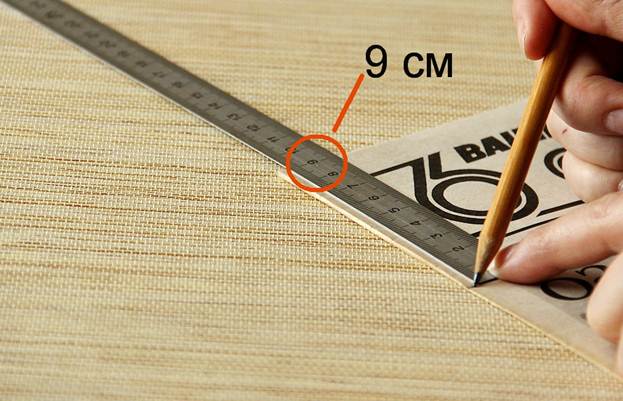
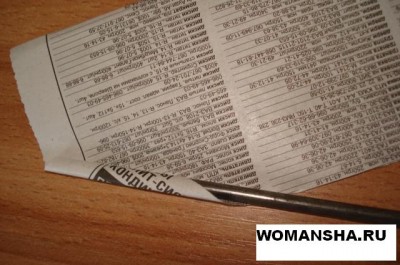
We horizontalize the newspaper page into strips 9 cm wide. If the pages are doubled, they should be cut in half.

We cut the sheets along the marked lines with scissors or a clerical knife and a ruler.
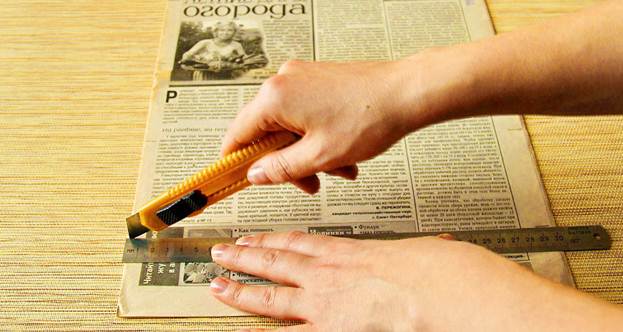
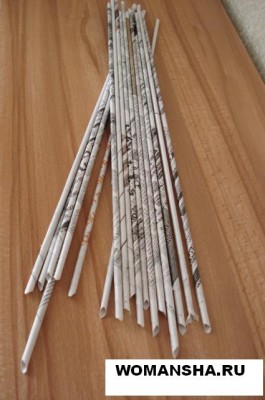
These should be such strips

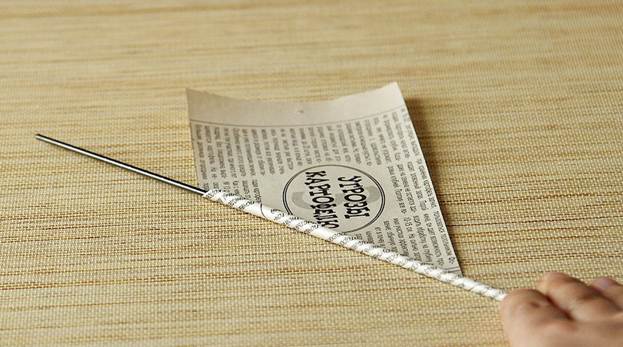
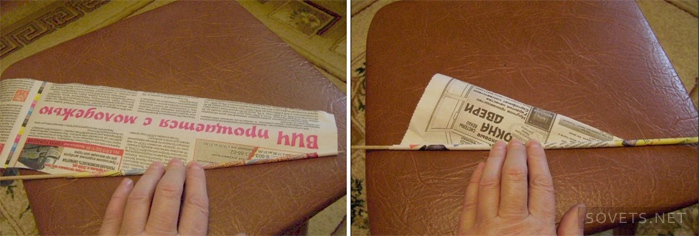
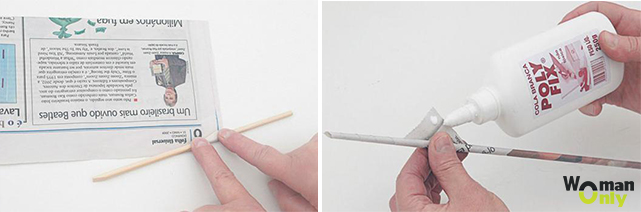
On the edge of the strip we apply a needle at an angle.
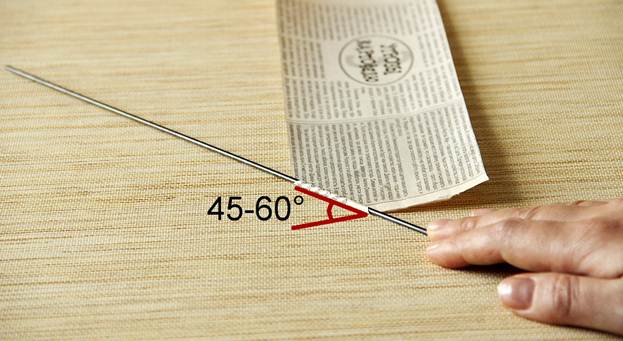
The angle of the knitting needles relative to the newspaper will depend on which tube you get. The larger the angle, the longer and more vulnerable to rupture will be the tube. The smaller the angle, the shorter and stiffer the tube, respectively. We will need both long and short tubes. More flexible and longer are used for weaving walls, and more rigid and durable - for frames. The main thing is not to make very large or very small angles. It is more difficult to work with such tubes, they are either very fragile and hardly bend. Basically, I make tubules at angles from 45 ° to 60 °.
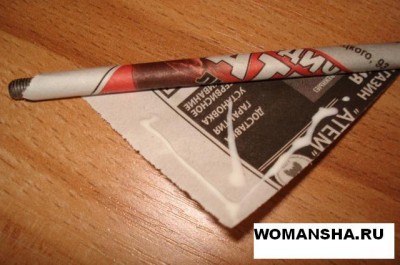
We begin to wind the paper tightly around the knitting needle.
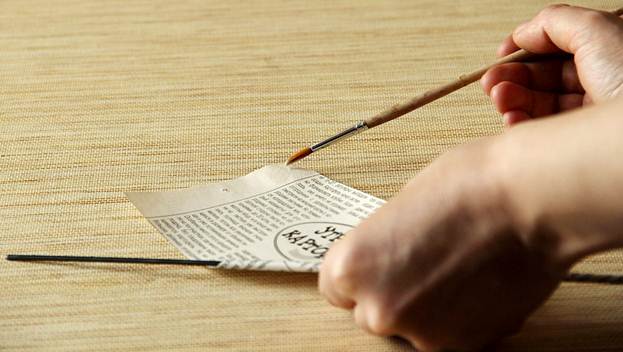
It is not necessary to glue the beginning of the tube, for a firm hold it is enough to apply a drop of glue at the end. We apply glue to the corner of the newspaper with a brush and press it with our fingers.
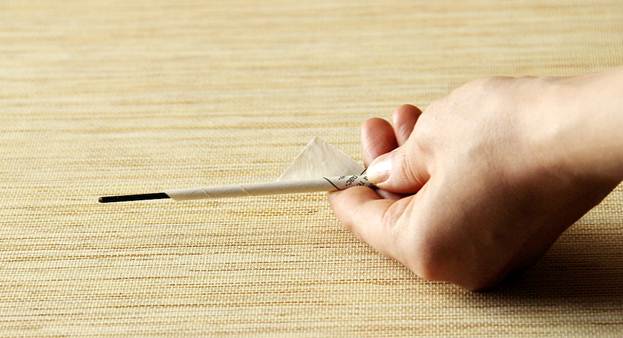
Then carefully remove the tube from the knitting needle.
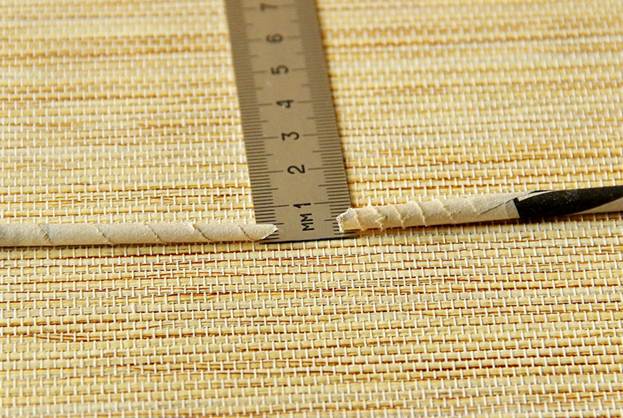
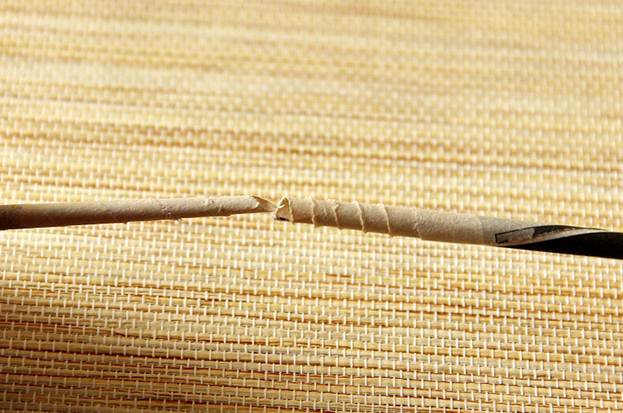
The thickness of the tube above and below should be slightly different. Due to this difference, it will be easy for us to increase the length of the tubes.
Newspaper weaving
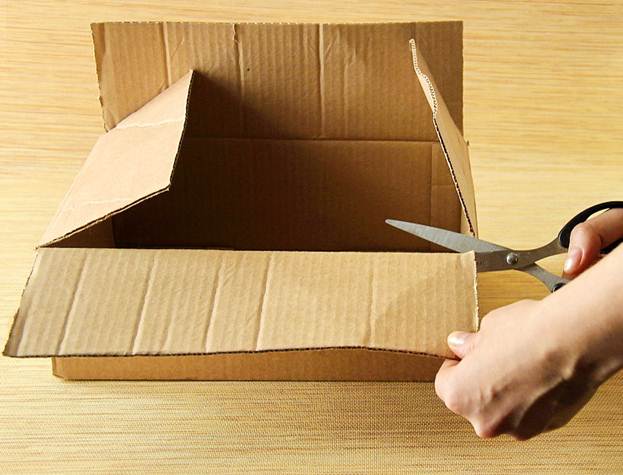
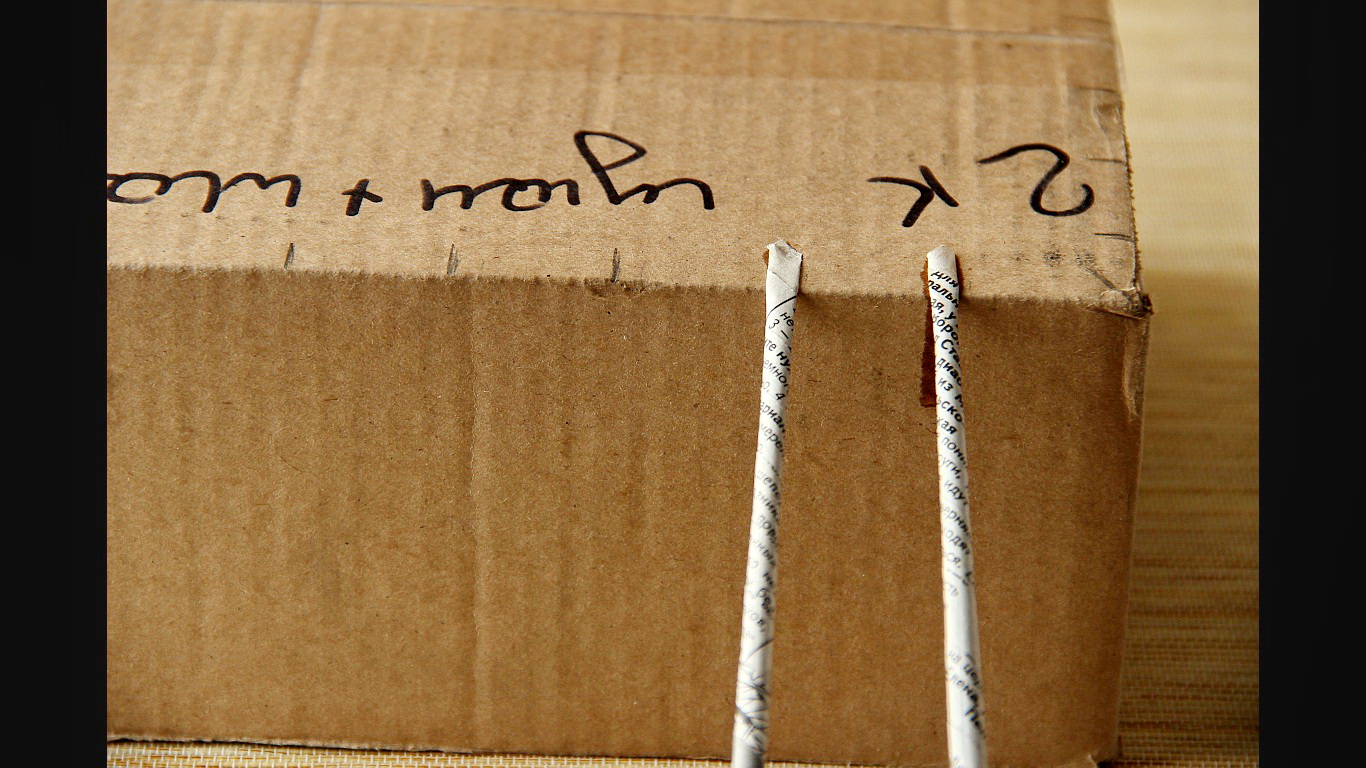
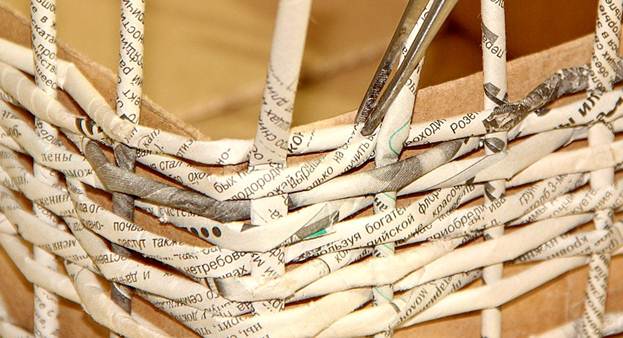
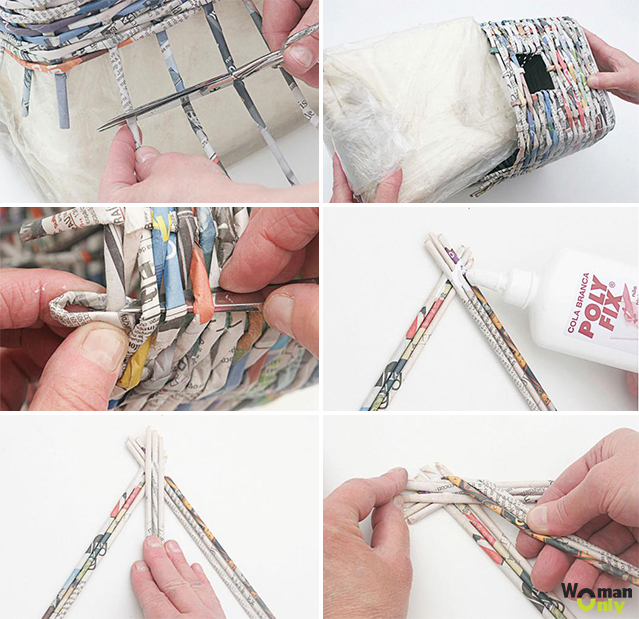
Take the box that we will braid and cut off the top covers
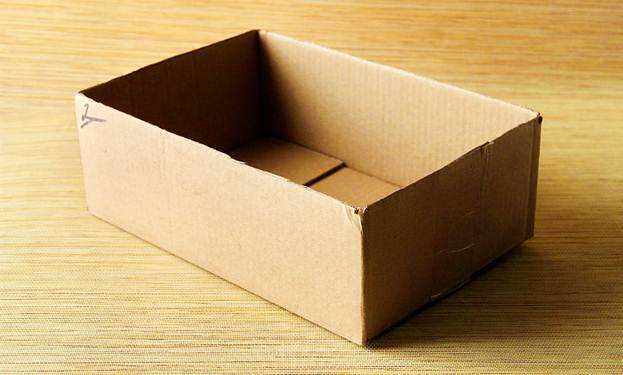
When the tubes and box are ready, you can begin the creative process. There are many varieties of weaving. After a short workout, you can invent various patterns yourself. In this article we will consider the simplest weaving. We will pass the tube through one, in layers. Despite its simplicity, this weaving looks very good on the finished product.
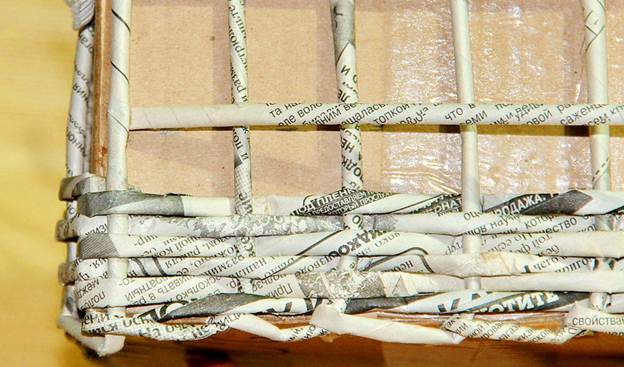
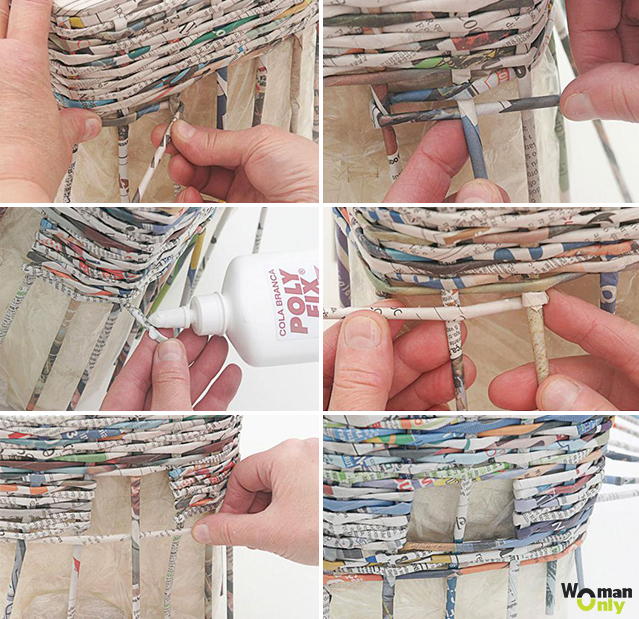
We begin to make the frame. To do this, at the bottom of the box, you need to make markings along which vertical tubes (racks) will go. They should be an odd number, they should be located at approximately the same distance from each other. The distance should not be very large, but also end-to-end tubes should not be placed. Depends on the distance, how often we will do the weave. The smaller the distance between the uprights, the denser and finer the weaving will be. I took a step of 3 cm. Regardless of the distance between the tubes, there must be a rack at the corners of the box. This will make weaving more pronounced and neat.
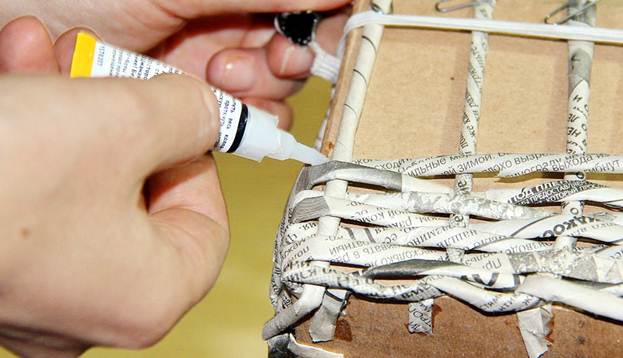
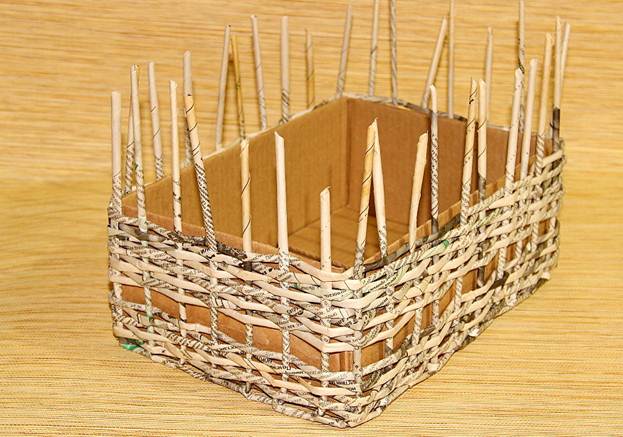
When the markup is ready, glue the tubes there. This will be the frame of our box. When creating the frame, it is more convenient to use glue instant fixation.
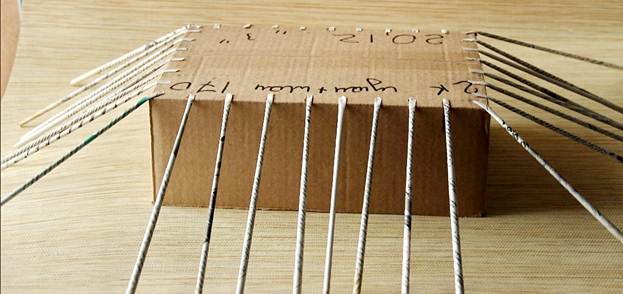
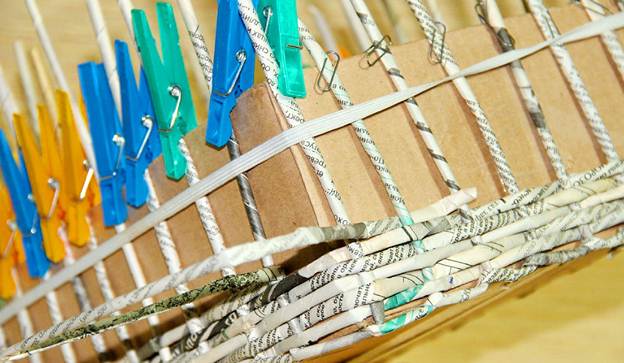
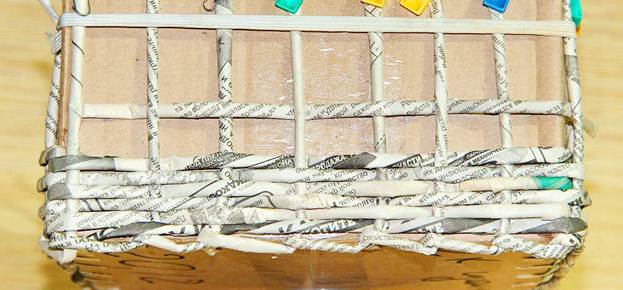
Now the box must be carefully rotated, and all the tubes must be lifted up and secured with rubber or clothespins.
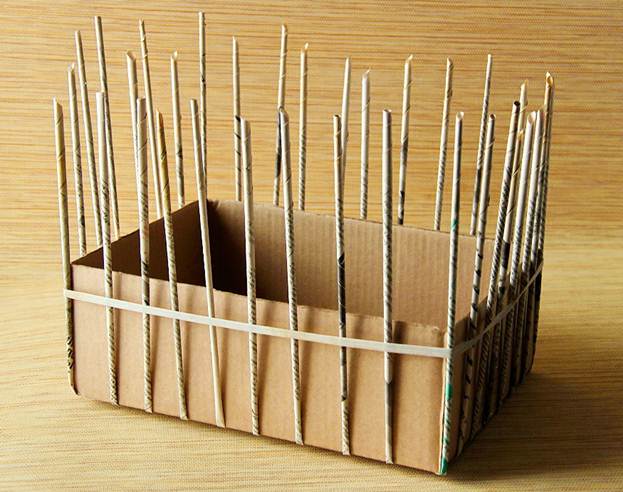
To create the first row, simply rotate each rack for the next.
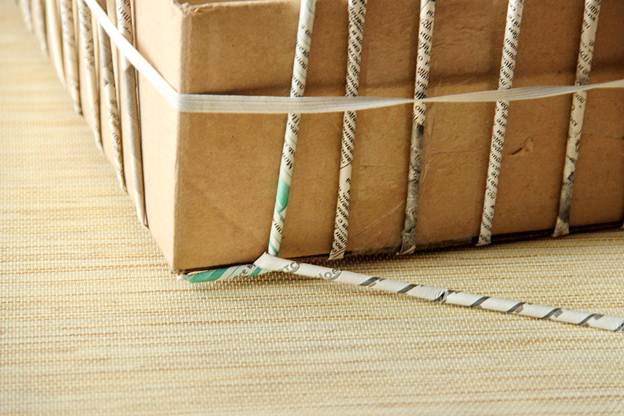
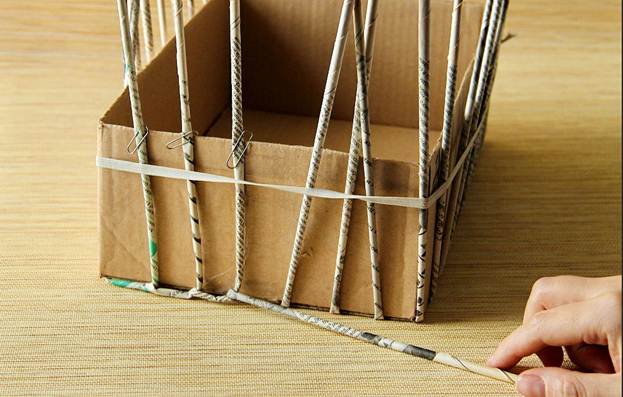
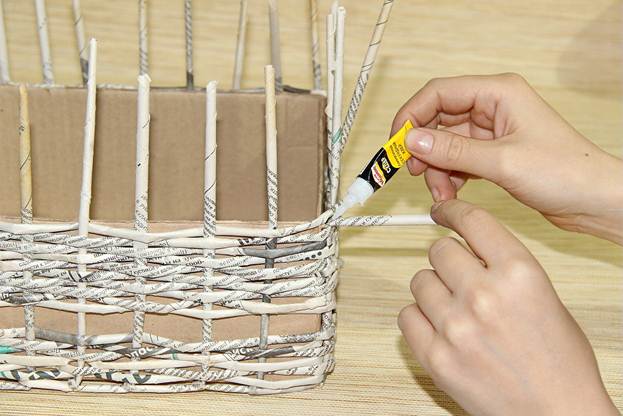
Then we glue an additional tube to the bottom of the box, with which we will weave the walls, constantly increasing it.
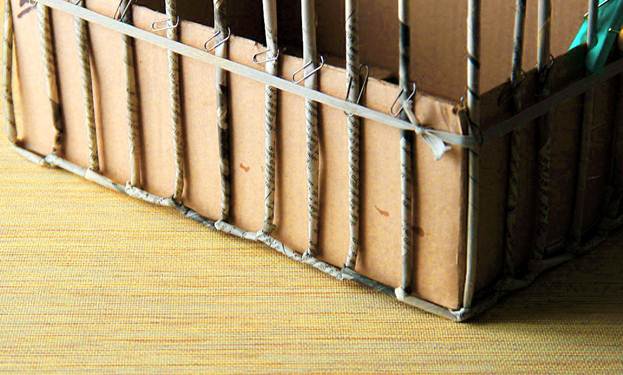
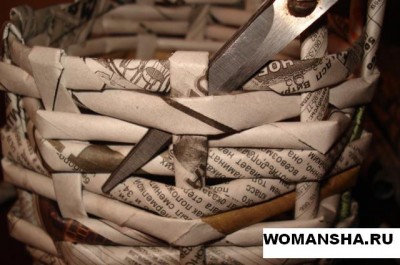
With a tube, we begin to braid the racks, so that there is an alternation: we braid the first rack from the outside, the second from the inside, and so on.
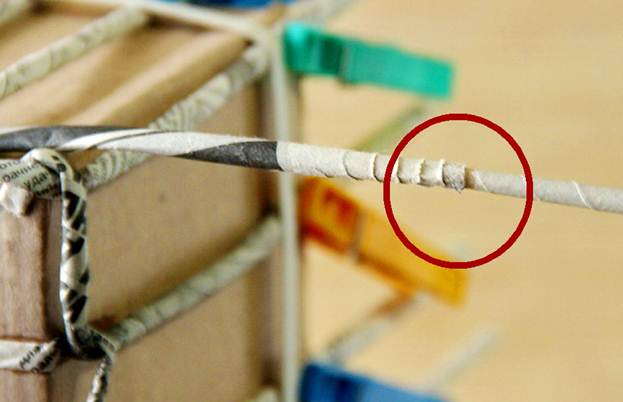
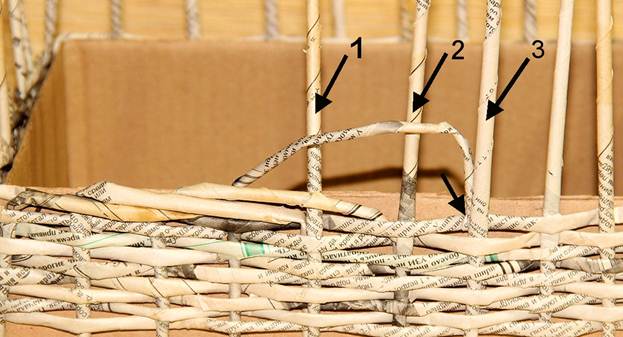
When the tube ends, it needs to be increased. To do this, take another tube, insert the narrow end into the wide one and fix it with glue.
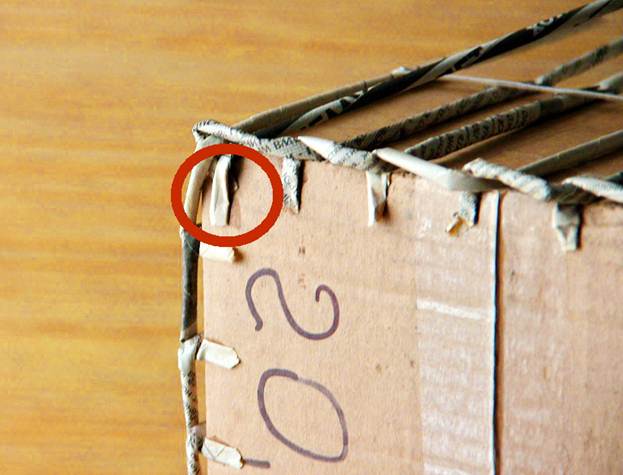
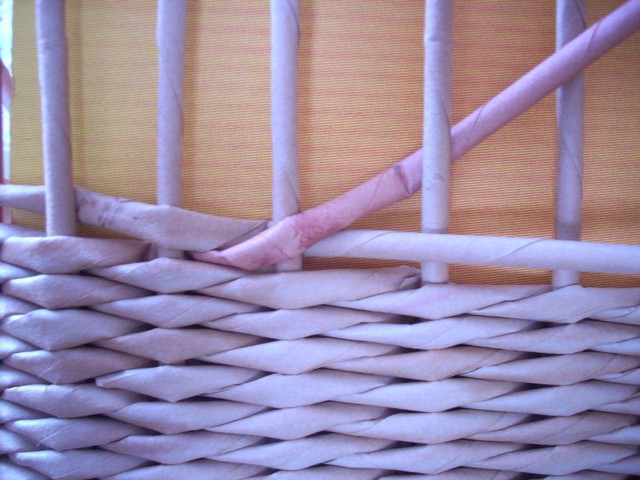
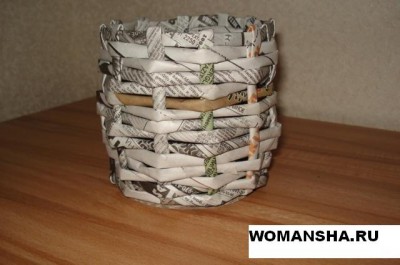
Thus, you can braid the box to the very top. But for a more beautiful design, I suggest in the middle of weaving to add a row of satin ribbons. To do this, we knit to the middle of the box and finish the row.
Glued the tube, gently glued to the counter and cut.
We take the tape with which we will decorate the box, and measure the distance that needs to be left for it. Do not thread right away, as the box has yet to be painted, and the tape will interfere.
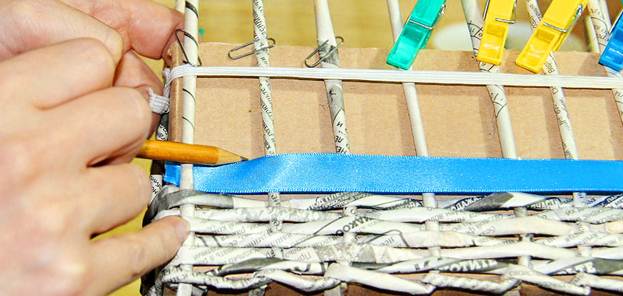
When the distance is known, we fasten a new tube and continue to weave.
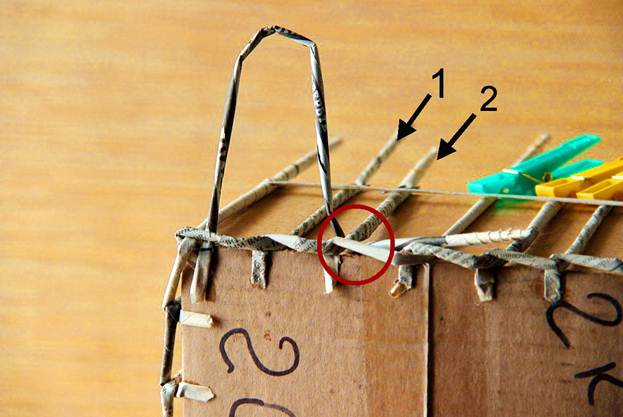
The first row after the tape in rotation should coincide with the row that goes in front of the tape.
We hide the remaining tip behind the counter. This is convenient to do with tweezers.
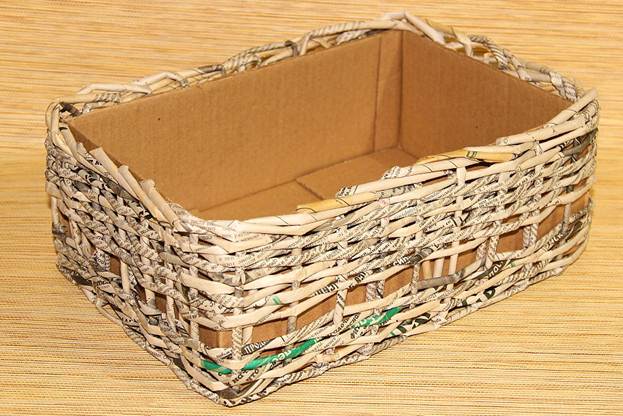
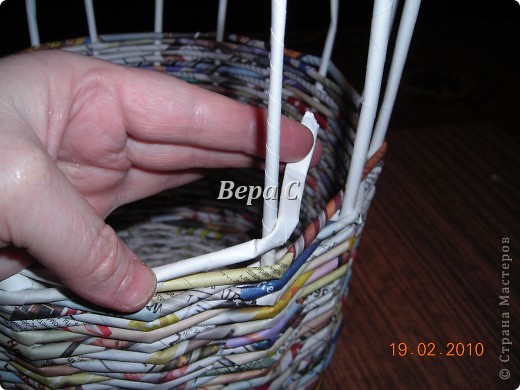
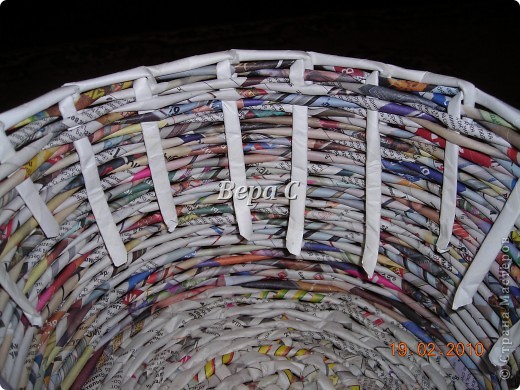
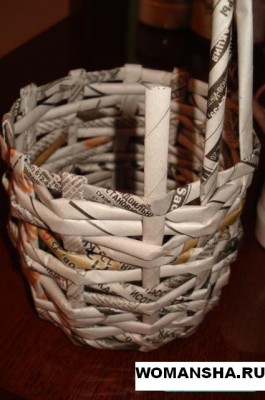
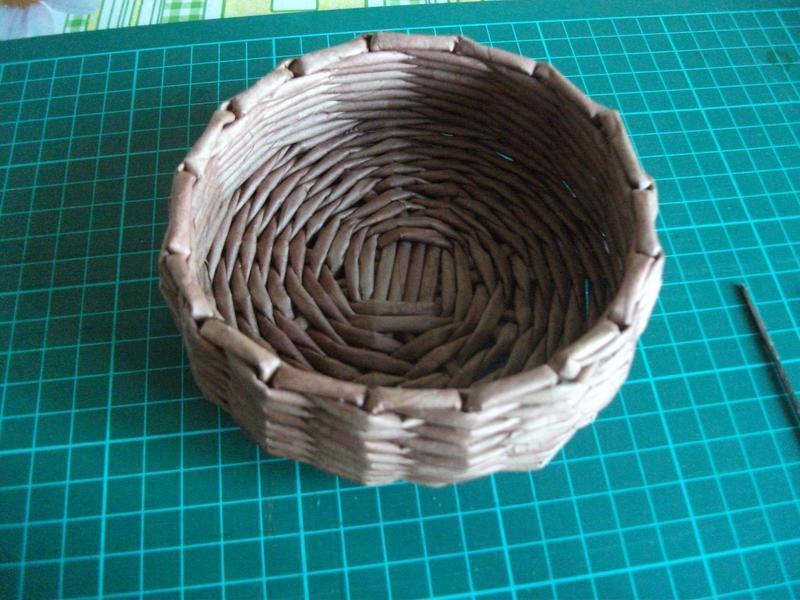
Such a box with sticking up racks should turn out here.
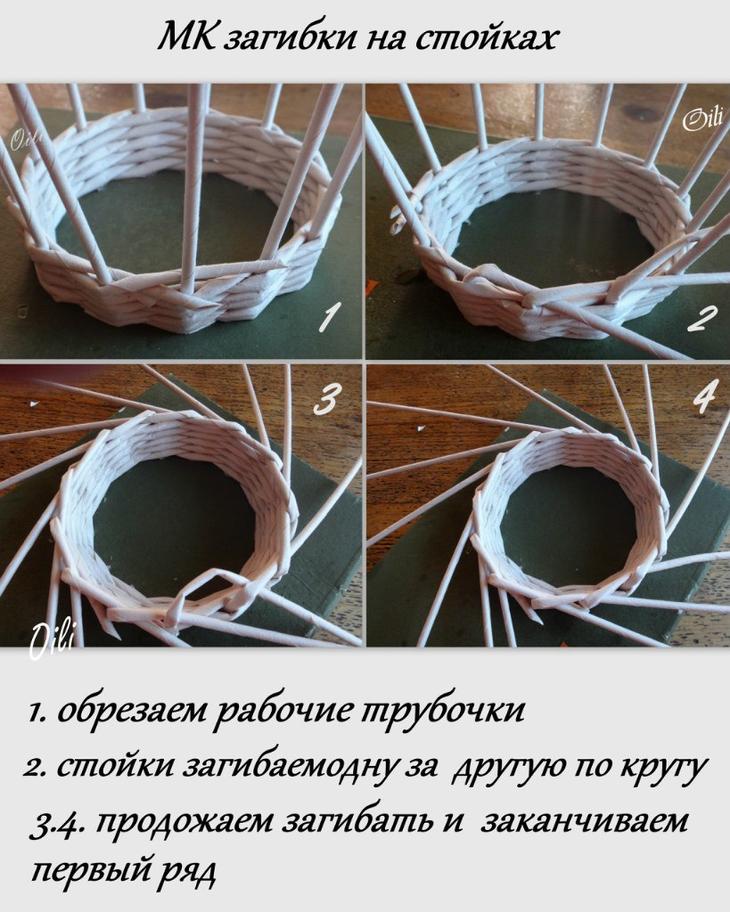
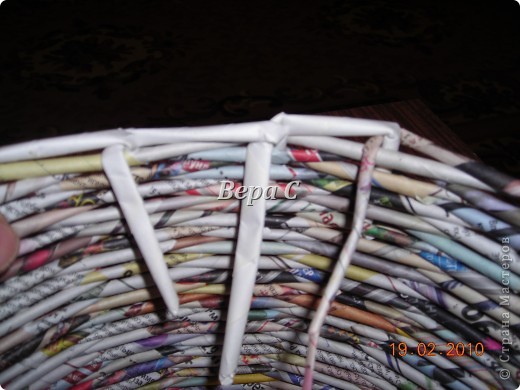
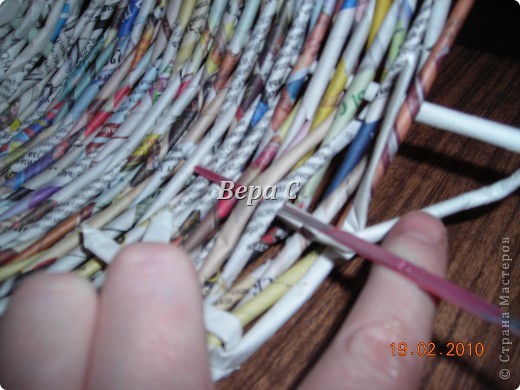
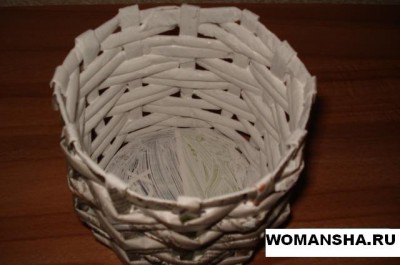
You can finish in different ways, someone just bends the Stoics inward, someone fixes with glue or weaves with a pigtail. Most of all I like this way: we take a rack, count two more from it and hide it behind a third, passing between the rack and weaving.
It is also convenient to do with tweezers. The top is beautiful, finished and does not require the use of glue.
Weaving newspaper tubes almost completely replaced the weaving of the vine in recent years. The fact is that getting this material is much easier than breaking willow branches or looking for a vine for weaving. In addition, you don’t have to spend money, because even if you don’t have a bunch of TV shows or advertisements in your house, you can always ask your relatives.
IMPORTANT: A thin long tube spins from a newspaper sheet, which is the main material. The tube is fastened with ordinary PVA or dry pencil glue. Moreover, it is not necessary to lubricate the entire sheet. This can only be done in the corner of the newspaper.
In the case when you should lengthen your newspaper tube, you simply insert the blanks one into one and put them on the glue, continuing to weave. So gluing the tubes can be almost to infinity, creating both small caskets and large vases with human height.
There are several weaving techniques., which depend on which product you create and which you want to make the pattern. In weaving, it is important to use patterns and patterns so that the pattern is beautiful and neat. In cases where the “sucker” doesn’t get threaded, you should use ordinary metal knitting needle or crochet.
At the end of weaving (for example, on the edge of the product) you should twist the twigs so that they bend inward. There you can put them on glue or wrap them so that the end is not visible. The finished product is usually covered with paint. To do this, it is advisable to use acrylic or spray paint, it is resistant to moisture. After drying, it is advisable to open the product with one or two layers of varnish.
Weaving technique, schemes:
Types and techniques of weaving
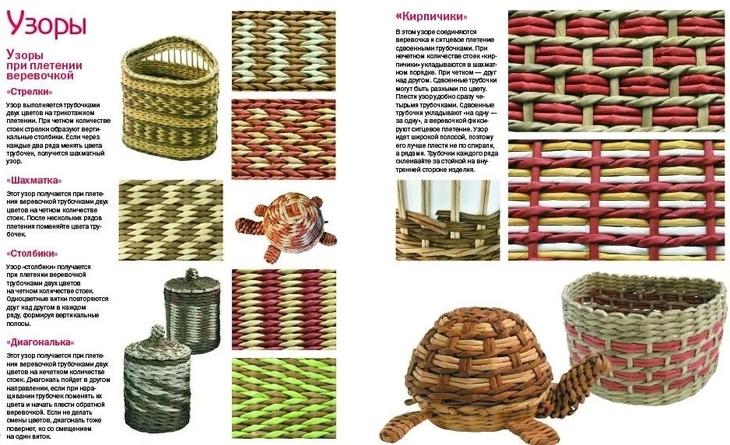
Patterns and weaving techniques from newspaper tubes
Video: “Seven types of weaving”
How to make newspaper tubes for weaving?
Any weaving begins with the preparation of the material, which means that many newspaper tubes should be prepared in advance. To twist a beautiful and even tube, you should use a long wooden skewer (for barbecue) or a thin metal knitting needle.
It is this subject that you lay the foundation of the newspaper sheet and twist the tube. Due to several layers of paper, it will be thick enough and suitable for creating wicker products. Thoroughly glue the corner of the newspaper with glue so that it can firmly adhere and the tube is strong.
Video: “Twisting newspaper tubes: nuances and secrets”
Where to start weaving a basket of newspapers?
After you have prepared a sufficient number of tubes, you should take care to choose the shape of the product: square, round, rectangular, heart, and so on.
You should decide what the bottom of the product will be. There are two options:
- Cardboard bottom
- The bottom connected from the tubes
The cardboard bottom is suitable for small items (caskets and boxes). Large ones (trays, boxes, boxes) should be woven independently. Any weaving should be done in strict accordance with the scheme. To weave was neat, you should fasten the ends of the tubes with clothespins, pinching them to the form.
Cardboard box

Weaving a bottom for articles from newspaper tubes
Step-by-step weaving of articles from newspaper tubes
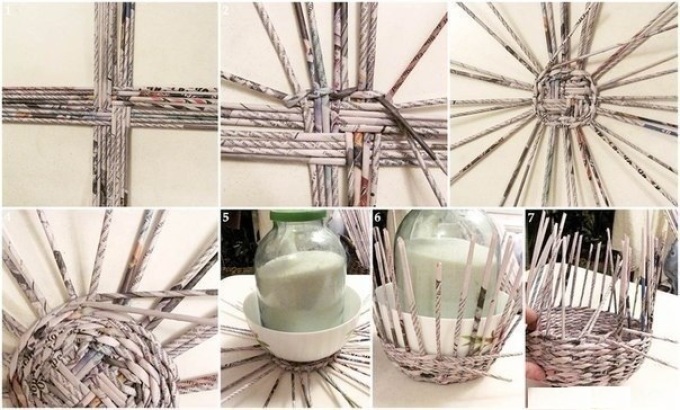
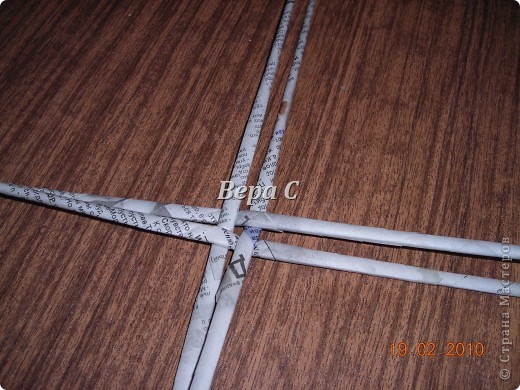
Description of weaving the bottom:
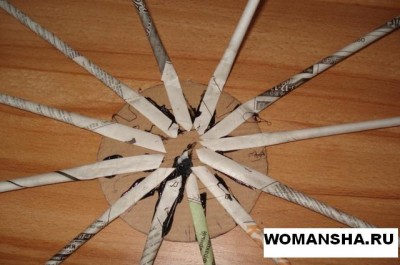
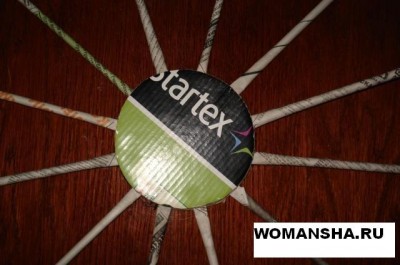
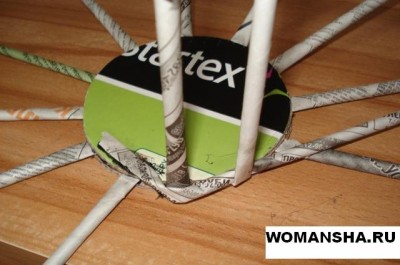
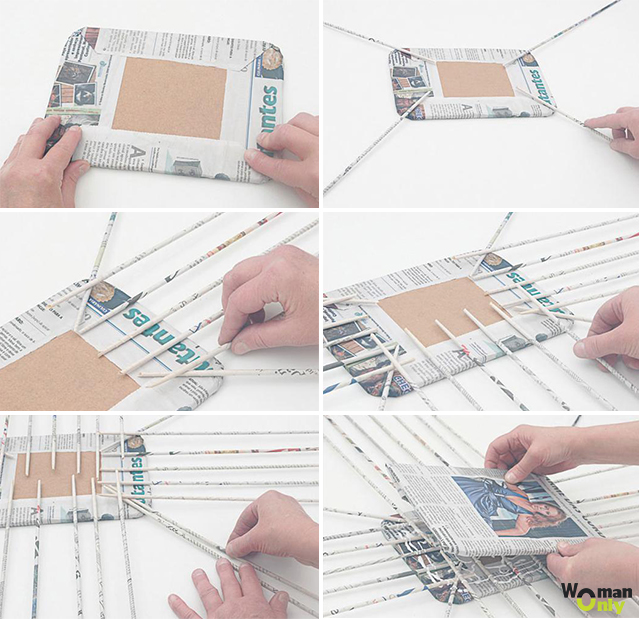
- Cross 8 tubes together (photo 1)
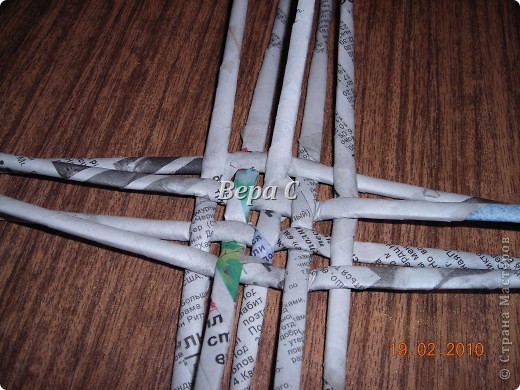
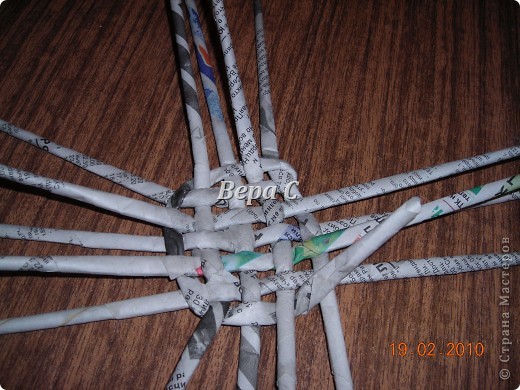
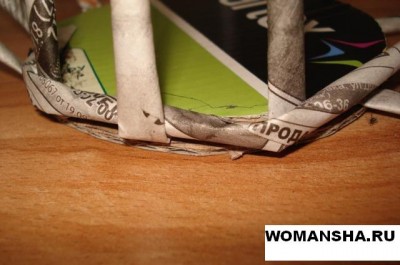
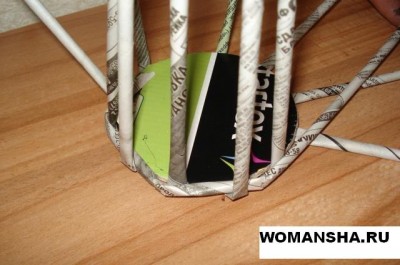
- Start weaving in a circle, bending each tube clockwise (photo 2 and 3).
- The weave should last until you reach the required diameter of the bottom.
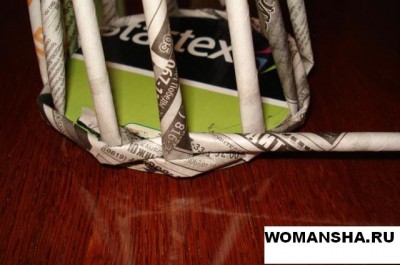
- Lengthen the tubes by inserting a new one each time (photo 4)
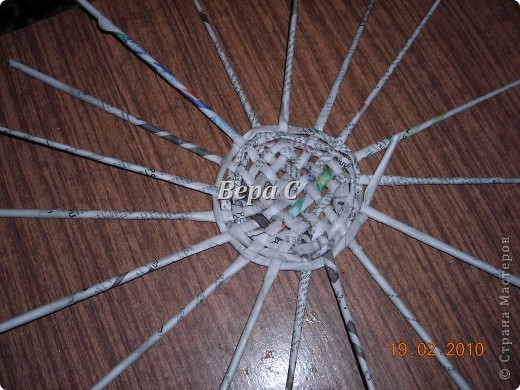
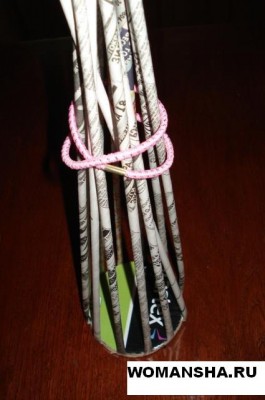
- Prepare a tying form
- Lift the tubules and fix them with clothespins to the edge of the mold (photo 5 and 6).
- Extend the tubules and continue weaving in a circle
Video: “Newspaper candy cane: master class”
How and how to paint newspaper tubes for weaving baskets?
It is better to color newspaper tubes after the product is fully completed. If you color them in advance, you risk violating their good flexibility by making them not malleable, which will completely ruin the weaving.
Open the finished product with acrylic or machine paints. Such paints are moisture resistant and do not leak upon contact with water. Paint can be applied in any way: with a brush, sponge, spray gun, spray gun, airbrush. Acrylic paints mix perfectly and you can always choose the right shade and color from them.
IMPORTANT: After the paint has dried, the product should be opened with a layer (or two layers) of varnish. This will allow the product to gain glossy gloss and become much stronger.
Photos of finished products:
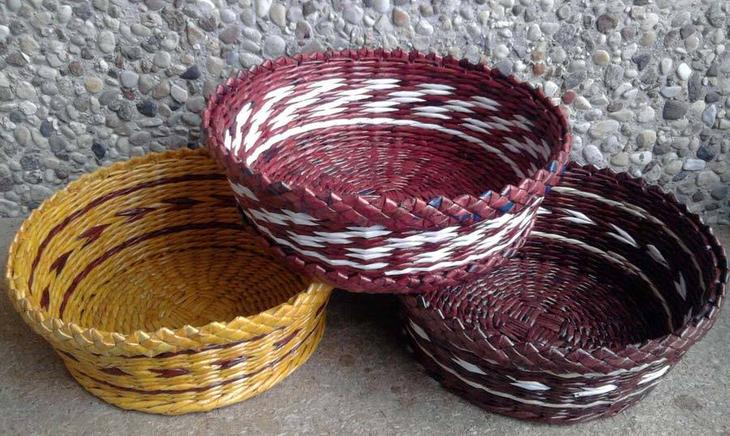
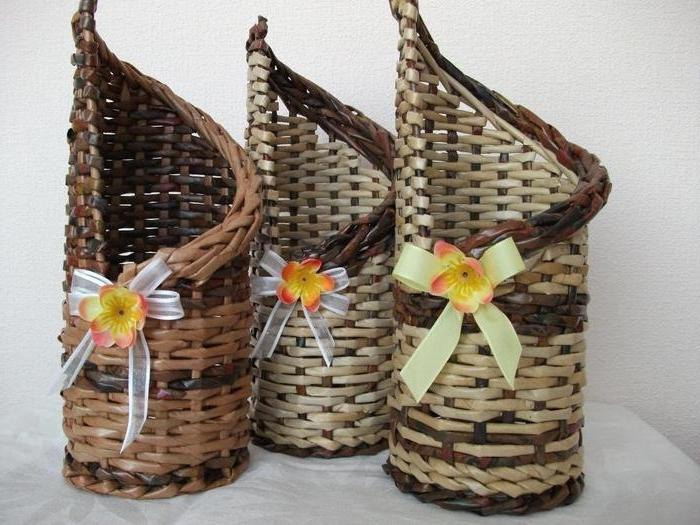
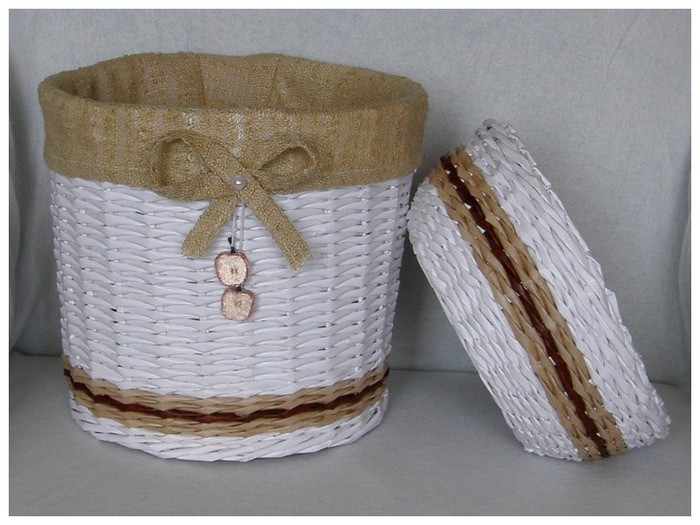
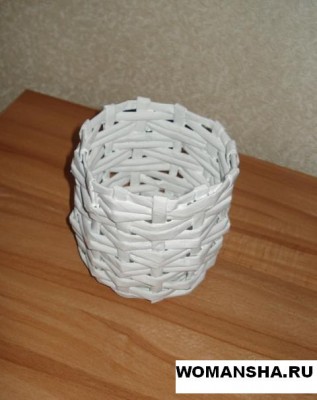
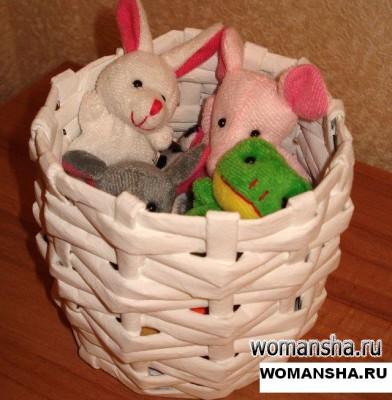
Bright storage baskets
Products painted in the natural color of the vine
![]()
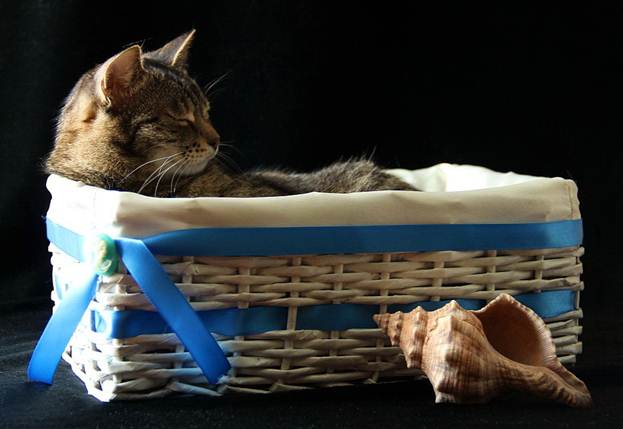
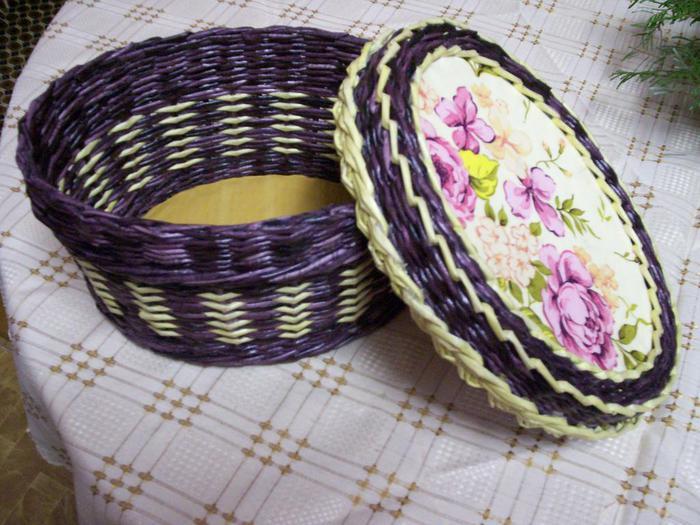
Product painted with paint and decorated with ribbon
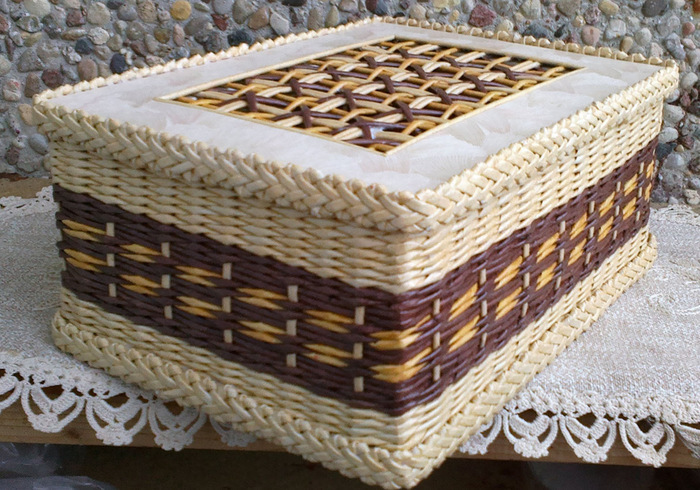
Multi-colored storage box
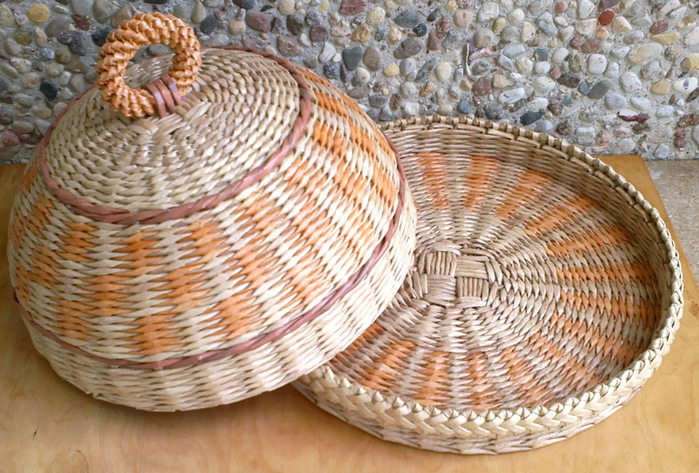
Bright newspaper box breadbox
A simple bending of the edge when weaving from newspapers: scheme, photo
Simple bending is an easy way to weave newspaper tubes. Such weaving will be mastered by any beginner in this business. Weaving is based on the bending of twigs, interwoven with each other in one direction (see diagram).
Simple bend: scheme
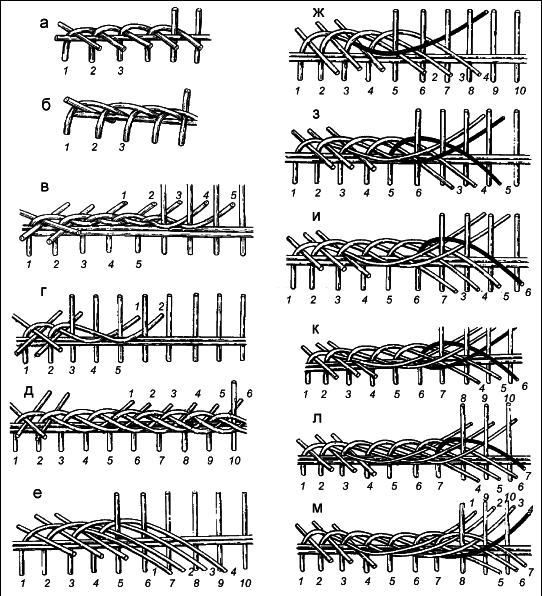
Step weaving: simple bending
Video: “The simplest bends”
Weaving newspaper tubes - bending the rod: diagram, photo
Weave the bend of the "rod" should be on the vertical columns of newspaper tubes. The bending is done according to the principle of weaving baskets from vines.
Bend weaving technology
Newspaper weaving: volume bending
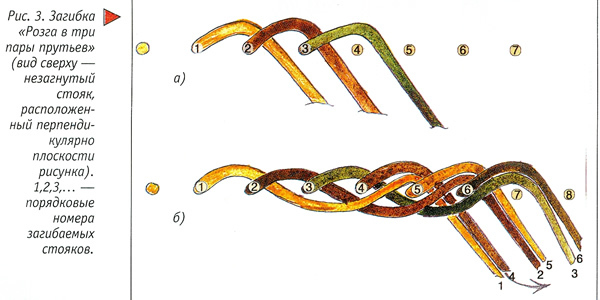
Weaving “volumetric bending” is necessary for the beautiful completion of the weaving of the product to make it a curly and volumetric edge in the form of a braid. Such weaving is suitable for knitting vases, flower pots, boxes and boxes. To make such weaving on the strength of each needlewoman, using step-by-step work in photos and diagrams.
Two-tube rope embossed pattern
Christmas double-sided star
Christmas tree
Vase of paper modules
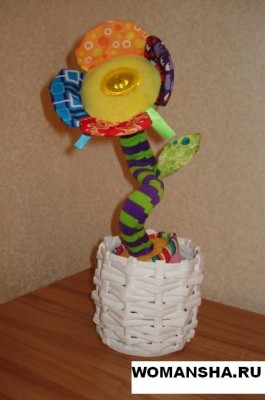
Flower arrangement of natural material
Wall panel “Cornflower field”
Note board
Wall organizer for the student
Summer bag "log"
Ideas for storage. To be continued. Pocket with a shelf.
Newspaper Sakura Flower
Storage ideas
Right angle in wickerwork
Easter wavy paper tray
Once again about the plasticity of the material
Pattern “Layered weaving with a rope”
Another sturdy handle. Part 18.
Mimosa bouquet for the spring holiday
A gift from the bottom of my heart for Valentine's Day. Stand for mobile phone. Part 5
Custom mobile phone stand. Part 4
Cell Phone Accessories. Pocket for charging. Part 3
Stand for mobile phone. Part 2.
Wicker stand for mobile phone. Part 1.
Weaving for the handle. Part 17.
Wicker handle - embroidered shirt. Part 16.
How to get white tubes?
Combination of weaving with modular origami
Handle for fruit bowl. Part 15.
Fruit maker
DIY flowers
Handle to the large wicker box
Weaving newspapers. From simple to complex
This is the second book from the newspaper weaving series. And if the first was called “Weaving from newspapers. Fundamentals of Mastery ”, then in the second book I want to help the reader delve deeper into the topic. Here, on each subsequent product, we master a new form and at the same time study a new pattern. In addition, we weave out different types of bottom, bends, and, if necessary, also handles.
If you are not already familiar with this type of needlework, for you at the end of the book is a description of the process of manufacturing the tubes and painting them.
I invite you to join this fascinating activity. Boredom and spleen will leave your home forever - creativity will live in it.
Weaving newspapers. Mastery Basics
The Phoenix Publishing House has published the 4th edition of my book Weaving From Newspapers. Fundamentals of Mastery.
This book is intended for people who are open to new knowledge, striving to develop and learn, for creative and enthusiastic natures. There have been many such people at all times.
Recently, in connection with the advent of the world wide web, the speed of dissemination of information allows us to learn new things in previously unprecedented volumes. Therefore, it became possible to learn new weaving techniques. It is weaving from paper tubes, this young kind of needlework, that is the subject of study in this book. I would be very glad if my experience will help you, dear reader, to master this fascinating type of needlework, distract from everyday problems, and bring to life the joy of creativity.
Sincerely, the author of the book "Weaving from newspapers. Fundamentals of craftsmanship" Elena Tishchenko.
Wicker frame for floral motif
We weave a basket of newspaper tubes with a diamond-shaped mesh pattern with Natalia Sorokina.
Fashion bags 2015
How to weave the crow's feet pattern
Kupala wreath
Cache-pot made of newspaper tubes. We play with forms.
Wicker square bottom made of newspaper tubes. Part 4
Lampshades and openwork
Twisted handle of two strands. Part 13.
How to weave an Easter Egg souvenir
What is patina and patination?
Italian bend. Part 15.
The lazy pigtail bend
Gift for mom - daisies for the holiday
At the junction of weaving and pottery
Wave Pattern
Little secrets of a great master or We make forms for wickerwork
28.12.2014
How to braid a vessel
New Year's star: panel, Christmas-tree decoration, tag, candlestick. Or "In the year of the goat we conquer the star"
Blank for bottom, cover, panel made on a plastic wrap
31.10.2014
How to weave a handle for a pram. Part 12.
3 0.10.2014
How to weave a pram
How to choose a hand sprayer
How to build up newspaper tubes
How to make paper tubes soft
Wicker frame with Mirahelka bend
Create a romantic atmosphere
Newspaper weaving. A combination of rope and chintz weaving.
Newspaper weaving. Pattern "Columns with a crochet."
Newspaper wicker clutch bag
Handle options for woven bags. Part 11.
Summer bag "Flower Glade"
How to calculate the size of the oval bottom
Wicker handle of eight tubes
The bend is volumetric. Part 12.
Reflections on a difficult bend
How and with what I paint newspaper tubes. Three years of experience.
The handle with the "embroidered" ornament. Part 9.
This handle is good both in plain and in two-color weaving, its main advantages are strength and decorativeness. You can see a master class on weaving handles for baskets
For those who have not tried the “Zigzag” pattern based on chintz weaving, we are addressing this master class.
We offer you to watch the master class of Elena Tishchenko for beginners of step-by-step weaving from newspaper tubes of office organizers.
Introducing a new pattern from Natalya Sergeevna Sorokina, our craftswoman, who was called "rope with volume."
The eighth of the workshops on weaving pens. Chinese zigzag braid.
We continue to study the topic of handles for wicker baskets. This is part 7 of the cycle we started on the topic of various types of pens.
In continuation of a series of workshops on weaving of bends, we present another lesson in which we will focus on weaving the bend of the “pigtail”.
We present the next replenishment in a series of Elena Tishchenko's master classes. This time added 3 and 4 part of the video on Christmas tree decorations. Enjoy your viewing and success!
We add 2 part of the video of the DIY Christmas tree workshop master class
Added 5 and 6 part of the workshop "How to weave a bag."
Added 4 part of the master class
Added 3 part of the workshop "Woven bags. Ways of fastening handles"
Today, a millionth visitor visited the site.
Another change in site design.
They took off a master class "Pattern" Crosses ". You can see
Origami. A master class entitled “Flowers from Paper. Part IV. Topiary” was specially prepared for the holiday of March 8.
Twill weaving from newspapers. This type of weaving is very interesting and can be used when weaving from newspapers. This workshop shows the twill weaving of the lid for the casket.
The beginning of the translation of the video of the master classes into English has begun. The first video is on our second channel You Tube "WEAVING FROM NEWSPAPERS - 2".
The new master class of Elena Tishchenko "How to weave pens. Part 5".
Layered weaving from newspapers. Part 2.
The full version of the article and video can be viewed in the "Master Class" section.
Layered weaving from newspapers. Part 1.
Layered weaving comes from weaving. It gives the product not only strength, but also decorativeness. It is in newspaper weaving that the ability to weave with tubes of different colors gives so many options for layered weaving that it is simply impossible to list everything.
We present another version of the video workshop for the manufacture of handles for woven products. They are lightweight, comfortable, practical and quite aesthetic.
Origami. Paper flowers
Making flowers from paper is a fairly vast area of \u200b\u200bneedlework. I would like to supplement this topic with a section on decorating wickerwork.
Flowers from napkins, flowers from corrugated paper can be used to decorate the covers and walls of caskets. An interesting wicker gift basket filled with bright or delicate paper roses. The rose is rightly called the queen of flowers. These flowers are very beautiful, have a diverse, unique, sophisticated aroma. Crafts of paper roses occupy a special place in needlework. We offer paper flowers. This is the third and, hopefully, not the last video from this series.
We are posting another video master class by Elena Tishchenko, in which she will tell and show two ways to make decorative roses from napkins.
We continue a series of decoupage master classes. This time we will talk about decoupage directly on the braids themselves.
At the request of visitors to our site, a video master-class of Elena Tishchenko was shot and it is dedicated to decoupage on braids. The master will share his experience in decorating newspaper tube products using decoupage.
Sorochinskaya fair
We offer you to plunge into the world of the fair and enjoy the spirit of creativity, art and trade. I would like to recall that the Great Sorochintsy from the 19th century are famous as the venue for the largest and most colorful in Ukraine fair of masters. She gained special fame thanks to the publication of the immortal story of Nikolai Vasilyevich Gogol "Sorochinskaya fair"who was born in Sorochintsy.
Another video master class by Elena Tishchenko has been added. This time we will focus on decorating wicker newspaper articles with the "Catfish" pattern. You can see two options for weaving this beautiful and original pattern, the history of which originates from the technique of weaving straws. You can see
The work on the new video by Elena Tishchenko’s master class on round bottom weaving has been completed. This is the third option. You can see
A new video master class from Elena Tishchenko on weaving from the newspapers of the Kosichka pattern has been added. You can download or
Today they made an update to the site design. Pages began to load noticeably faster. We continue to saturate the site with useful and functional options.
We suggest watching a video master class from Elena Tishchenko on weaving decorative borders for decorating newspaper products. Today we will talk about weaving decorative borders "rope" of several tubes.
Our site has the opportunity to create your own galleries and add your work to them. There is also a common gallery where all registered users can add their work.
Video master class from Elena Tishchenko on weaving the "Gretham" bend from newspaper tubes. Part 8.
The work on the eighth part of the video of a master class from Elena Tishchenko on weaving a bend from newspaper tubes is completed. This is a continuation of the cycle of workshops on weaving the top of newspaper tubes. This type of bending is suitable for weaving baskets, flowerpots, vases and other products from newspapers.
The next video Elena Tishchenko’s master class on weaving round-bottom newspapers was released. This is a continuation of the MK series on weaving various forms of the bottom.
Continuing a series of video workshops from Elena Tishchenko on various types of weaving, we shot MK on chintz weaving.
View the full version in the section "VIDEO MASTER CLASS"
Video master class from Elena Tishchenko on weaving bends from newspaper tubes. Part 7.
The slave over the seventh part of the video of the master class from Elena Tishchenko on weaving the bends from newspaper tubes is completed. This is a continuation of the cycle of workshops on weaving the top of products from newspaper tubes. This type of bending is suitable for weaving baskets, flowerpots, vases and other products from newspapers.
The work on the second part of the video of the master class from Elena Tishchenko on spiral weaving from newspapers is finished. You can see the full version of the second part in the section of the site "Video master class. Types of patterns"
Add a video master class from Elena Tishchenko on various types of weaving (patterns) from newspapers. You can see in the section VIDEO MASTER CLASS The first part is devoted to weaving with a rope. This is the most common type of weaving. Here, the forward and reverse rope are presented, as well as two variants of color patterns formed when weaving tubes of different colors.
The sixth part of the video of Elena Tishchenko’s master class on weaving newspapers from the bend was published. This is a continuation of a series of workshops on the topic of bending. Enjoy watching.
The fifth part of the video of Elena Tishchenko’s master class on weaving newspapers from the bend was published. This is a continuation of a series of workshops on the topic of bending. Such lessons turned out to be in demand, so it is planned to shoot several more options. Enjoy watching.
Updated photo gallery. Added 126 new works.
Systematization of the photo catalog was carried out. Now there are new directories: "Panel" and "Shoe".
02/19/2012 Going to meet the wishes of the participants of our forum, we shot several options for braiding the top of products (bending) from newspaper tubes. Three-part video workshop is available
Origami. The third part of the video of the master class from Elena Tishchenko on weaving from shoe newspapers has been added. In this video tutorial you will see another option for weaving a shoe newspaper. The master will share with you his experience, details and details of the manufacture of such a product. You can discuss this video master class, ask questions of interest on our forum. Enjoy your viewing and creative success in needlework.
Origami. So the second part of the video of the master class on weaving shoes from newspapers is finished. They planned to make only two parts, but there was more material, so we are preparing the third part. I think we will finish it soon and put it out for general discussion. As always, we will be glad to hear your feedback and suggestions. We invite you to discuss this video master-class on weaving from shoe newspapers on our forum in the "Master-class" section.
Origami. We are presenting to your court the first part of a video workshop on weaving newspaper shoes. The second part has already been shot and work is underway to edit the material. We plan to finish before the end of the week. As always, we look forward to your feedback and comments. Comments and suggestions are also accepted. We invite you to discuss this video master class on weaving shoes from newspapers on our forum in the "Master class" section.
Origami. Video editing of the previously filmed video of a master class on weaving newspapers frames is completed. Add the second part of a series of workshops on weaving frames from newspapers. If you have interesting ideas or options for weaving frames, we will be glad to see them on our forum. Enjoy your viewing and creative success. "Weaving newspaper frames. Part II."
Origami. Add the promised video master class on weaving newspapers frames. In the first part you will see a detailed step-by-step process of weaving newspaper frames for photographs, decoupage pictures and for other purposes. We look forward to your feedback and suggestions. Enjoy watching. "Weaving newspapers frames. Part I."
On the site site in the section "Master Class" we add the third part of a detailed video of the master class from Elena Tishchenko on weaving pens from newspapers. Enjoy your viewing and creative ideas. We are waiting for your comments.
Today the site has a record of visits - 1000 visitors in one day !!!
Added a video workshop on painting newspaper tubes. In this video master class, the author will talk in detail about the technology of painting newspaper tubes for weaving newspapers. Your attention is presented to several options and methods of painting, designed to simplify and speed up this process. Detailed descriptions of the devices are given, which are not at all difficult to make at home, but with the help of which the preparation of the "newspaper vine" for weaving can be greatly facilitated. You can watch and discuss the video master class from Elena on our forum.
The next video master class from Elena on painting articles from newspaper tubes was released. In this lesson, the master will tell and show the basic techniques and features of painting products from newspaper tubes. You can watch and discuss the video master class from Elena on our forum.
The site http: // site added works of the author Elena Tishchenko in the photo album:
The next video master-class from Elena on weaving pens from newspaper tubes was released. This lesson is a continuation of the previous workshops. In it you will see a detailed process of manufacturing simple, and at the same time functional handles for braids.
You can watch and discuss the video master class from Elena on our forum.
A video master class from Elena on weaving the basics of a vase from newspaper tubes has been added to our website. You can see
On our website a video master-class of Elena on weaving two variants of round bottoms from newspaper tubes was added. You can see.
Added video master class for Elena making newspaper tubes. You can see.
Today the site design has been partially changed, the page sizes are optimized for different monitor sizes. Testing and modification work is ongoing.
Today our site was launched !!! 9 categories have been created, in which the main page of the site about weaving from newspapers, the history of introducing needlewomen to the world, a brief overview of the types of weaving, the beginning of the master classes, in the 3D gallery you can see photos of copyright works. To be continued...
ABC WEAVING
DO YOU STILL KNOW PAPER WEAVING TECHNIQUE?And CAN, AND HEAR FOR ALL THE FIRST TIME?
YOU HAVE BEEN AT THE ADDRESS!
Stay on this page and you won’t regret the time spent
Having studied this small, compiled from various sources master Class You will EASY and FAST master the technique paper weaving and you can safely move to a new, more complex and exciting level, weaving truly professional stuff.
Paper Vine Preparation
First you need to prepare the material. It may be pure paper, but practice shows that it is rather difficult to weave from it because of its density. Of course, if there is newsprint paper that is used in printing houses, this will be an ideal option, since the absence of printed text on it greatly facilitates the painting of the product. But more on that later. So, prepare newspapers in large quantities. Using a sharp knife, cut strips no more than 10 centimeters wide. For starters, you can practice on shorter strips and only after gaining some experience go to long ones. At the same time, making a product from long strips is much easier than from short ones.
Put a strip of paper in front of you. To it at an acute angle we apply a knitting needle. Next, we tuck the corner of the newspaper under the knitting needle and start twisting the sheet as tightly as possible.
Do not be alarmed if one end is slightly thicker than the other. This is normal, although there should not be much difference. In order for our tube not to unravel, use glue and fix the corner of the sheet. Thus, you need to cook at least 50 tubes. The quantity depends on the size and complexity of the product.
Further actions depend on how you are going to paint the finished product. You can paint the sticks even before weaving. But there are some nuances. Incorrectly selected varnish will make them stiff and brittle, as a result of which the vase or casket will become rough. It is recommended to use acrylic varnish for artwork.
A basket of tubes, on which the text is clearly visible, also looks beautiful. You can paint the product even after manufacturing, especially if it is not particularly complex in shape.
Making the bottom
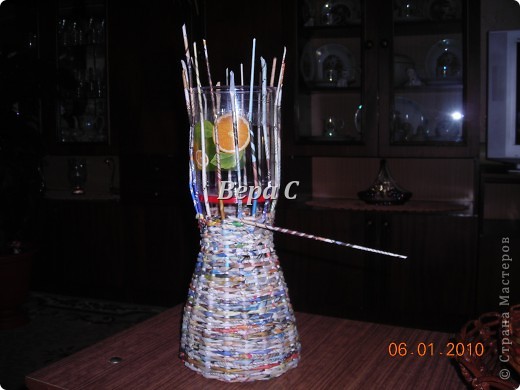
The base of the product can be absolutely anything. To begin, try to make a vase with a solid bottom. To do this, it is enough to choose a dense material, for example, cardboard, and cut two circles out of it. Why two? And in order to hide in the bottom of the ends of the tubes, which will be resistant. Next, we put one circle and use a pencil to make marks where the racks will be fixed. If this is a future vase, then you can make racks at a wide distance from each other. Some types of weaving, for example, oblique allows you to weave on 5-6 racks. Glue the ends of the sticks and immediately apply the second circle. A solid square bottom is likewise made. But still, the wicker bottom looks particularly attractive. It is with him that the weaving of a basket or casket most often begins. In this case, you need to cross several tubes, for example 5-7. Next, we take one tube and begin to braid from the center in a circle, alternating the position of the main sticks above and below the worker. As needed, we increase the tube. How to do this will be described in the next section. Thus, we create a circle of the desired diameter. In order to understand how to weave a round bottom in other techniques, it is enough to watch the video lesson once.
Rarely, but still sometimes a square bottom is woven. This is a rather complicated process and you need to master it only after you make a couple of products in a lighter technique.
Duct extension and weaving
Some crafts, such as a vase, can be quite high, which requires frequent building up of paper vines. To facilitate this process and to ensure that the finished product has the most attractive appearance, you should learn how to properly connect the tubes. As already mentioned, the procurement of paper vines has different ends in thickness. This is what allows them to seamlessly connect them. Take a stick with a thin end and a second with a thick one. Now we just insert one with another with gentle movements and scroll a little. To fix the joint, you can lubricate the thin end with glue. Often there is a recommendation to trim the thick end before connecting the vine. But at the same time, you will get a sharper transition, since the wall thickness of the stick will be much larger than if it is not cut. That is, in our case, the transition will be smoother, and after painting it will become completely invisible.
Next, we try to weave with the simplest weaving, that is, with one strip. To do this, take our bottom and fix a stick near one of the racks. Before that, you need to choose the shape that you will braid. It can be a jar, a bottle or a box, in case a basket is woven. We lift each end of the racks up and, if possible, fix it with a clothespin. Next, with a free vine, we begin to braid our racks. As an option, the basket is also braided using two sticks. In the future, you will be able to experiment and alternate weaving with one or two tubes.
More difficult to weave a rope. In this case, two tubes are used. They are located on opposite sides of the rack and at the same time intertwined with each other on the gap between the racks. But in the photo this weaving looks especially interesting, and the basket made using this technique turns out to be strong and keeps its shape perfectly.
Almost all types of weaving are solid, that is, each previous row goes into the next.
Some products have a cover. It weaves in the same way, only with a lower height.
After the product is ready, it must be painted and, if desired, apply a pattern. It can be a painting, tapes or decoupage. There is a detailed manual for each technique that will allow you to master it. Next, the product is varnished.
What can be done from a paper vine
At first glance, it seems that a limited number of products can be made from newspaper tubes. But as soon as you master this technique, and during work you no longer need instructions, you can create your own weaving methods and, accordingly, new crafts. We can only give advice on how to weave this or that product. In order to create a basket, it is enough to weave the form with classic weaving. Further, a pair of tubes is woven from both sides, on the basis of which a handle is woven. For practice, you can weave a laundry basket or a chest for sewing accessories.
The first is larger, but the second one can make internal partitions. Especially often weaves a vase from newspaper tubes. To create a unique image, you can make a lace edge. To do this, you can simply weave a pigtail or master a more complex way of weaving lace, but for this you need a scheme.
For the decor of the room, a cache-pot of tubules is used, as well as all kinds of cup holders, coasters for pots and hot dishes. But that is not all. The paper bell, prams, hearts and balls, photo frames and even animals and birds look great. ![]()
Having looked at once an example of products from newspaper tubes, you simply can’t get past this technique and be sure to master it by creating many useful and beautiful things. Sergey Batov
Newspaper weaving masterclass
For a long time already weaving from the newspaper, put up for review. And when asked how to do this, we send to other sites via links. So, at the next weaving of the pot for flowers, I decided that we should have our own workshop on weaving baskets.

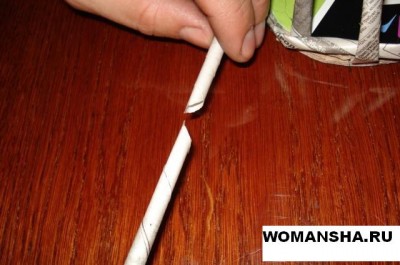
They wound the sticks, then I connect them in two pieces, so that they are immediately longer.
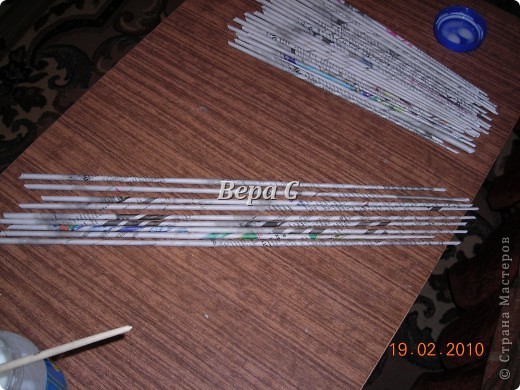
I roll it out with a rolling pin to make it easier to palm off on each other.
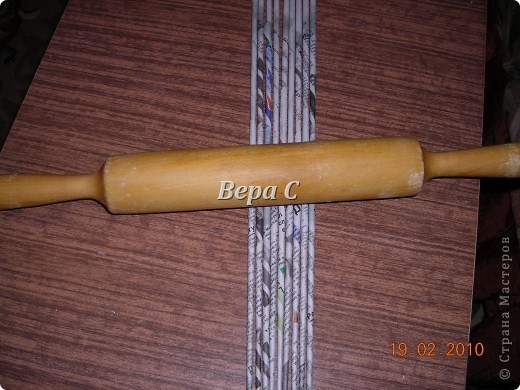
There should be an odd number of sticks.
I start to braid with that stick, which are in a row more, we have 5 pcs.

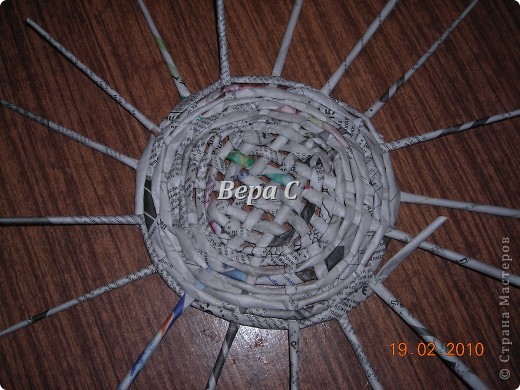
There you go, holding it with your hand and leveling it to make a circle.
Rays, too, gradually align, like the sun.
The size of the circle must strictly correspond to the bottom of the shape that we will braid. Otherwise, there will be a gap or an ugly transition.
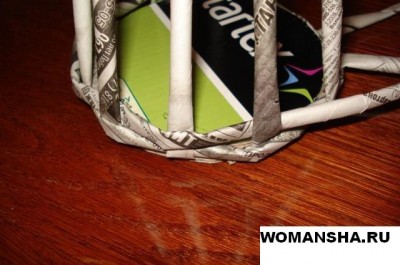
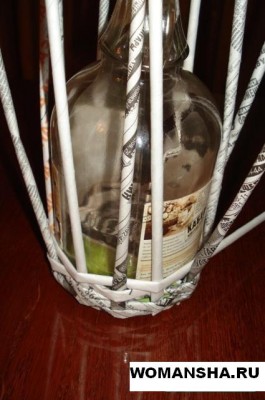
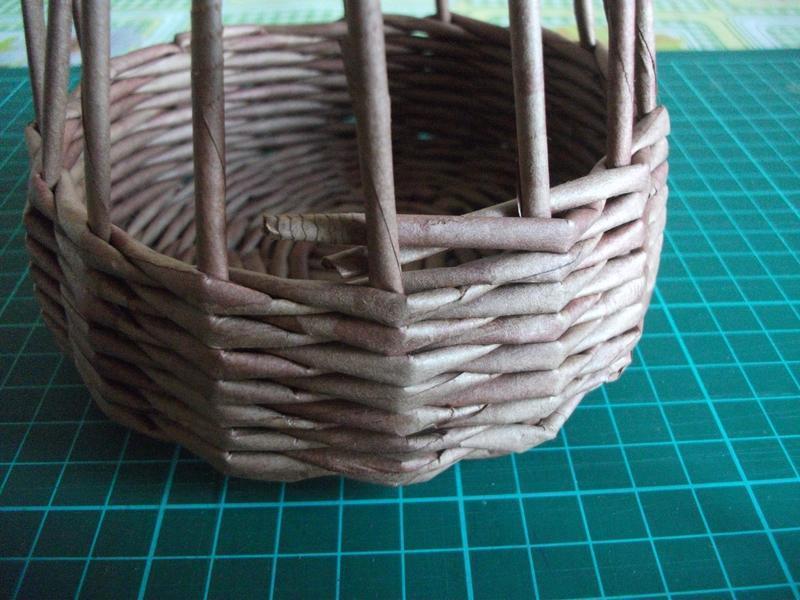
Then I insert the mold (I have a jar of washing powder) and raise the sticks up, and to prevent it from moving, put a load inside (I have a pot of earth). I fix the sticks with a rubber band (I used to make tape) to her. I align all of them through the same distance. Yes, before that I build up all the sticks with thicker and thicker sticks.
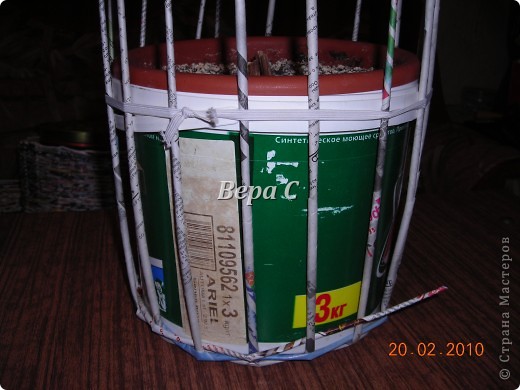
And braid. It is better to choose a shape that has a little protrusion at the top so that the sticks touch this protrusion and you can freely and quickly stick the sticks. (But this is for the first 5-7 rows) And then the gum can be removed.
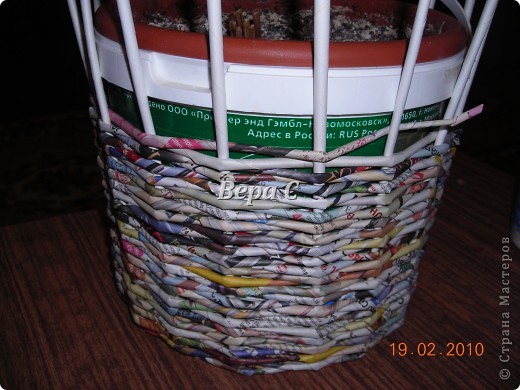
That's what happened
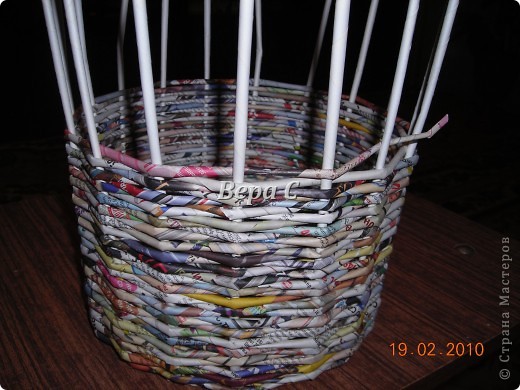
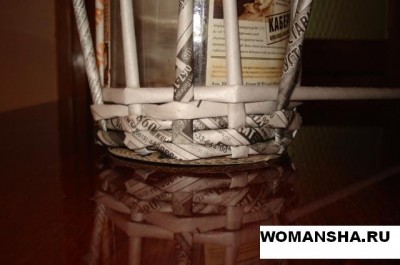
Close the edges. Alternately bend the sticks one after another inward.
Here it is visible.
Then, with a crochet or knitting needle, we retract several rows from the inside and insert a wand for them
Then we cut off the excess.
To get curly braids, you need to alternate the shapes that we braid and also fasten either with elastic or tape.
Well, then we paint at our discretion. Whoever you like.
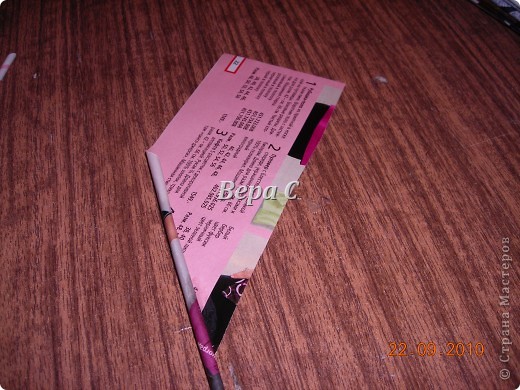
When I did MK, I thought, and maybe I’m doing it in vain, why “reinvent the wheel”, so I omitted such details as making tubes and their size. Now corrected. The size of the sheet I have is half the sheet of the magazine.
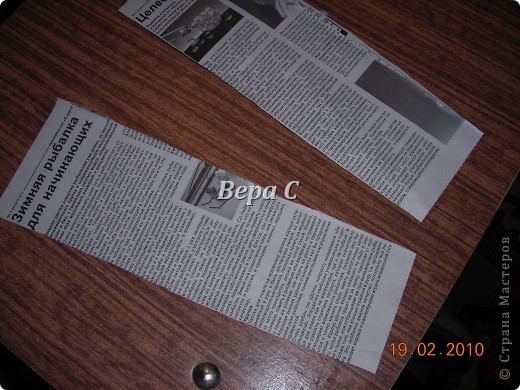
Here I can see. 27 cm by 9 cm. This leaflet from the Book World catalog has accumulated a lot of them. The sheets from the cover or the tabs that are thicker go the same size to the ducts, with which I extend the ducts of the sides, which are vertically tied with an elastic band. That's how it put it, it seems clear.
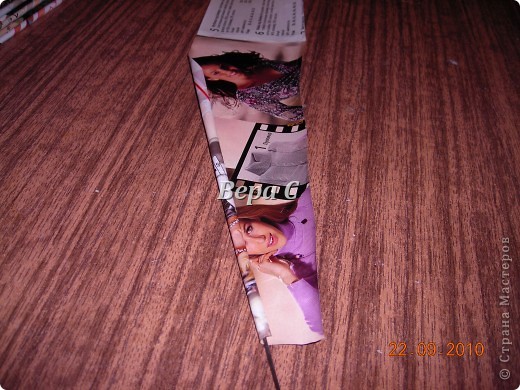
I twist here on such a needle, size 1.5 mm (on which socks are knitted)
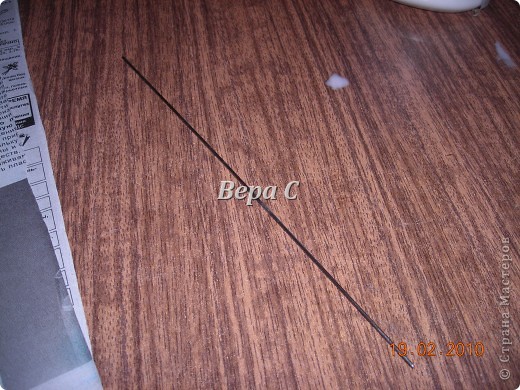
Torsion process.
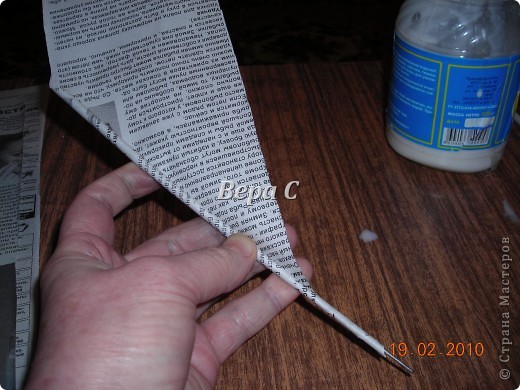
At the corner drop a glue of PVA and scroll between your fingers.
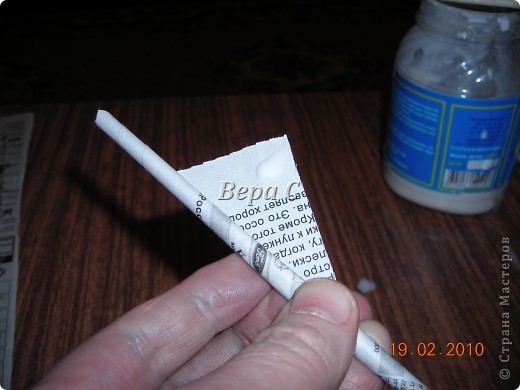
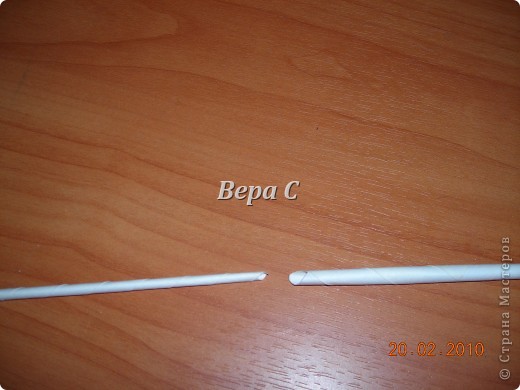
Here it is seen on the white tubes that the ends of the tubes should not be the same (one thinner, the other thicker) in order to connect them conveniently and quickly. I drip 1-2 drops of glue into the thick end (it is better to have glue in a bottle with a tip) and connect with a thin end (there is no need to regret, push 3 cm or more and therefore you can not wait when it sticks together, but continue to weave, the tube will not disconnect.
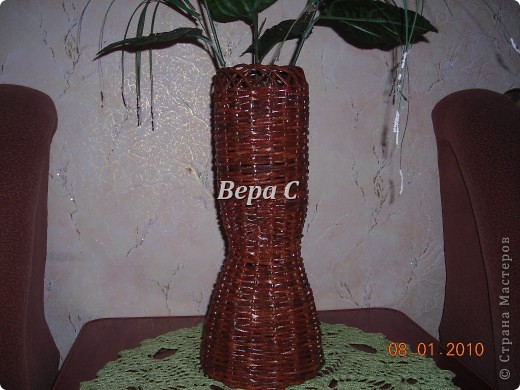
Here is the finished product, which was under number 18.
In the comments, many write that the tubes are either very hard and not bent, or soft and torn. Therefore, I decided to supplement the photo by twisting the sticks. This picture shows how to twist (at an angle of 45 degrees). Such a stick is both durable and flexible. And the ends are one narrow and the other wide.
This twist is also not correct. Low strength, breaks when stretched.
Now we have our own master class and we will not send newcomers to other sites. That seems to have added the missing details. I paint with acrylic varnish, immediately already colored in three layers. It doesn’t smell, it can be painted directly on the kitchen table (covered with a newspaper). I came across colors (oak, maple, walnut, pine (the lightest), you can mix them. Someone first paints with water-based paint or acrylic paint to make letters invisible, but then colorless varnish. And I like it so naturally. Well, it seems like I answered all the questions, weave it to health. And I’ll try to do the MK for weaving the frame. Yes, more. Edging of the edge is visible under No. 13-14. And if curly rim, then the sticks simply wind up, leaving a loop, through two vertical sticks under third down inward.
“Today we’ll talk about how to use the old newspaper. Indeed, many do not even know that very nice souvenirs in the form of vases and pots are obtained from the newspaper.
If this is the first time you hear about this, then I’ll tell you about weaving newspaper tubes for beginners step by step.
In order to create a beautiful vase from a newspaper vine, we need the following tools:
- a stack of old newspapers
- bottle or can
- pVA glue,
- brush
- knitting needle
- thick cardboard
- ruler
- acrylic paints (you can use one, for example, white),
- scissors,
- as well as a hot gun, but you can do without it.
In the course of work, we will apply the technique of simple weaving newspaper tubes - “rope” .
We take the line and with its help we divide the newspaper spreads into long strips, each of which should be about 10 centimeters wide.
Now we take a knitting needle (you can also use the wire).
We begin to wrap our strips around the knitting needle, while the knitting needle should lie slightly obliquely relative to the paper.
The remaining edge of the newspaper needs to be smeared with glue and fixed. We get a tube. About thirty pieces of such tubes need to be made — they will be the material for weaving our product.
After all the tubes are ready, we take a bottle or a jar of the right size (this is at your discretion) and put it on cardboard. Circle the bottom with a pencil and cut out two identical circles.
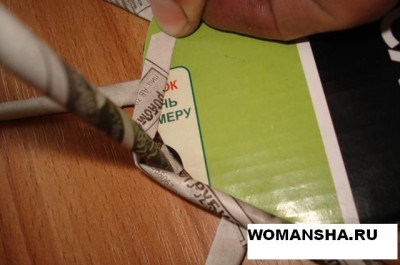
Now you need to prepare the tubes for the frame. To do this, one end of the tube needs to be flattened a little (from the edge by about 3 centimeters).
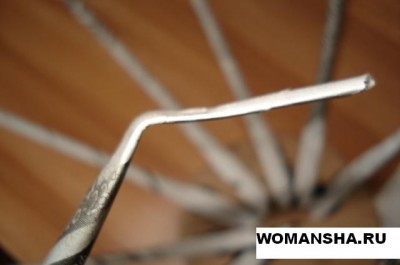
Now you need to apply glue to one of the cardboard circles and stick newspaper tubes to it with flattened edges. The newspaper vine must be distributed so that it is at the same distance from each other. To do this, you can make rough measurements in advance and mark them with a pencil on cardboard. Glue on cardboard can be applied using a hot gun. If there is none, then we smear the bottom with an ordinary PVA and at the same time use a press.
The glued newspaper vine needs to be lifted up and fixed with an elastic band. Now we have the basis for weaving ready.
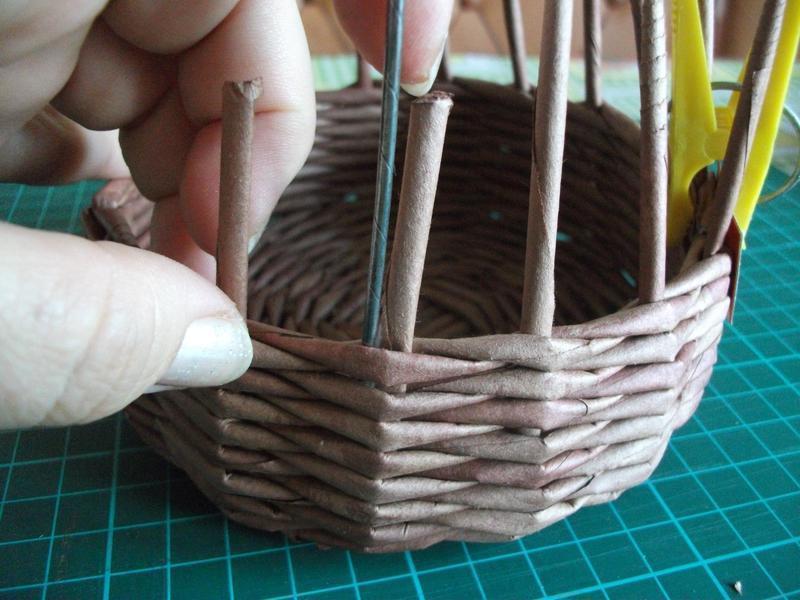
Now you need to take one newspaper tube, flatten its end, figure it first to the bottom, and then stick it.
We will start this tube for the nearby frame tube on the right side, it should grasp the frame tube outside.
Now we will alternate - grasp the frame tubules from the outside, then from the inside, and thus complete the first row.
If you have run out of wicker vines, you need to attach another harvested vine to it. This is done simply - in one newspaper vine (the one that ends) another is inserted (as if screwing it in).

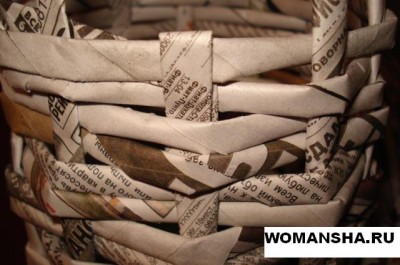
Attention, when we start weaving the second row, you need to insert a jar or a bottle (what you took as a basis) and continue weaving.

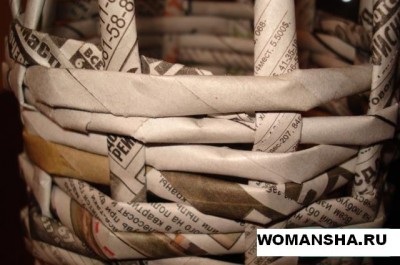
Therefore, we must weave all the rows. That is, weave until we get the required height.
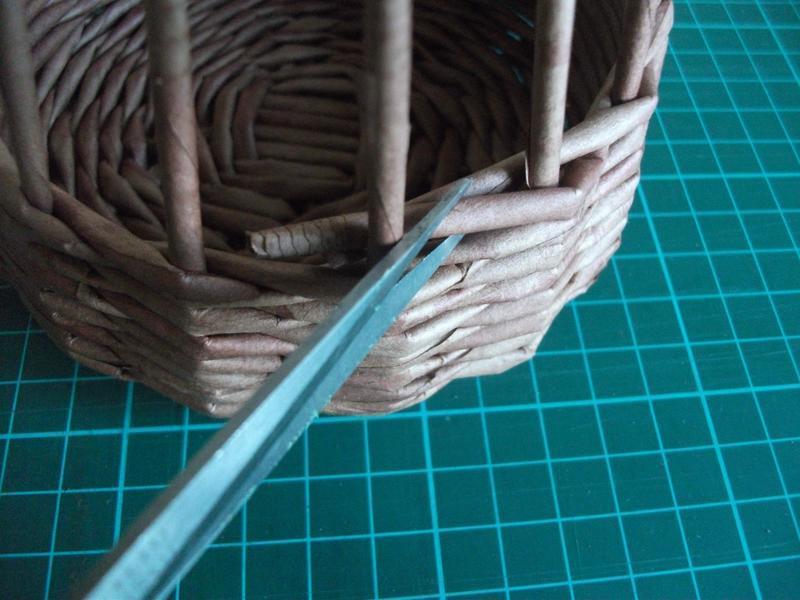
After the last row is gossip, you need to cut the edge of the newspaper tube obliquely and bring it inside the basket to the limit.
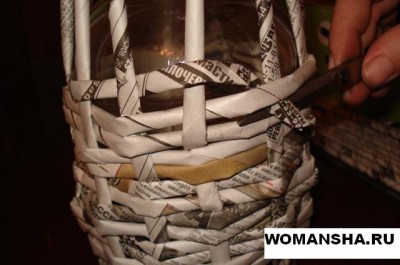
The edge of the newspaper tube must be fixed with glue.
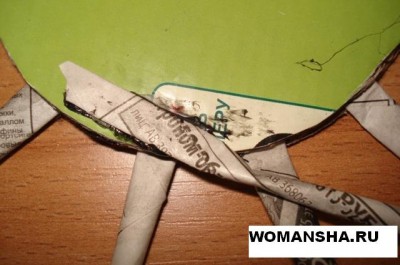
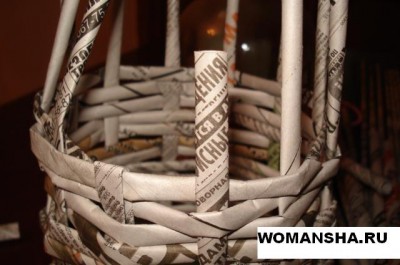
The first frame tube on the right side needs to be cut, but at the same time leave the tail (3-4 centimeters), spread with glue and put it inside the wicker.
The second tube, which is located on the frame, is also cut off, smeared with glue and seasoned inside.

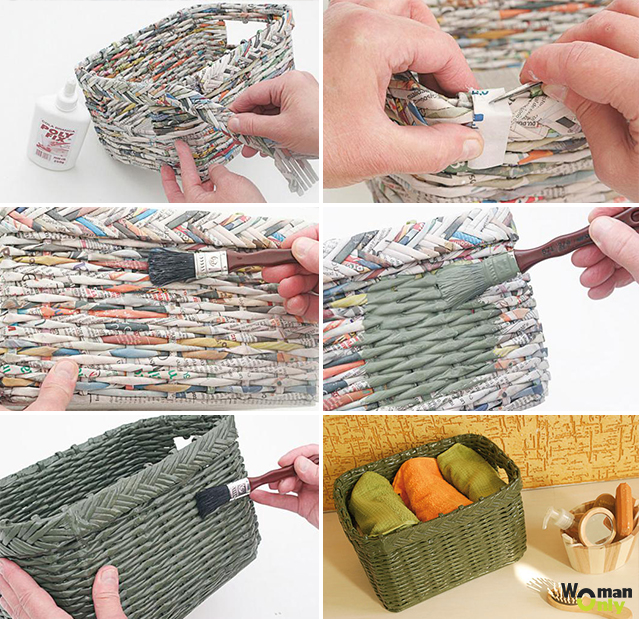
Next, we decorate the basket. To do this, use a brush to apply acrylic paint on the inside of the basket, then paint the outer part. We will wait until the paint dries a little, and paint the product a second time.
The bottom of the basket can be painted over three times, allowed to dry.
Decorative basket is ready!
Now you own the weaving of newspaper tubes for beginners and you can safely take up the manufacture of such decorative products. For example, you can weave a vase, a pot or a shape for a bottle, which will bring a little variety to your interior.
Weaving a basket of newspapers. Final master class.
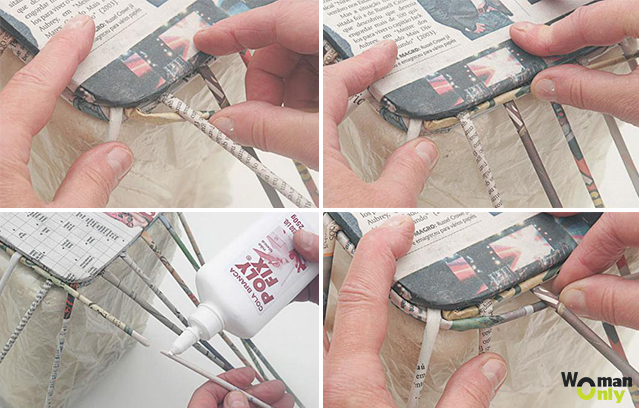
Author: Ekaterina Sukhanova When weaving a basket of the desired height, weave weaving in the place where we started (loop).
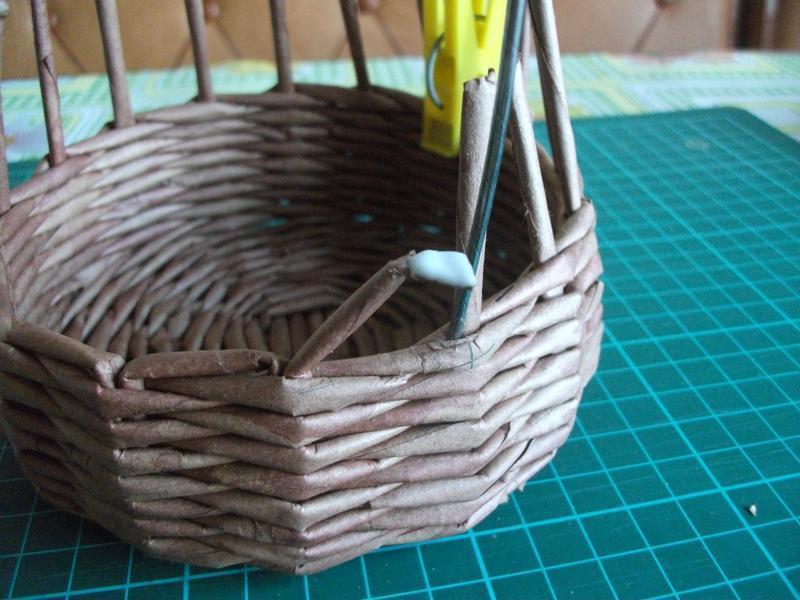
Work tubes cut obliquely lubricated with glue.
![]()
We fix with a clothespin for better fixation, between the tubes and the clothespin you can lay glazed cardboard so that there is no trace of the clothespin.
![]()
Finishing the edge, the easiest way.
We bend the vertical stand to the side of the next one, we make the second bend so that the distance between the bends is equal to the distance between adjacent stands.
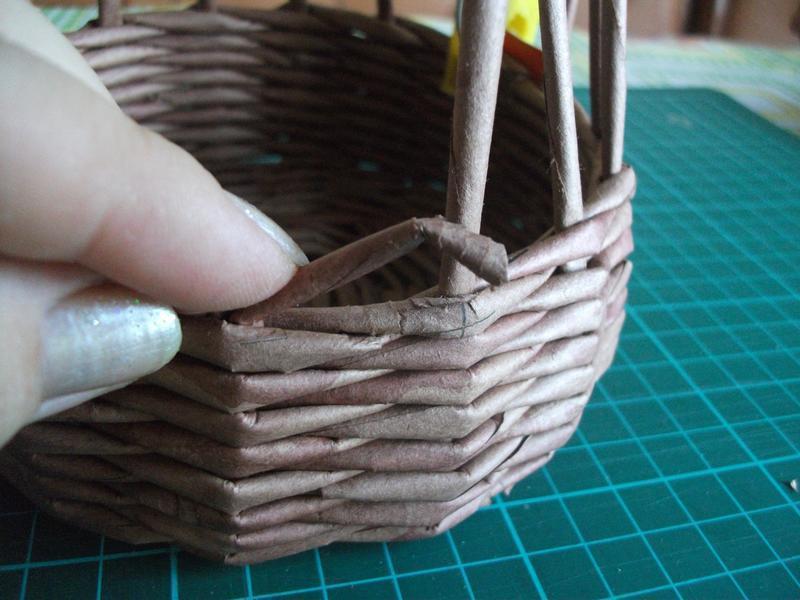
We cut the rest of the rack obliquely, grease the cut tip with glue and insert it with the help of a spoke next to the next rack. We continue to perform in a circle.
![]()
After complete drying, the product is covered with acrylic varnish.
Basics of weaving newspaper tubes: weaving everything!
WomanOnly has prepared a surprise for all lovers of wicker baskets and rattan chairs. From this article you will learn how to weave a variety of home decoration and even furniture from newspaper tubes.
It is difficult to imagine an interior in a summer cottage or ecological style without a wicker from a rod. But where is the vine, and where are we, residents of megacities? Fortunately for the townspeople, designer Peter Clark figured out how to weave from newspaper tubes all that weave from vines and straw.
Weaving newspaper tubes for beginners is easy.You will not need either expensive materials or special tools, and weaving skills are acquired very quickly. One has only to start, and very soon you can become the owner of an elegant coffee table woven from newspapers.
How to twist newspaper tubes?
In order to twist the tubes, you will need:
-
pVA glue.
The newspaper sheet needs to be cut lengthwise into 4 parts. Take 1 strip, slightly moisten your finger in the glue and from a corner start rolling at an angle of about 30 ° in relation to the long side of the strip. Each weaver rolls her own way. Someone rolls the tubes like a self-roll - on weight, others roll away from themselves on the smooth surface of the table. Many craftsmen twist the tubes on the knitting needles. Find the method that suits you best. Glue the end of the finished tube to PVA.
What should be the tubes?
For beginners, weaving newspaper tubes may seem difficult, because the tubes do not immediately turn out to be even and the same. Do not be upset if the tube expands to the end. It is even more convenient to weave with such tubes, and they are easy to build up by inserting one into the other. Evenly twisted tubules are needed only for small panels and frames.
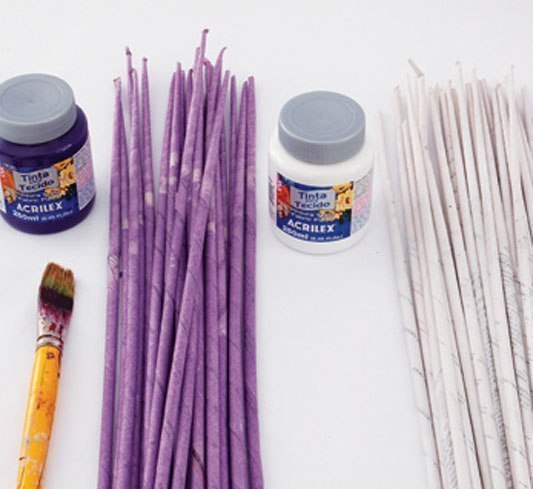
How to paint the tubes?
Before weaving newspaper the tubes can be painted with wood stain or food coloring. Drying is necessary by spreading the tubes on a flat surface. It is better to paint the finished product with paints that are not completely absorbed into the paper, otherwise it will crumble during weaving.
Newspaper weaving for beginners
To understand how to weave newspaper tubes, try starting with a tray, vase, or box.In order not to suffer from weaving the bottom, take a sheet of thick cardboard and cut 2 bottoms of the desired shape. On one bottom in a circle at a distance of 2-3 cm, glue the base tubes, like diverging rays. Glue the second bottom on top.
When the glue dries, bend the base tubes up. Lay the working tube across, then behind, or in front of the base tubes. Continue until the height of the rim suits you.
You can try to make "windows" -handles. It is not difficult.
Tips the ends of the base tubes into the weave. This is enough to finish it, but if you wish, you can still weave a pigtail out of newspaper tubes to decorate the sides of the basket.
The pigtail can be glued, the joint is closed with a strip of newsprint. The finished product must be densely coated with PVA glue and let it dry. Be careful, when wet, the product softens and may be twisted. To give greater strength, repeat this treatment several times. Completely dried product can be painted and varnished.
If you are a beginner, learn to twist the tubes well first and try to make something completely simple - for example, a vase decorated with such tubes from magazines.