Make a folding table out of wood. How to make a practical sliding table with your own hands
It is a pleasure to assemble cabinet furniture. All costs fade before the convenience of using items made "for themselves." We suggest you study the common designs of folding dining tables, as well as the technique of their assembly, and you can make a folding dining table with your own hands.
What will we do
The main advantage of folding tables is their mobility, and for this they should be light. Exactly to the extent that the housewife will cope with their transformation and movement. It is unlikely that a table made of solid wood will be easy to lift, and with small dimensions such material is completely inappropriate.
The use of light and thin trims of chipboard of factory or self-cut is supposed to create the basis of the table.
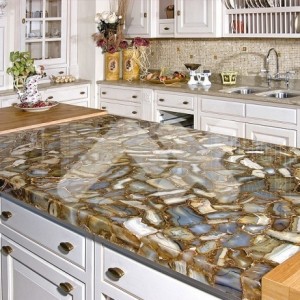
For countertops, the choice is practically unlimited. You may prefer the familiar chipboards, but also pay attention to MDF panels, furniture panels or 40 mm kitchen worktops made of chipboard with acrylic or vinyl coating. However, keep in mind that for most of these materials, the wrong side is different from the front, it simply does not withstand normal operating loads. This point may be crucial in some table designs.
Swivel, sliding or classic "book"
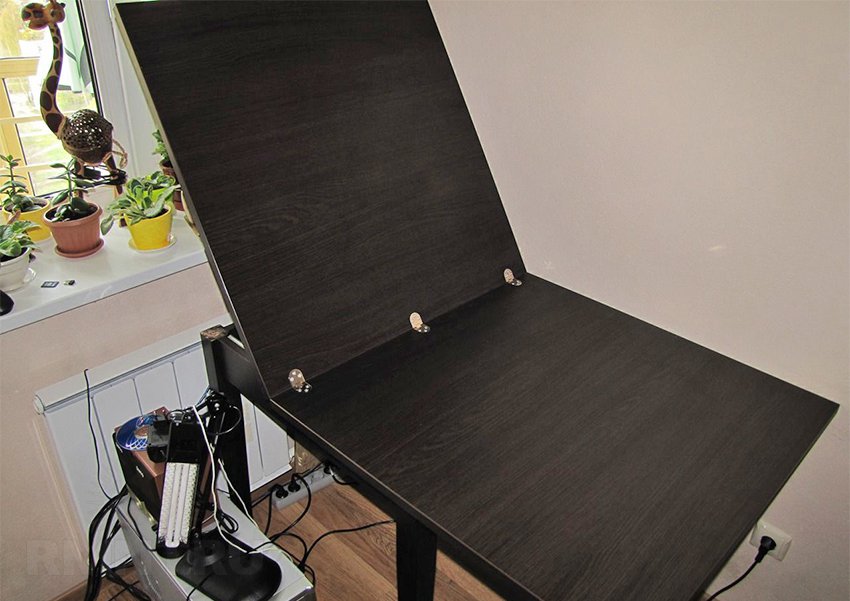
Truly many ways have been invented to transform the countertop. The simplest and most familiar of them is used in a pedestal table, which has two lifting tabletops on piano loops and rotary legs as a support for them. The table is not always convenient: the person sitting at the central section simply has nowhere to put his knees on; moreover, when unfolding, he often has to be pushed and turned. The aesthetic value of such furniture is almost zero, but the “book” is the most budgetary version of the table.
Extendable tables have a rigid frame with fixed legs. Only the countertop undergoes transformation: it moves sideways to the middle of the frame, while the open part is covered by the second half, stored separately. Such tables are good in spacious dining rooms, the transformation is carried out in a few simple movements.

By the way, there are several layout options, for example, the edges of the countertop can be shifted with the insert of the central segment. Or, for example, the countertop can be folded in half on hidden mortise hinges and recline on the open part of the frame after a shift. Do not bypass the rotary structures, in which the countertop does not move to the side, but rotates perpendicularly, after which it is supplemented by the second half.
We make table legs
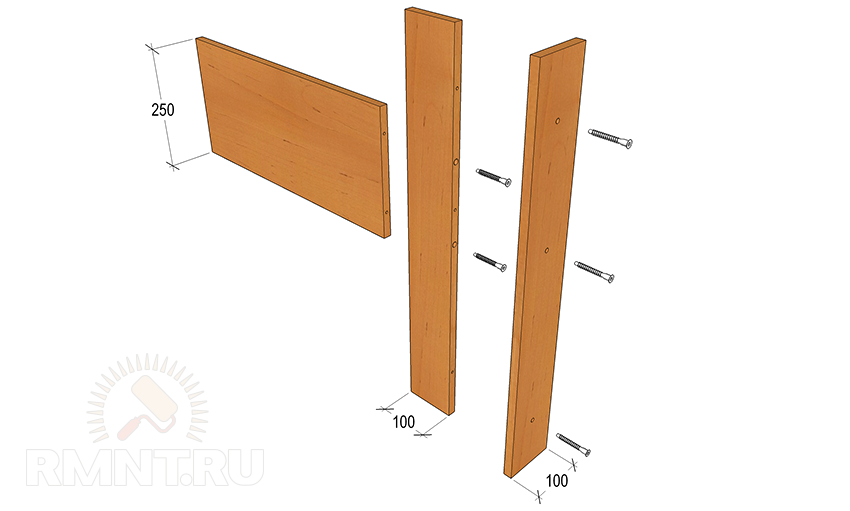
Legs for the "book" are assembled from three planks of chipboard. Two of them are fastened with the letter G on 60 mm confirmations. To do this, in the end face of a 100 mm rail, it is necessary to drill a through hole by 4 mm, expand it with a 6 mm drill to a depth of 70 mm, and then a 10 mm drill to a depth of 60 mm. In other words, manually and stage-by-stage milling to an in-depth confirmation file.
To prevent the tabletop from swaying on the sides, the leg is covered at the end with a 100 mm wide bar and fastened with 45 mm confirmations in three arbitrary places, hiding the traces of the previous fastening. The indicated method of fastening is the least noticeable and most durable, but you can also use patch corners, dowels or ties.
Legs of two folded perpendicular to the chipboard slats are suitable for a sliding table. A rectangular frame is assembled between the legs of the same material, fastening the base of the table. Another, more difficult option is to assemble square baskets from planks 84 mm wide and pull them together with confirmations. Such strict and discreet legs will suit most interior solutions, while ensuring good stability and allowing you to comfortably stretch your legs.
As legs for all types of tables, you can also use chrome pipes or turned products.
The main frame - everything is very simple
For sliding and rotary tables, the main frame is made of laminated chipboards with a width of 120-200 mm. In the general case, the frame surrounds the legs in a circle and hides the traces of fastening the tabletop. Square legs can also be fastened not with an external belt, but with intermediate inserts. The upper ends of the parts must be flush, to add diagonal strength, it is possible to add jumpers inside the frame. The elements are fastened with furniture corners from the inside.
The total length of the base should be 40-50% less than the length of the countertop when unfolded. The width is chosen so that the overhang of the countertops at the edges is at least 100-150 mm.
When assembling the base under the "book" the main dimensions have a more stringent relationship. The central segment of the countertop determines the total width of the table, which should be 20-25 cm less than the length of the side wings. That, in turn, should be less than the height of the table by about 50 mm. Since the legs are hidden inside the base when the table is assembled, its minimum width when folded is at least 300 mm.
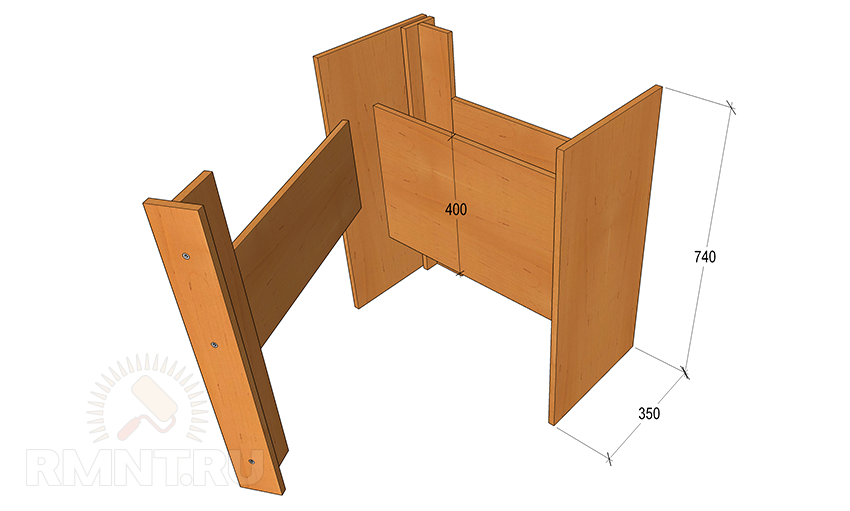
The base itself is assembled in the shape of the letter P and is strengthened by one crossbar 400 mm wide in the center on the rib. It is possible to fix the inside with furniture corners, but in this case it is better to prefer confirmations. The hinges of the legs are attached no closer than 50 mm to the edge of the side walls.
Hidden storage sections
Often the interior space of the base of the table is used to store dishes or household chemicals. The simplest way is to organize a storage space inside a folding “book”. The width of the central segment needs to be increased by 200-250 mm and several horizontal shelves should be used instead of one vertical crossbar. It is also possible option with a blank sheathing of the inner box and the installation of doors on the ends of the base.
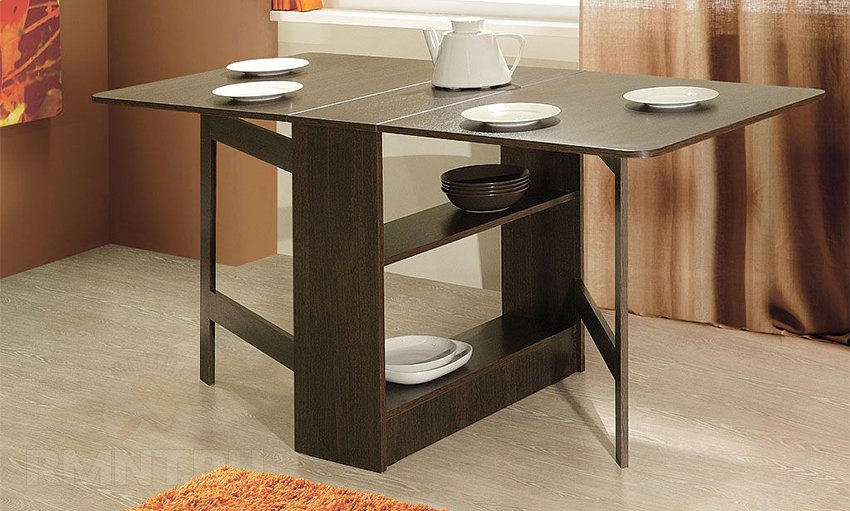
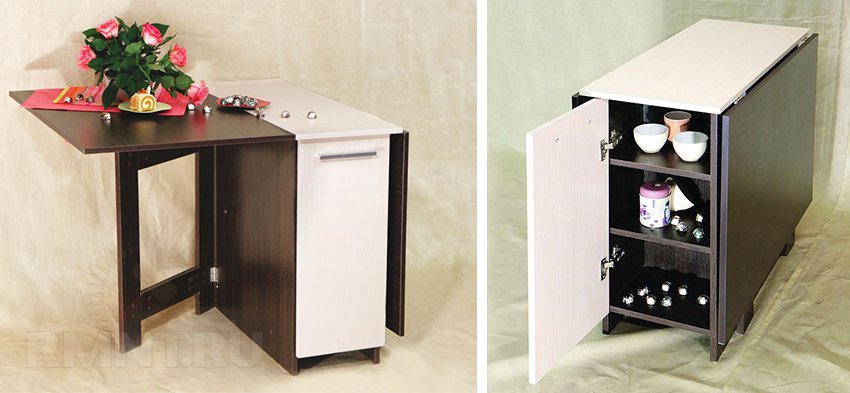
Due to the complex shape of the legs, the door will be 100 mm wider than the box on both sides, so it is important to remember one thing: the handle on the door is installed on the side where the table leg is in the folded state. Accordingly, under different wings, the direction of opening the doors and the location of the legs should be opposite.
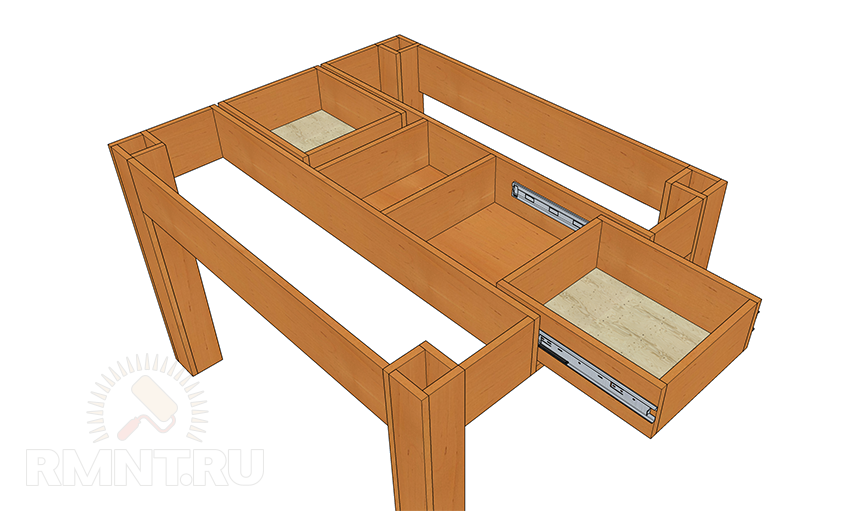
In sliding tables for arranging a niche, it is enough to knock down the frame from below with a solid sheet of MDF and add a few transverse slats for a more firm fixation of the bottom. Another option is to use the slats of the frame up to 400 mm wide and fasten the base along the center. In the niches formed, you can install boxes on the rails full extension.
Worktop Options
The countertop for the “book” needs to be assembled upside down by spreading the sheets of chipboard on the floor and carefully leveling them. The wings are connected to the central section by piano loops, then drilling under dowels is performed to fix to the ends of the base. In addition, it is necessary to provide limiters in the center of each wing, so that the leg does not form from accidental foot movement.
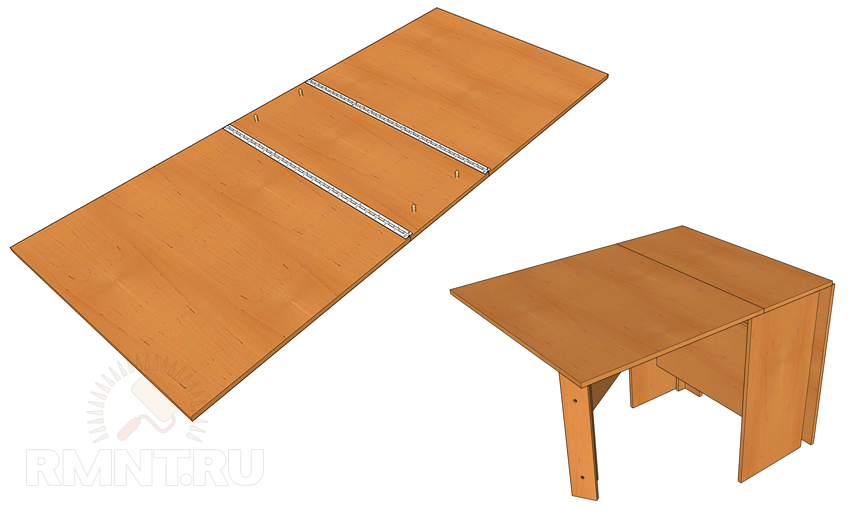
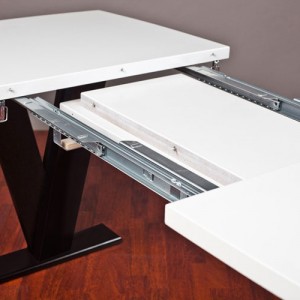
The most universal option for mounting tabletops on sliding tables is on drawer rails. For this, the countertop or its halves are supplemented by a pair of longitudinal ribs, the distance between which is 20 mm greater than the width of the base body. The guides can be used both conventional and full extension, their length should be comparable with the overhang of the countertop in the unfolded state. This installation allows you to maximize the size of the laid out table, at the same time, strength and stability do not deteriorate.
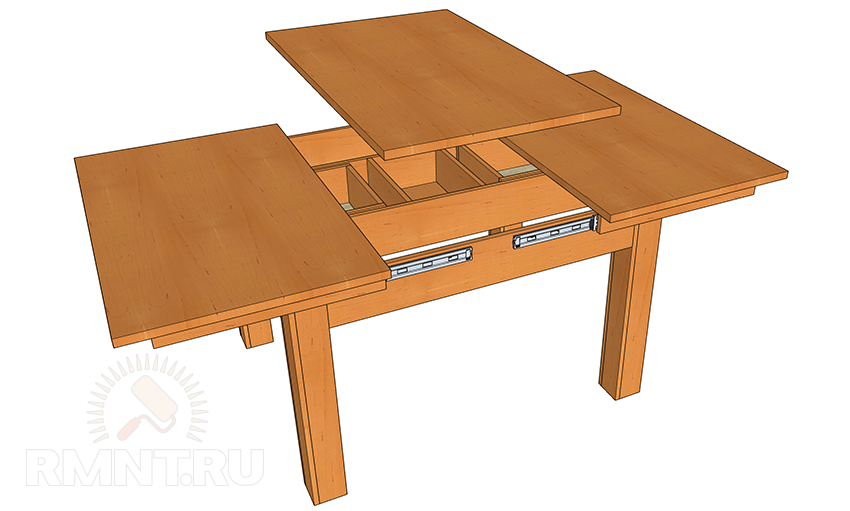
If the countertop is assembled from two halves, they can be folded with their faces to each other and cut hidden loops into the ends. With this option, the front surface of the spread out countertops always remains intact, that is, its individual parts will not have different degrees of wear.
Metal dowels at the ends of different segments of countertops are also very useful, which ensures greater solidity and eliminates the formation of edges and differences.
The extendable table is comfortable and compact. But not everyone has the opportunity to buy it, since the price of a sliding table is quite high. But all craftsmen who are ready to create household items with their own hands have the opportunity to do it themselves. Tabletops can be made with your own hands, using a glass cover or wooden. Glass tables or made of natural wood look very nice. But since natural materials are not cheap, it is better to entrust the legs and countertops to specialists to cut, so as not to spoil the tree. Very beautiful sliding tables - on one leg.
Extendable table is very convenient and compact, it can also be done with your own hands, using a glass or wooden coating.
Design can be chosen as desired, for example, to make the legs chiseled or curly. The extendable table will have the following dimensions (in millimeters):
- table height - 775;
- worktop width - 885;
- countertop length - 1245;
- insert - 375.
Materials and tools that will be needed in modeling
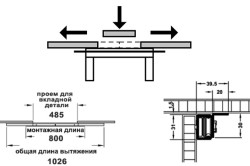
In order to make such a sliding table, not so much materials will be required, so the piece of furniture will turn out to be inexpensive, but practical and beautiful. The most important thing is that all the parts have the right size and are symmetrical. From the materials you will need:
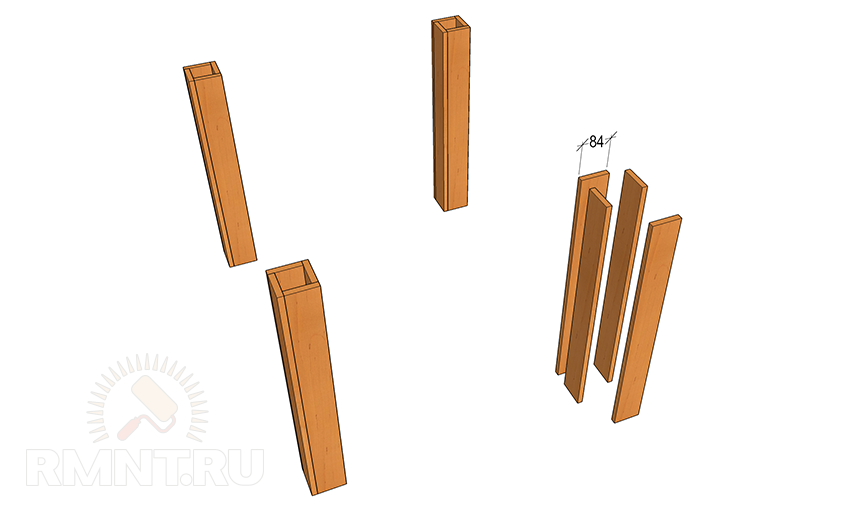
- wooden bars (legs) - section 85 \\ 85 mm, length 745 mm;
- frames connecting the legs (width - 105 mm, thickness 30 mm): 2 pcs. length of 925 mm (+ 2 spikes - their length is 40-55 mm), 2 pieces of 485 mm (+ 2 spikes, length of 40-55 mm);
- 2 wooden surfaces for countertops of the same size - 805 mm wide, 625 mm long;
- insert worktop - width 375 mm;
- for countertops, it is better to choose a joinery (thickness 35-45 mm);
- sliding mechanism;
- wooden spikes for connecting frames (diameter 9-11 mm);
- a drill for creating nests into which spikes will then be inserted;
- self-tapping screws for installing a sliding mechanism;
- glue for wooden surfaces (PVA can be used);
- machine for grinding wooden surfaces;
- sandpaper is loose;
- varnish for coating wooden surfaces;
- brush;
- ruler.
DIY Extendable Table - Assembly
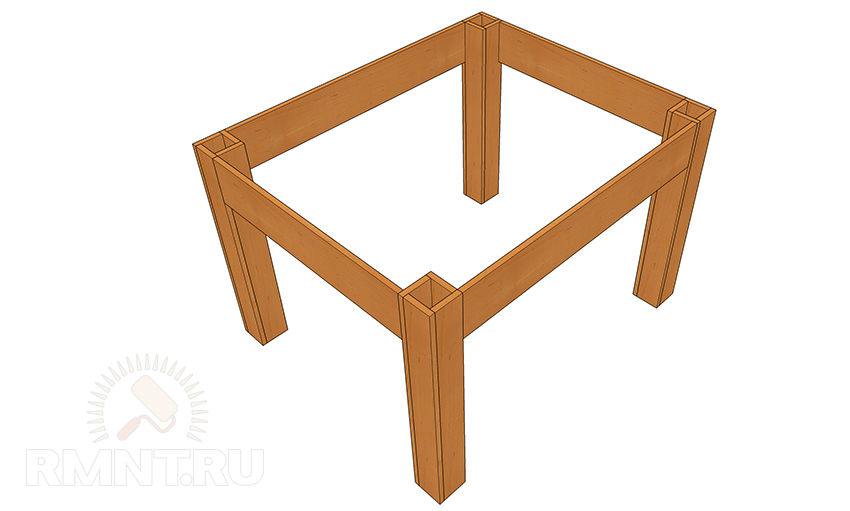
When the parts are assembled, the simulation process can begin. First of all, it is necessary to mark the nests on wooden workpieces for legs. In these slots, spikes of frames for connecting the legs will be inserted in the future. In accordance with the diameter of the spike you need to make holes. The spikes are better to “put” on the glue, in this case the design will be much stronger.
First you need to assemble the underframe and only then proceed with the assembly of the main parts. A prerequisite - the docking at the ends should be as accurate as possible. After placing the spikes in the sockets, assemble the structure. It is not recommended to glue parts immediately, it’s better to first assemble the entire table, see firsthand whether the sizes and joints coincide, and only then glue the parts.
After all the above steps, you need to do the installation of the insert. Some differences in the level of one or more parts may occur, which can easily be eliminated with a grinder. The mechanism for the sliding table is mainly made of aluminum. Installation is carried out either using self-tapping screws or by gluing.
The next step is the installation of a sliding mechanism. It’s easy to attach it, just fasten the guides to the long frames, and each of the sliders to its part of the countertop. It is better to mount the sliding mechanism by turning the table on the countertop. Be sure to check how the central insert will be installed after installing the mechanism.
Under the countertop, it is necessary to install two slats of the same length as the wooden central insert. You need to do this for ease of use - when the insert board is not needed, it will be under the countertop and held by rails. After the assembly process, the finished product can be coated with stain.
A real chic and luxury is a round table. Today they are the most expensive in the market, especially those made of natural wood. It is also possible to make a sliding table with your own hands of a round shape, most importantly, to have a desire.
Round shape do-it-yourself extension table
In principle, the round table assembly technique does not differ from the above technique. The only thing that the edges of the countertops will be rounded. To make it you will need:
- whatman;
- scissors;
- any glue for a wooden surface;
- beam for legs;
- a simple pencil;
- ruler;
- boards;
- plywood 8 mm;
- self-tapping screws;
- screwdriver;
- hacksaw.
Using a large compass, you need to cut out the shape of the future countertop from a Whatman paper. Only then cut it out of wood. What kind of countertop will be - glass or wooden, depends on the desire of the owner of the future sliding table.
Glass and wooden sliding tables look much more beautiful if they have one curly leg.
What you need to know about assembling a sliding table with your own hands
All About Countertops
First of all, you need to decide what material and what shape the table will be. Pine or chipboard are perfect. Naturally, a pine board is preferable, since it is much stronger, in addition, pine boards are environmentally friendly. Boards are trimmed and processed according to the size of the future countertops. In the event that the table is nevertheless made of chipboard, the sheets must be drawn into 3 parts, 2 of which will be the same size, and the 3rd part will serve as an insert in the center of the countertop. Before you assemble this piece of furniture, it is better to draw a drawing or use ready-made drawings. In order for it to be strong and last for a long time, it is necessary to observe accuracy in the calculations. Only in this case it will not “float” and will be durable.
The legs are mainly made of bars, which can be purchased at the store. The color scheme of the countertops and legs should be either the same or differ in color by 1-2 tones. And the countertop should be darker. A prerequisite in the manufacture of sliding - the proportionality of the size of the countertops and legs. Too thin legs will not be able to hold a large countertop. The length of the legs should correspond to the general appearance - a small coffee table will not look with long legs. But if the idea is an unusual sliding table, then special attention is paid to the marking of the center of the bar. The legs can be made curly. It is also possible to make a curly leg yourself. To do this, just learn the technique of cutting figures from wood.
A draw bar is a plank that connects two parts with ends. To mark the drawer, you need to put the countertop on a convenient surface "face" down, but before that it is better to lay a soft cloth so as not to damage the surface. It is better to make each of the blanks of the drawer slightly larger than the expected size. Surplus can always be removed, but the shortcomings of the length - no. The drawbar is machined by a lathe and a milling cutter.
All about assembly
The most important stage is the assembly. Particular attention should be paid to the connection of the side frames with the leg or legs. To do this, each spike must correspond to a pre-prepared groove. Do not forget about the grooves - they provide a strong connection. Applying glue for structural strength, after drying, all of its excess must be removed with sandpaper. In any work, inconsistencies may occur, for example, mismatched edges of the countertop. It is easy to fix with a grinder. Then clean with sandpaper and varnish the surface.
Advantages of Extendable Tables
The main and obvious advantage of the do-it-yourself sliding table is its versatility. A special mechanism helps to make a large dining room out of a small compact table. That is why it is convenient for small apartment rooms. It does not take up much space, but allows you to seat about 9-10 people.
Due to the fact that in the trading market there is a huge amount of material for creating a sliding table at home, it can be made not only multifunctional and convenient, but also beautiful, stylish.
To classify tables that are sliding, you can as follows:
Transformers
Sliding tables got this name due to their unique ability to transform. From a seemingly small table, you can get a quite roomy dining room. The shapes of the transformers are round or oval. The main distinguishing feature of these tables is an increase not only in their size, but also in height. You can make such a table with your own hands. To do this, just have a drawing. In addition, transformers have recently been especially popular not only because of convenience, but also because of design superiority. Basically, transformer tables are made of wood or glass. Mirrored look very nice and save a lot of space in an apartment or house.
Standard extendable tables.
No less popular are tables of these types. They are made of natural wood, fiberboard or particleboard. The advantage is their compactness. In addition, to make a sliding table with your own hands will not be difficult. It is enough to adhere to the instructions for their construction.
Any sliding table is comfort and versatility. All of them are practical and economical. You can make a table not only for eating, but also for drawing, games. A self-made sliding table is a wonderful way to make a children's room comfortable and stylish. In addition to all the advantages, it is much easier to transport sliding tables than ordinary ones.
A do-it-yourself sliding table for a children's room is an ideal solution, especially if there are several children in the family. In addition, it can be combined with a bed. Well, the most important positive side of a do-it-yourself sliding table is its economical cost.
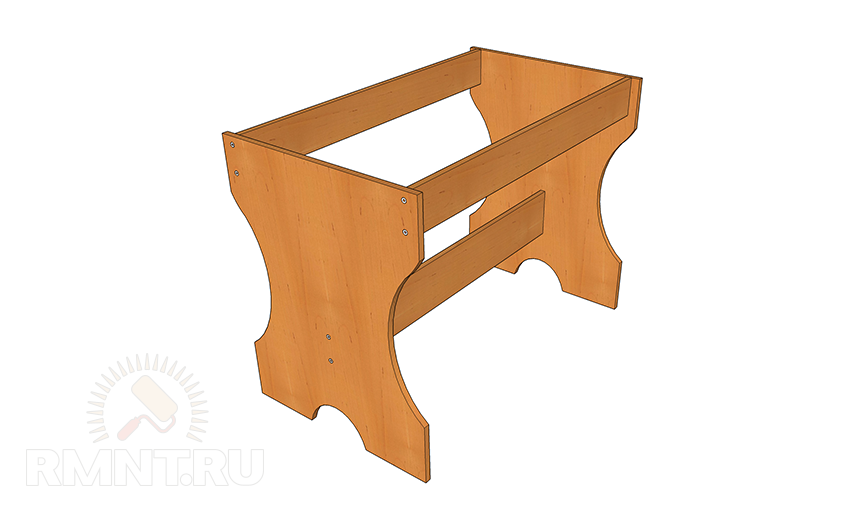
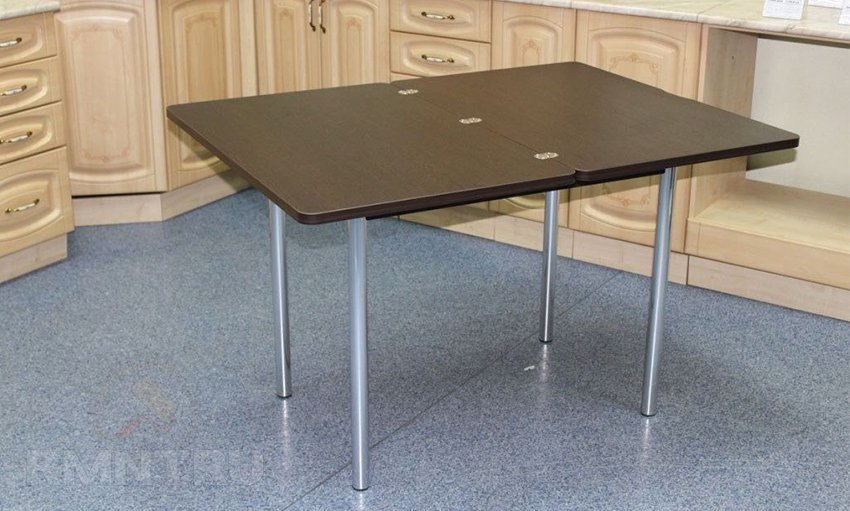
Table - This is a mandatory attribute of the kitchen, dining room and living room. The size of the table is determined by its purpose and the number of people using it. For a small kitchen, a table with standard sizes countertops - 60x95, 60x90 or 65x100 cm (see photo 1 and fig. 1) For a large kitchen, the countertops are made larger - 65x105.70x110 cm or even more.
In photo 2 you see a sliding table, which has a tabletop size of 92x116 cm. Spreading it and using an insert with a width of 42 cm, you will get a table length of 158 cm. Sliding tables with inserts are becoming less common today. And once they were in every house. I thought that such a table would be convenient, and brought something of my own into his form.
TABLE MAKING
When making a table on your own, first of all, it is necessary to determine its “style”, and then the material from which its tabletop will be made.
The simplest thing is to make a wood worktop. To do this, we take pine boards and, connecting them together on glue, we get a joinery. It needs to be cut off and cut to the size of the countertops.
For the manufacture of a sliding table, I used chipboard, the dimensions of which are -600x3000x28 mm. I marked it and cut it in size (see. Fig. 2) into three parts. Two of them are the same, with dimensions of 600x925 mm, and the third (for insertion) - with dimensions of 420x925 mm. The insert can be made up to 500 mm wide.
MAKING TABLE FEET
For the legs of the table I prepared 4 bars. It is desirable that their wood be the same in color and structure. Depending on the size of the table, we make bars with a section of 75x75 mm. It is possible and less, but the legs of the bars of a small cross-section look less impressive. The length of the workpieces is 770 mm. It is important to determine the centers on each bar as accurately as possible. I did the markup using the template (Fig. 3 and photo 3). Sharpen the legs at a slow machine speed. I sharpened at a speed of 1500 rpm. Initially processed the upper cylindrical part, then - the cone of the middle part (055-45 mm) and the last - the lower cylinder and the support cone (0 44-40 mm) (photo 4). Then you can switch the machine to high speeds (2300 rpm) and perform all further work at this speed.
Particular care requires turning the “balls” on the legs. They should not be made into a regular spherical shape. They look good and oval. All dimensions of the turned parts of the table are shown in Fig. 3. The bars must be used no thinner than 70x70 mm.
I made the grooves between the cones and the cylinders with a 08 mm rasp. He polished each turned leg without removing it from the machine first with sandpaper No. 40, then No. 100, then No. 150, and finally with felt. The square parts of the legs were processed by a grinder. As a result, the legs became shiny. Using the main template, he cut the legs to a length of up to 730 mm.
I laid out the finished legs on the table, examined the wood pattern on them and chose the “front” side for the right and left legs, marking with letters P and L. On each of the legs I marked a nest for a 15 mm wide spike. The method of selecting the groove for the spike depends on the tool available. I used a drilling machine (photo 5).
MANUFACTURE OF THE FACIAL AND SIDE PARTS OF THE TSARGA
The size and configuration of the drawer can be chosen to taste. They can be high and low, straight and curly, long or not very. To try it on, I turned the countertop upside down and laid it on the floor, laying a cover under it, or you can use the carpet path so as not to scratch the front side.
To select the position of the legs, I placed trimming cubes from the workpieces from which they ground them on an inverted tabletop, and chose the length of the parts of the drawer. At my table, the front part of the drawer is 68 cm long. The workpieces should be longer by the height of the spikes protruding along the edges by 35 mm. In addition, you need to leave a margin of 20 mm for the final accurate trimming of the spikes along the depth of the grooves in the legs. Cutting off excess is never too late. I put all these dimensions on the drawing (Fig. 4).
Do not make the drawers shorter than 670 mm, otherwise with a standard seat width, two stools together will not go under the table. And in a small kitchen there is for them the best place. The side drawers are shorter - only 400 mm, but the blanks for them from the above considerations should be at least 500 mm.
The processing of the drawer blanks and their finishing before assembly differs only in that a milling cutter is used instead of a lathe.
ASSEMBLY TABLE
They begin to assemble the table with the connection of the side tsar with legs. First of all, you need to adjust the spikes to the corresponding grooves in the legs of the table. I specially made the spikes with a slight taper so that the connection was tight. Grooves need to be cut on the spikes to release excess glue, otherwise it will be difficult to assemble the joint.
Having collected the fitted parts dry without glue, I determined the length of the middle turned chisel joint (photo 6). I turned it from a bar with a section of 45x45 mm. The central cylinder and cylinders on the sides were machined to 038 mm. Then, using the template, he processed the bar finally over the entire length.
On the legs, it is necessary to mark the joints with the jig and drill two blind holes with a depth of 25 mm and 020 mm. Inserting the spit into place, I turn it several times to select a beautiful pattern of wood. Now it’s easy to determine where you need to drill holes for the center screed, which will give the table stiffness and extra strength.
After complete assembly, I once again check the fit of the individual parts of the tsar, jigging, their connection. If everything is in order, then you can glue.
For bonding I use high-quality glue. The best of them is PVA Lux. After fitting the parts onto the glue, gently tap all the joints and remove any excess glue. If you do not have large clamps (up to 1 m), then do it like me: squeeze the structure with the help of whetstones and hold it until the glue completely seizes (photo 7).
Leaks at the junction of the tsar and legs I immediately close up with a mixture of PVA glue with fine sawdust. After the glue has dried, I remove the clamps and clean the traces of glue and other places again with sandpaper No. 150. Assembling the fixed table, on the reverse side of it to the tsar I fasten the bars 20x30 mm, to which I then fix the countertop with screws.
With a folding tabletop, it is necessary to install guides with longitudinal grooves on the long sides of the drawers. Milling the guide grooves in the drawer itself is undesirable, since then a deep groove will weaken the table. Of course, it is possible to make the front parts of the drawer from a board with a thickness of at least 30 mm: then it will be possible to mill the grooves.
Having laid the countertop with the front part on the floor, I put a base on it. Then I make 8 slider bars and process their edges facing the longitudinal grooves of the guide with a rasp so that they move freely in the grooves (photo 8). Then I fasten the spaced bars with screws and be sure to number them, putting down the numbers 1 to 8 on the guides attached to the king. This may come in handy - suddenly you have to disassemble the table during transportation or when installing it in a new place in another room.
Then I make dowels that fix the position of the parts of the countertop. In order to accurately mark the places of their installation, I take carnations with bitten hats. Slightly drive them into the end of one sliding part of the countertop and, shifting both of these parts together, mark the places of drilling holes for dowels. Then I drive the cloves through the marked places into the second half of the countertop. Now, having laid the insert in the middle and shifted both halves of the countertop with protruding nails, I get marks on the insert as well. I mark the marked places with a drill d10 mm. It remains to insert the wooden dowels on the PVA glue into one of the moving parts of the countertop and from the opposite side of the insert. If you now move all three parts of this sliding table, it will be very durable.
The edges of the countertops assembled in this way will not necessarily match. But this can be easily fixed by treating the edges of the assembled tabletops with a belt sander to a complete match (photo 9). The final width of my table was 920 mm. Then I disassemble the entire countertop and paste it around the edges with a furniture edge 30 mm wide.
I clean the finished table again, eliminating small surface roughness, and then stain it with the Healthy Home aquotex. You can choose the color yourself.
It will take a day to dry the table, after which it must be coated in 2 layers with the glossy varnish NTs-2144. After drying, it is useful to wipe the table with a cloth moistened with a wax polish. Gloss will be provided.
For all my experience, I can only make one table per month, but of excellent quality. If you do not have experience, then surely there is a desire and patience - and you are guaranteed success.
Feature of the layout of most apartments of a typical building of the 20th century: a small area of \u200b\u200bpremises, especially the kitchen (even if the apartment is multi-room). Under such conditions, the ideal solution to avoid unnecessarily cluttered furniture with an already cramped space is to increase the functionality of basic furniture. If in the living room it can be a sofa, lengthening if necessary to seat a certain number of guests, then in the kitchen such a thing is a table. For a large family living in an apartment with the usual layout, a sliding dining table is an indispensable attribute of the interior: in its usual state, it takes up quite a bit of space - and when sliding it can fit a large number of eaters behind its tabletop.
Advantages of a sliding table if made by yourself
Nowadays (with that choice various materials and furniture accessories, which are offered by specialized stores) making a sliding table for yourself is much more profitable: the cost of a table is cheaper, and everyone can choose a design, including individual sizes. Agree - it’s nice if there is a single table in your kitchen!
The design of wooden sliding tables has long been known. If earlier all the details were made of wood, and only a high-class carpenter could make a good sliding table, today such furniture can even be made by a beginner - thanks to the commercially available mechanisms made of durable metal.
Having the simplest skills of working with elementary tools: an electric drill, a jigsaw, a screwdriver - you can easily make the table the shape and size you need. To do this, we suggest you use a few simple examples of sliding tables.
The general principles for the manufacture of such tables are the same for any DIY products:
- Determining the dimensions of the future product;
- Drawing up a design drawing (or making changes to an existing drawing);
- The acquisition of basic and finishing materials, fasteners and fittings;
- Cutting out structural elements, intermediate surface finish of parts;
- Assembly of the structure;
- Finishing
Moreover, the first and last points of the algorithm are individual for each case, and it does not make sense to describe them in detail. Detailed instructions for the remaining steps are given in the proposed descriptions.
Option 1. We make a sliding table - a “minute" of the simplest design
The table is called “Minute” because it takes a minimum of time to make it.
The table has a height of 735 mm, countertop: the minimum size is 1200x800 mm, the maximum is 1670x800 mm.
We will need:
- 25 mm thick chipboard sheets: 600x800 mm - 2 pcs., 470x800 mm - 1 pc.;
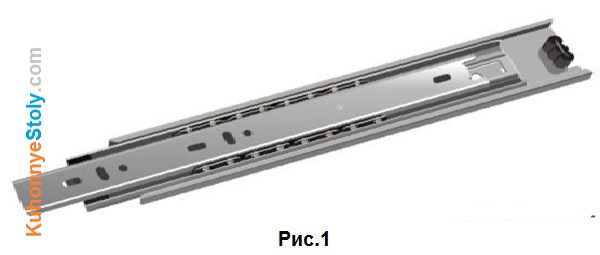
- Telescopic guides of full extension, 500 mm long - 2 pieces. (fig. 1);
- Foot for kitchen table with flange (710mm) - 4 pcs.;
- Aluminum corner with a 50mm rib - 2 meters;
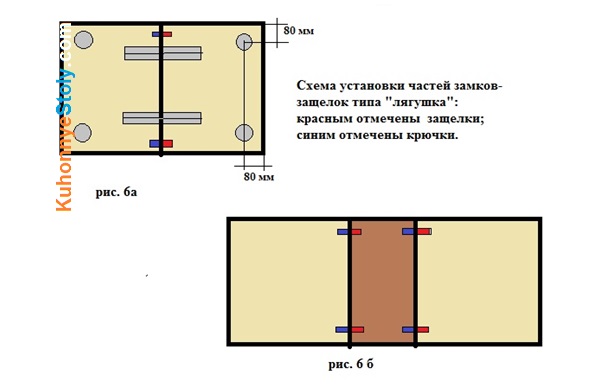
- Frog lock-latch - 4 pcs. (fig. 2);

- M4 screws with a length of 10 mm and nuts to them (it is imperative that the nuts are with a stop) - 16 pcs.
Making the main element - the sliding table mechanism
- Cut the corner into 4 parts, grind the sharp corners of the side faces, as shown in Fig. 3;
- Separate the telescopic rails into two parts - a narrow bar and a wide canvas, attach each of the parts to the corners to get the design shown in Fig. 4;
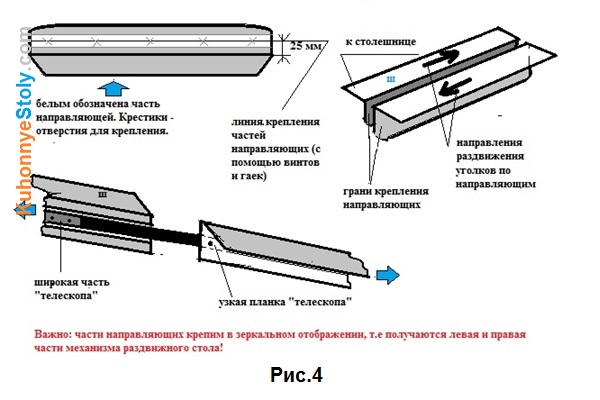
- Repeat the process with the two remaining corners and the second “telescope”.
Table assembly
- Put both sides of the countertop together;
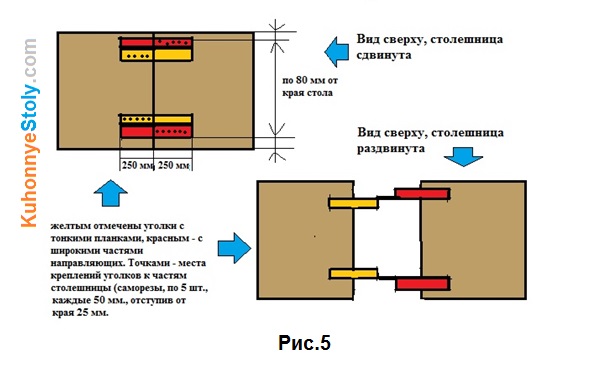
- Set the corners on the back of the countertop (Fig. 5);
- Install the lock-latches on the sliding parts (Fig. 6, a);
- Extend the countertop, opening the locks, and insert the removable part;
- On the insert of the countertop, install the parts of the latches-latches in such a way that all parts of the countertop can be firmly fixed (Fig. 6, b);
- We fasten the legs to the countertop - the table is ready!
As you can see, making an extensible table of the simplest design is easy, and does not take much time.
Some inconvenience of this design is in the removable part of the countertop: there is no place for storage in this table, so it is cleaned in the closet until the next “influx” of guests.
The next option will help you make a sliding round table, free from this inconvenience.
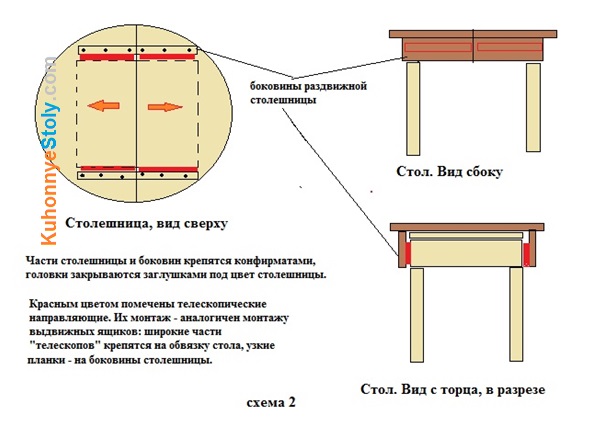
Option 2. We make a round sliding table with a folding insert
You will need:
- 25 mm thick chipboard
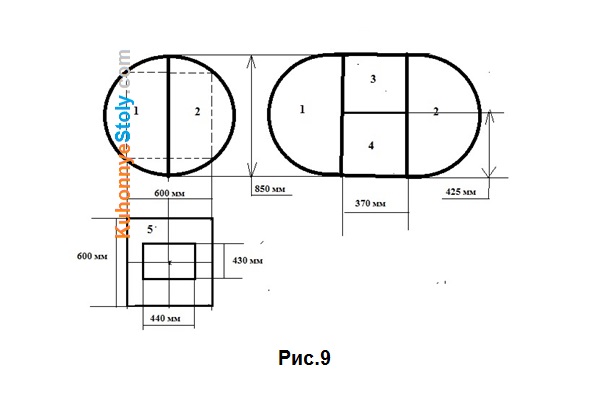
- For countertops - 850x850 mm - 1 sheet; for the insert - 850x 370 mm;
- For false countertops - 600x600 mm - 1 sheet;
- For the underframe: slats 100x575mm - 4pcs and 2 slats 120x600mm (chipboard, 18mm).
- Legs - bars 60x60x710 mm;
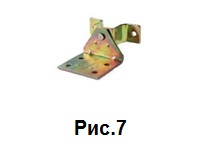
- Telescopic rails 250 mm - 4 pcs., Swivel mounts (Fig. 7) - 2 pcs. and hidden end loops (180 degrees) -3 pcs., as well as stops for folded inserts;
- Furniture corners, confirmations, self-tapping screws, wooden dowels.
Production of round table elements:
- We cut the countertop. There are several ways to make a perfectly round countertop. The first of them is to make a pattern from an ordinary Whatman paper by drawing a circle with a large compass, or using a simple tool (Fig. 8a), and then start sawing along its contour.
We propose to do it a little easier: to assemble a sawing “compass” from a jigsaw or an angular circular saw (depending on what you have) - you can use it repeatedly.
For such a "compass" you will need the actual cutting tool, tape measure, drill, 3-4 self-tapping screws and a meter rail made of plywood. The width of the rail is equal to the length of the sole of the tool (see Figure 8c, this is how the whole structure looks).

The solution of such a compass can be changed in the range from 20 cm to 1 meter (respectively, the diameter of the tabletop to be sawn can be from 40 cm to 2 meters). It is very easy to use, the saw cut is clean, and the circle is perfectly even: at a distance of 425 mm from the cutting blade (disk or file) we drill a hole, using a self-tapping screw we attach the structure to the material to be cut - the compass is ready, it remains only to evenly push the tool forward, and he himself will move along the desired trajectory.
Important! It is better to cut the countertop not from the front side - the trace of a self-tapping screw in the center will spoil the appearance.
The tool must be driven slowly and without jerking, otherwise you can get uneven chips on the surface of the chipboard (if a saw is used, it is better to gradually increase the depth of cut).
- Divide the countertop in half. To divide it into two identical parts, you need to draw a straight line through the center of the circle (diameter), and then carefully cut the countertop at this mark.
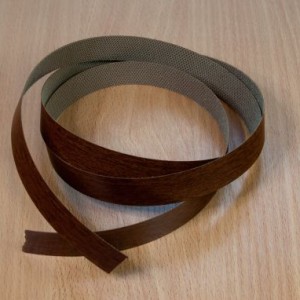
- We stick an end tape on all the slices. I must say that it can be of two types - melamine (from paper with a special coating) and more expensive (but also better) plastic edge of the ABS.
The melamine edging tape is available with a layer of hot-melt adhesive already applied to it (glued with a conventional iron).
However, in order to achieve a better coating, it is advisable to putty and sand before cutting the tape before gluing the tape - and only after that start sticking the tape:
The tape is superimposed on the end of the chipboard, pressed by the sole of the iron, and so held for some time (so that the glue melts under the influence of temperature). Then, removing the iron, it is advisable to press the tape by hand (having previously laid on it folded in several layers of cotton fabric). Cut off excess tape with a sharp spatula or knife - while doing so, try not to damage the cutting corners!
The edge of the ABS is more durable, however, and glues not so elementary. Glue is required for edgebanding with ABS tape (as a rule, manufacturers recommend the most suitable). Moreover: when removing excess glue that protrudes beyond the edge of the tape with a solvent, you can damage the laminated surface of the chipboard - special care and practice are needed here.
- The part intended for the insert is cut into 2 parts 425x370 mm, all the ends are also glued with tape. We connect the parts of the liner with hidden loops like a book.
- In the false worktop, exactly in the middle, we cut a hole 430x4400 mm - we glue the end parts of the hole with the same tape (Fig. 9).
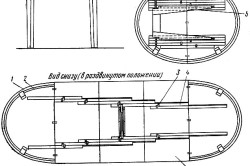
The assembly of the table occurs in stages:
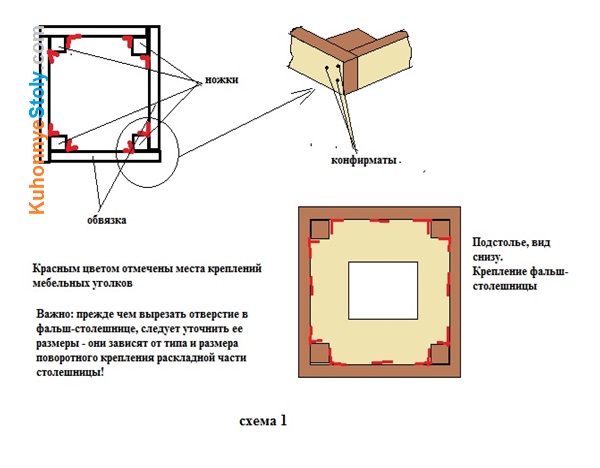
1st stage: underframe with false counter top (Scheme 1);
2nd stage: assembly of the design of the sliding table (scheme 2);
An oval-shaped folding kitchen table is perfect for those who like to have dinner with the whole family and occasionally receive guests. It is quite easy to do it yourself. Self-made furniture is distinguished by its original design and the ability to take into account individual needs, due to the characteristics of the premises and the taste of the owners of the house.
Why exactly an oval table
An oval folding dining table is good because it has rounded corners. This avoids "unpleasant clashes" and is especially appreciated by those who have small children at home. Oval shape suggests the location of the table in the center of the room. However, if necessary, you can put such a table near the kitchen corner.
Preparation for work
Before you begin, you must:
- Determine the dimensions of the future table.
- Make sketches and drawings of the product design and its individual parts.
- The choice of material for countertops and supports.
- Calculate the required amount of materials.
- Purchase materials, fasteners and fittings.
Determining the size and shape of the table
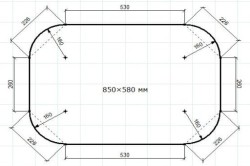
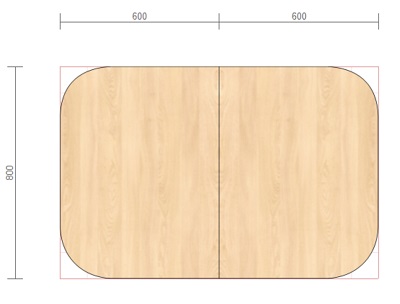
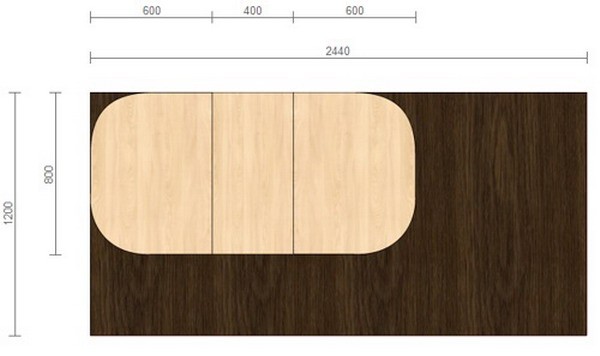
The size of the product depends on the area of \u200b\u200bthe kitchen and the number of people that need to be placed at the table. The optimal solution for a medium-sized kitchen is a folding dining table with a size of 120 × 80 cm (folded), consisting of two parts with dimensions of 60 × 80 cm each.
It will be correct to draw a sketch of the future product on a scale in order to understand what ratio of the width and length of the table allows you to maintain a beautiful rounded shape even when unfolded, as well as a size suitable for a particular kitchen.
For a kitchen of this size, a folding oval dining table with a size of 120 × 80 cm is suitable if you put it with a kitchen corner. If you place the table in the center of the room, access to cabinets will be difficult kitchen set and household appliances. Receiving guests, you can put it in the middle of the kitchen.
The optimal length of the length of the dining table top for a convenient location of one person is 60 cm. From the sketch it can be seen that a 120 × 80 cm extendable table is perfect for four to six people (six will fit behind it if you extend the table to the center of the kitchen). When unfolded, at such a table it will be possible to seat up to 8 people. If you need a folding dining table for more guests, you can increase the size of the insert or make two of the same.
Execution of drawings
It is necessary to carry out the following drawings and sketches (option with a two-part countertop 60 × 80 cm in size and one insert 40 × 80 cm in size):
- drawing of the details of the main countertop, to determine the desired shape of the table and the corresponding rounding radius;
Two-piece worktop 60 × 80 cm, fillet radius 20 cm
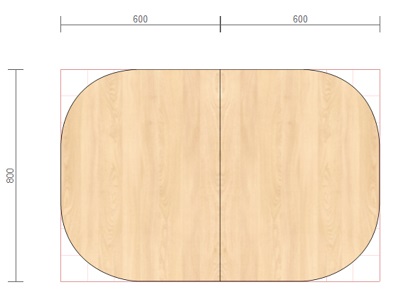
Two-piece worktop with size 60 × 80 cm, rounding radius 30 cm

Two-piece worktop with size 60 × 80 cm, rounding radius 40 cm
- drawing of the insert 80x40 cm;
- a sketch of the countertops in an expanded form;
- for tables with a drawer (table) drawing details of the drawer.
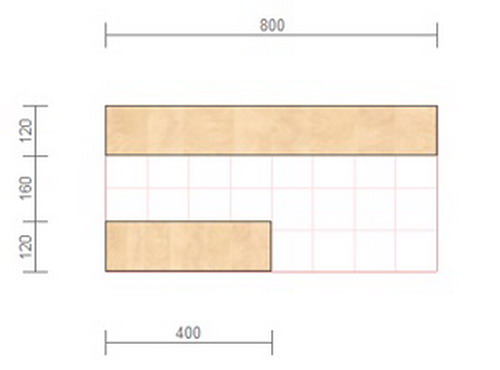
The indicated dimensions of the drawer parts are suitable for a folding dining table measuring 120 × 80 cm in the shifted position. It is necessary to make two parts with dimensions of 80 × 12 cm and 40 × 12 cm.
Material selection
Details of a folding kitchen table:
- countertop and inserts to it;
- supports (legs);
- king
- edge (for tables made of chipboard and MDF);
- extension mechanism;
- tabletop latches;
- fasteners.
For the manufacture of tabletops folding tables, you can use wood, particleboard, MDF, natural stone and glass. Particleboard and MDF can be either laminated or coated with plastic. The thickness of the countertops can be from 18 to 48 mm (sometimes more).
Natural stone is the most durable, moisture- and heat-resistant material. But this material has a significant minus, it is a rather high cost. As an alternative, you can use a tabletop made of chipboard or MDF, decorated with ceramic tiles.
When choosing the color and thickness of the countertops, it is imperative to take into account the design of the other furnishings in the kitchen, especially the thickness and texture of the countertops of the kitchen unit.
The legs can be made of the same material as the countertop, or you can purchase ready-made metal supports. They are of two types: for tables with a drawer and for drawless structures.
The drawbridge can also be made from one material with a countertop, or from any other suitable in thickness and texture.
For the processing of slices of chipboard and MDF, the following edges are used:
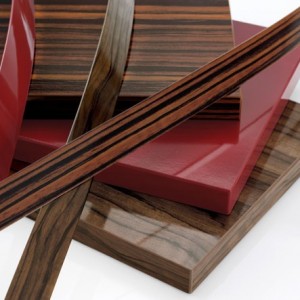
The most budgetary and least practical option is the melamine edge, it is the thinnest and is a ribbon of paper with a density of 120-130 g per square meter. m. Its thickness is 0.1 mm.
The PVC edge differs from it in greater thickness and wear resistance.
The ABS edge is made of plastic and is characterized by increased impact resistance and resistance to external influences.
Acrylic edge is often called 3D edge because of the effect of "bulk". This is the most advantageous option in terms of appearance.
The edges of PVC, ABS and acrylic have a thickness of 0.4 to 2 mm. Depending on the thickness of the countertop and other parts of the product, a suitable edge width is selected, which ranges from 18 to 55 mm. There are types of edges with an already applied adhesive layer on sale.
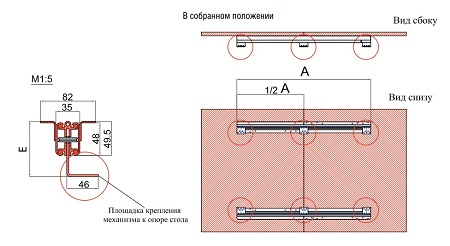
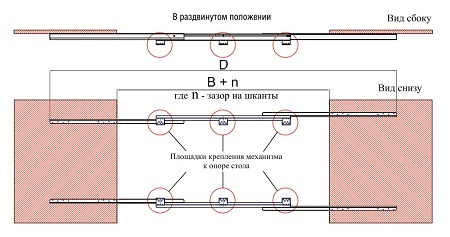
 The sliding mechanisms for folding tables according to the method of fastening are of three types:
- for kingless tables;
- for internal fastening to a tsar;
- for external fastening to a tsar.
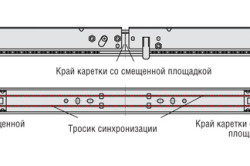
There are two types of mechanisms by the method of extension: synchronous and non-synchronous. In the first case, the details of the countertops are moved apart at the same time, in the second separately.
When buying, you need to take into account the length of the non-spread mechanism and the maximum size of the inserts (these parameters should be indicated in the characteristics of the mechanism).
For a folding table 120 × 80 cm in size with two inserts of 40 or 50 cm in a shifted state, a mechanism 98 cm long with a maximum insert size of 50 cm (48/980 / T2S) is suitable.
To fix the countertops, you will additionally need special locking locks. Their number depends on how many inserts will be on the table.
Calculation of the necessary materials
Based on the completed drawings and you need to calculate:
- the total area of \u200b\u200ball parts of the table made of wood, particleboard or MDF;
- footage of an edge, for tables from chipboard and MDF.
For a table without a table with a worktop of two parts, particleboard 60 × 80 cm in size and one insert 40 cm wide, you will need: 1.3 sq. m. chipboard, 9 m edges (with a margin), 4 metal supports, a sliding mechanism, 4 tabletop latches, dowels and screws.
Table making process
- Cut out the details of the table according to the drawings and cut them out.
- Paste over the edges.
- Assemble a table.
- Finish the finish.
 Instruments:
- large ruler or tape measure;
- pencil;
- electric jigsaw;
- milling cutter;
- belt sander;
- drill;
- an iron or a building hair dryer.
Cut
Particleboard and MDF can be purchased in the form of sheets (boards) of a certain size. The minimum dimensions of a chipboard or MDF sheet are 244 × 120 cm. From the above calculation it can be seen that for the manufacture of an oval sliding kitchen table measuring 120 × 80 cm (160 × 80 in the extended position), you need one such sheet.
Examples of cutting a chipboard sheet for an oval sliding kitchen table
![]()
The main countertop will consist of two parts 60 × 80 cm in size. In addition to it, there will be one 40 × 80 cm part. The rest of the material can be used to make stools and as a result a wonderful kitchen kit.
Parts can be cut using a jigsaw, rounding is done with a milling machine.
Edge pasting
First you need to thoroughly process all sections with a sealant (silicone), allow to dry, and then you can proceed with gluing. To do this, use an iron or a building hair dryer.
 It is necessary to previously clean the sections from wood dust. Then attach the edge so that it completely covers the cut (the width of the edge should be greater than the thickness of the countertop). Turn on the iron and set the synthetics mode. Lay a newspaper between the iron and the cut and start heating the edge. After it begins to stick, smooth the finished area with a cloth and continue to iron. Smooth until the edge cools down.
If the edge does not have its own adhesive layer, then any universal adhesive can be used. In this case, the surface of the cut should be smooth and free from dust. Glue should be applied to the edge and to the end and glue them, while smoothing with a roller or cloth. Instead of fabric and roller, you can use a wooden block covered with felt.
After completion of work, it is required to carefully check whether there are fragments with a loose fit. Then you need to chop off the edge protruding beyond the edges, remove the remaining glue and sand the edges with sandpaper.
Better bonding can be achieved with a building hair dryer. A stream of air with a temperature of 200 degrees should be directed only to the adhesive layer. Well-heated glue should protrude from under the edge. Excess glue can only be removed after it has completely dried.
Table assembly
The assembly is performed in the following sequence:
- Put half of the main countertop together.
- Attach a sliding mechanism to them.
- Install tabletop latches.
- Spread the halves of the main countertop and insert the removable part.
- Fasten the tabs on the insert so that when sliding, their parts coincide with the corresponding parts of the main tabletop.
- Screw the legs to the countertop.
To do this, on the reverse side of the countertop, we mark with a pencil, to determine the place of attachment of the legs. The optimal distance from the edge of the countertop to the leg is 10 cm. On the beam connecting the center of the circle along which the countertop was rounded with its edge, we retreat from the cutoff of the countertop 13 cm (10 cm + 3 cm radius of the leg) and put a point. This point coincides with the center of the pylon.