We make a table of countertops. Do-it-yourself kitchen table (better and cheaper than purchased)
Dining table is an important element of the interior of the kitchen. The design and dimensions of the kitchen table should make it possible to place the whole family behind it, but at the same time not interfere with the free movement. On sale there is a large selection of kitchen tables of various shapes, from domestic and foreign manufacturers. But if you have a bit of carpentry skills, then it may make sense to make a table with your own hands, with your own design that will fit perfectly into the overall interior of the kitchen.
In our article we will tell: how to make kitchen tables of different models, which tools and materials to use for this. Also at the end of the article, you can find unusual models of kitchen tables.
Instruments
Despite the variety of table models and production methods, the set of tools used for manufacturing tools, with minor exceptions, remains the same:
- Electric jigsaw.
- Hacksaw.
- Drill.
- Screwdriver.
- Set of drills.
- Set of screwdrivers.
- Electric Planer.
- Electric Planer.
- Sander.
- A set of hexagons (in the case of confirmations).
- Iron or building hair dryer (for edging tape ends).
- Yardstick.
- Pencil.
- Ruler.

Depending on the complexity of the design of the table, additional tools are included in the kit.
Materials for the manufacture
For the manufacture of a kitchen table, the following materials can be used:
- Particleboard - Chipboard.
- Chipboard - Laminated chipboard.
- Glued board.
- Plain edged board.
- Wooden beam.
Often in the manufacture of kitchen tables, a combination of two or more of the above materials is used. 
Hardware
The accessories for the kitchen table include the following elements of fixtures and decor:
- Furniture corners.
- Confirmats.
- Eccentric bolts.
- Hinges for folding tables.
- Castors for sliding tables.
- Corner mounts for legs.
- Chips for tables made of chipboard.
- Plastic profile for countertops.
- Miter adhesive tape.
- Decorative caps.

Certain table models may include additional fittings that are not on the list.
Table options and methods for their manufacture
Simple kitchen table made of chipboard
Markup
On the purchased sheets of chipboard, mark the parts of the table:
- First, mark the countertops, as it is the largest element of the table. The countertop is made in the form of a rounded rectangle.
- In the second stage, draw two side racks that will serve as the legs of the table. Racks are usually made in the form of a checkerboard with a round neckline at the bottom. But you can show imagination and make racks of a different shape, the main thing is to observe two conditions: racks must be stable and not crawl out from under the countertop.
- In conclusion, mark up the upper and lower crossbars connecting the racks to each other and increase the stability of the table and the strength of the tabletop. Note that the lower crossbar is 1.5-2 times wider than the upper. The shape of the lower crossbar can be either flat or wavy.
When marking, consider the fact that the table racks should be located at 15-20 centimeters from the edge of the countertop. 
Cutting table parts
- Place the chipboard on the table.
- Use a jigsaw to cut out the countertop. During the cut, do not forget to put an unnecessary piece of plywood under the cut line, this will help to avoid chips on the back of the cut.
- Cut out the rest of the table. Avoid sagging of the sheet, this can lead to the clamping of the jigsaw, as well as to the breaking of the part to be cut.
- Work the edges of the cut parts with sandpaper or a vibrating sander.

Edge trimming of parts with tape and profile
- Put the plastic profile on the edge of the countertop.
- Having reached the point of angular bending, heat the profile with a construction hairdryer and rotate the profile.
- For a more reliable installation plastic profile on the countertop, optional you can use universal glue.
At the second stage, it will be necessary to make the ends of the racks and crossbars of the table with a special tape:
- Clean the ends of the parts from dust and grease.
- While pressing the tape with a hot iron, glue it to the end of the part.
- Cut off the excess with a knife, equalizing the width of the tape with the width of the end. Smooth irregularities with sandpaper, while being careful not to scratch the tape and the part.
- Glue the tape on the ends of the remaining parts.

Please note that gluing the trimming tape is required only in the visible places of the table parts.
Table assembly
- With the help of confirmations, connect the racks from the tol with the upper and lower crossbeams. The location of the upper crossbar should allow supporting the countertop and not allow it to bend. The lower crossbar is mounted above the round cutouts of the racks 20-25 centimeters from the floor.
- Having made the base of the table, install the countertop on it, fixing it to the furniture corners from the inside.
- Install the plastic feet on the bottom of the table racks.
- Close the confirmation heads with decorative plugs.
A simple table for the kitchen from the chipboard is ready! 
You can also see how to make a table from chipboard in the video:
Kitchen table "book"
The table "book" consists of the following parts:
- The base of the racks and crossbars.
- Narrow main countertops.
- Pairs of movable stand legs.
- Two opening side worktops.
- Royal and ordinary loops.
- Fasteners.
You can make a table of this design from chipboard, or from glued and edged timber. Also, metal parts are used to make the base.
Let's look at the process of making a table from glued beams.

Manufacturing countertops and racks
In order to make a worktop from glued together bars, you need to have at least two racks with clamps on which you will form the worktops. Racks and tabletops for a table of glued beams are made in the following way:
- Take a few bars with a cross section of 50x30 millimeters and lay them on racks with clamps. Place the bars in such a way that the annual rings on adjacent bars look in different directions, this will avoid bending the part during subsequent operation.
- Form a shield from the bars, slightly larger than the future countertop.
- Coat the ends of the bars with PVA glue.
- Clamp the shield with clamps. Avoid very strong compression, otherwise the shield will bend.
- Leave the glued bars for a day to completely dry the glue.
- After a day, remove the shield from the clamps and treat the surface with a surface planer or using an electric planer.
- Cut the shield to the required size and process the edges with a planer or a hand mill.
- Thus, you need to make two table racks, two rails, one narrow and two wide side countertops.
 Bars clamped by clamps
 Extendable Leg Making
Retractable legs for the table "books" are made in the form of frames, where the lower crossbar is located 15-20 centimeters from the floor. To make a frame, you will need four bars with a section of 50x25 millimeters. The connection of the bars can be made using long screws, spikes and glue or confirmates.
Assembly of the table "books"
- Assemble the base of the table by connecting the racks and crossbars.
- Fasten a narrow countertop to the base.
- To the racks of the table, using the hinges, attach the extendable legs.
- Attach the side ones to the narrow countertop by attaching them to the piano awnings.
- Install the legs on the racks.
- Check the operation of all moving parts of the table by unfolding it completely.
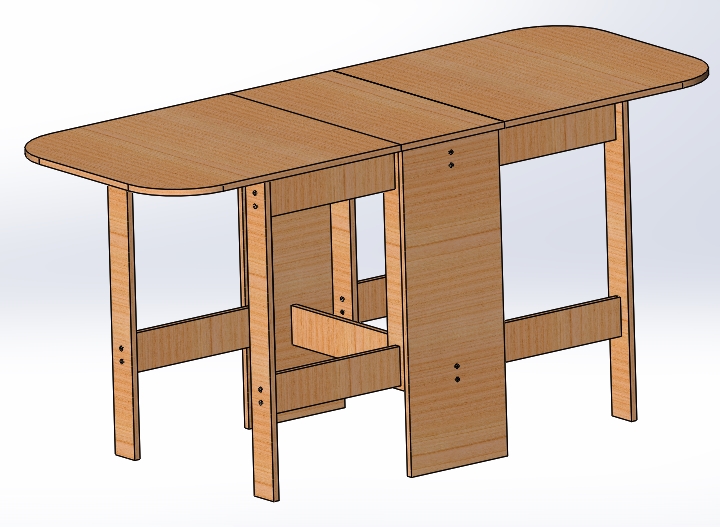 Table book
 Table lacquering
To emphasize the beauty of the tree, cover the finished table with clear varnish, if desired, pre-treating its surface with a stain. To obtain the effect of polishing, you need to apply several layers of varnish. 
How to make a table "book", see the video:
Extendable kitchen table
The extendable table has the function of increasing the surface of the countertop by installing additional elements. This type of tables is popular in small-sized apartments, where the area of \u200b\u200bthe house does not allow you to set an ordinary large table.
A sliding table is made of the following parts:
- Two main countertops.
- Additional collapsible countertops.
- Bases with a pallet.
- Four legs.
- Corner mounts for legs.
- Rollers for countertops.
- Fixing tabletop hooks.
- Spikes retainers.
It is best to make a sliding table from a combination of chipboard and bars.  Hardware for extendable table
Tabletop manufacturing
- From a chipboard sheet, cut out two identical-sized countertops that will form the main surface of the table.
- Cut an extra countertop. The width of the additional countertop should not exceed one third of the total area of \u200b\u200bthe table, otherwise the table in the extended position will not be stable.
- Stick on the edges of the countertops edge tape.

Making the base of the sliding table
The base for the sliding table is made of four narrow rails connected to each other by corner mounts for legs and a pallet. To lighten the overall weight of the table, for a pallet, instead of chipboard, plywood with a thickness of 5 millimeters can be used. Also, instead of a pallet, manufacturers often use metal or wooden crossbars that strengthen the structure and serve as a storage place for the middle countertop.
Making table legs
The legs for the sliding table are made of four bars with a cross section of approximately 50x50 millimeters, slightly slanted to the bottom. At the top of each leg is a hole for a mounting screw. The hole should be located on the inside. Do not forget to treat the legs with a planer and sandpaper.
Sliding table assembly
- Install the sliding tabletops on the base by attaching them to the roller mounts.
- Spread the worktops and install a removable worktop. For a good fixation of the additional tabletop on the base, install spikes on it that will connect all parts of the table to each other.
- To prevent tabletops from diverging when the table is in the assembled state, install hook-type locks on them.
- Attach the legs to the base.
- Varnish or paint over the tray and legs.

Assembly instructions for the sliding table are also in the video:
Folding wall table
If you have a very small kitchen and there is no way to put an ordinary kitchen table, then the solution to the problem may be the manufacture of a folding wall table. Its advantage is that when folded it takes up only 15-20 centimeters of kitchen space, and two or three people can easily have lunch after it is disassembled.
Folding table consists of three parts:
- Countertops.
- T-shaped wall mount.
- Triangular folding coasters
You can make a table from plywood, bars, hinges and screws.
 Parts of the wall table
 Making a wall table
- Use a plywood saw to cut out the countertop.
- From the bars with a cross section of 100x20 millimeters, make a wall mount in the shape of the letter T. The upper mounting bar should correspond to the width of the tabletop, and the lower height of the triangular stand.
- Make a triangular stand that will be attached to the hinges and keep the countertop open.
- Install the wall mount using dowels.
- Attach the worktop to the upper bracket. Use hinges or piano awnings to connect.
- Install the triangular stand.
- Check the operation of all parts of the table by disassembling and assembling it several times.
- Cover the table with varnish or paint.
If you have a countertop, but you do not want to make parts for a folding table manually, then purchase folding brackets in the store. Bracket models are specially designed for wall mounting and cost very little from 170 to 700 rubles.  Wall bracket for table
You can familiarize yourself with another version of the kitchen table in the video:
Design and shape of kitchen tables
To help you choose a kitchen table, we present you photos of the original models:
- Kitchen table from a glued board in a rustic style.
- Tansformer table on one leg of complex construction.
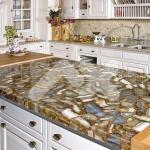
- Extendable table with a picture on the countertops.
- High-tech glued-wood table with rounded worktops.
- Round table with original legs.
- Massive kitchen table made of timber.
- Original table made of glued beams.
- A beautiful table made of boards with a very simple design.
- with internal electric backlight.


Now that you know everything about making tables, it’s easy for you to make your own table in the kitchen!
With a wooden tabletop with minimal financial costs.
The house was rebuilt, repairs are being completed. The kitchen was also ready at that time. The question was about the kitchen table. The shops looked after wooden tables. Normal tables with a wooden table top (not chipboard) cost from 3000 rubles. After looking at the whole thing, I decided to make a table with my own hands.
To make a table I bought:
- typesetting wooden furniture panel 60cm wide and 3m long (there wasn’t less),
- wooden beam 4 x 4 cm,
- 4 legs for the table. (they are sold in furniture hardware stores),
- screw nuts for fixing the legs.
Everything about everything took 1,500 rubles.
The dimensions of our future table are 60 cm by 160 cm (half of the furniture panel), based on the size of the kitchen), so the cost of the table put a little more than 1000 rubles.


Sawing the countertop according to the size of the table, I began to sawing the ends of the beam at 45 degrees.
A beam is needed to give rigidity to the countertops. Let him go around the table from the bottom. Without a bar, the countertop will bend.
We place the blanks of the bars on the countertop and check whether everything fits together without gaps.
We fasten the timber to the countertop with screws.


On the reverse side of the countertop, we mark the places of attachment of the legs and holes.


We drill holes in the countertop under the vertices. The diameter of the drill is 10 mm. The diameter of the screw-nut is 12 mm.
To facilitate screwing in the nuts, a 12 mm tap stroke can be set. The tap pitch is equal to the thread pitch on the screw-nut.
We do all this with four legs.
The table is ready and stands on its legs. We proceed to its grinding and varnishing.
I cleaned the table with sandpaper, first the 80th, then the smaller one - the 150th. The edges of the table and bars I made a little rounded. In some places I worked part-time bumps.


After thorough grinding, he began to cover the table with varnish.
The varnish was matte with us (taken earlier to cover the floor). After coating with the first layer, let the varnish dry. After drying, the pile rises. Again we pass with fine sandpaper and cover with a second layer of varnish.
If necessary, then after the second layer we also sanded with sandpaper and varnish the table, as I did.


The table is ready!

Instead of metal legs, you can also use a square beam or ready-made balusters that are sold ready-made.
Likely when I will make one more table, I will use balusters. They come in different sizes. It is advisable to use balusters with a diameter of more than 70 mm. They are also fastened to the screws.
The "heart" of any home, the housewives always try to equip especially comfortably. Chairs and a table are usually most carefully selected, where the whole family gathers for dinner. In this article, we offer two do-it-yourself kitchen table design ideas that are easy to put into practice.
Do-it-yourself wooden kitchen table from the boards
If you want to make a kitchen table with a solid one, for this it is absolutely not necessary to buy expensive wood. Quite often, in small private factories, a huge amount of waste remains in the form of boards from different species of trees. Yes, and in the cottages, many have entire warehouses of such good.
- First, we adjust the entire material to one size. It is very convenient to calculate the size of the boards based on the final size of the table. For example, the finished table should be 42x42 cm, then it will be convenient to use workpieces with a width of 4 cm.
- Next, we begin to lay out our boards on the work surface. It reminds a little brickwork. You arrange each subsequent board so that its middle is at the junction of the two previous ones.
- All work material is laid out. Now you need to make the countertop of the kitchen table with your own hands. To do this, we take carpentry glue and three clamps. At one time you will be able to glue together up to six rows.
- Next, you need to level the surface with a grinder and trim the edges. You will have to work in tandem, since the countertop of such a kitchen table with your own hands will turn out to be very heavy.
- When everything is ready, it is necessary to carefully sand the entire surface and cuts.
- We make the legs for a wooden kitchen table from two boards, which are connected by a corner to each other. To do this, we also use carpentry glue, carefully loan the entire surface of the loan.
- We will assemble the whole structure with the help of such an iron corner and screws. At the end between the legs under the countertop we fasten the "skirt", which will give the whole structure a finished look.
- At the end, the table can be covered with a layer of stain or immediately varnish. If you have sanded all surfaces well, the surface will turn out to be smooth.


Making a kitchen table with your own hands from wooden pallets
Sometimes it turns out to make a kitchen table with your own hands and even for a penny. For example, in warehouses you can buy wooden pallets for ridiculous money, which are often thrown away. We will make a table of them.
- First of all, we make the frame of the future countertop.
- Next, install and nail the legs of the table. Also, if necessary, you can install such partitions here: they will make the structure more rigid and cross boards can be nailed to them to make a shelf for the necessary trifles.
- To make the table mobile, we attach to the legs of the wheel.
- Turn over our table. Next, we need a sheet of plywood. Its thickness should be sufficient to work on the finished table.
- We put a sheet of plywood on the frame and cut off the excess.
- On the perimeter you need to make such a side.
- Next, we work on the countertop of the kitchen table with our own hands. Here you can use any available materials: a finished mural or small tiles, small pieces of chipped tiles. Glue


Modern plastic and composites adequately compete with natural materials, and in many respects they are noticeably superior. Kitchen tables with a plastic worktop almost replaced the wooden dining furniture, as they have a number of objective advantages:
- resistant to mechanical damage;
- do not absorb pollution and are easy to care for;
- do not lose their original characteristics when exposed to heat and contact with aggressive household chemicals;
- do not change color when exposed to sunlight.
The latter characteristic is extremely important because it has turned a table with a plastic coating from a completely utilitarian piece of furniture into an important element of the style of interior design.
Things to remember when choosing a table with a plastic worktop
Whatever the size, shape, purpose of the room - it’s simply impossible not to notice the table in it.
Dimensions
The classic version of this furniture has standard height 75 cm. Design models or bar tables with plastic tabletops, the photos of which are presented on the website, can be 3-6 cm lower or have an adjustable parameter within 70-95 cm. Dining at such a table is not very convenient, but "non-format" has to friendly and informal communication.
The length of the countertop, as a rule, does not exceed 140 cm, and the width is 80 cm, which is comfortable for 4-6 people. But in transformer models, the length and number of seats can be increased.
Geometry
The catalog of our store contains dining tables with a plastic coating of the most popular forms:
- rectangular;
- square;
- oval;
- round.
The straight lines are harmonious in any interior, including hi-tech, modern and country. Rounded lines are preferred in spacious and well-lit rooms. classic style, especially in the dining rooms located in the bay window. Small round tables are appropriate in an eclectic and minimalist design. However, there are no definite recommendations.
Color spectrum
The “right” color is hardly the main factor in getting into style. In our store you can buy a table with a plastic coating in both classic and modern colors:
- plain;
- with imitation of wood texture (oak, wenge, walnut and others) or natural stone;
- with a picture or photo printing.
The number of options is much larger than the photos presented in the catalog, which allows you to choose a table at a reasonable price for any interior. Call our managers or make an order on the site right now!