Sew curtains in the kitchen from the old tulle. How to sew tulle curtains on your own
Every woman dreams of transforming her home, making it more beautiful and comfortable. First of all, this concerns the kitchen room. A few good tips will help create. Since ancient times, any housewife knew how to decorate their own housing and do it with minimal financial costs. Today, manual production is particularly popular. You can create unique curtains yourself, having previously thought over all the details.
DIY kitchen curtains: material selection
Every woman can buy ready-made curtains, but not everyone can sew them on her own. Modern hand made is very popular. Self-made curtains is an opportunity to make any dreams come true. It is enough to choose the fabric, determine the model and beautifully decorate everything. If we consider this issue from the point of view of practicality, then independent sewing is the best way to decorate the kitchen.
in most cases, they are sewn from the following materials:
- Flax.
- Tulle.
- Nets.
- Organza

The advantages of different types of materials
Linen is a practical and durable fabric. It does not require special care, pleasant to the touch, and most importantly - this fabric is hypoallergenic. Due to the volume of fabric, you can create a real work of art with additional density and weight.
Tulle is a classic material, it is recommended to use it for the kitchen, especially if it faces the north.
A grid is an original material that may contain decor elements, patterns, and lace. It features interesting weaving, folds and volume. It allows you to make the kitchen luxuriant and airy.
Organza softens lighting well. It is unpretentious in care and does not require additional cleaning. The material is characterized by a light shine, which gives it a touch of sophistication. Organza color drawings
These materials can underlie both the curtain itself and the decor elements. It is advisable to select everything to match each other, so that in the aggregate the new one looks beautiful, and not pretentious.
Original do-it-yourself kitchen curtains: choice of color and design
Arched curtains are especially popular. They can be made of any material. The hue is selected according to the color scheme of the kitchen or is completely different from it. The curtain can be both a pleasant addition and the main highlight of the room. The main thing is to decide on her appointment.
If the kitchen is dark and is located on the north side, it is advisable to give preference to warm colors. They will replace the lack of solar heat and light.
With an orange and peach tint, the kitchen will sparkle with new colors, and will become pleasant both for the landlady and her guests.
During the design of the kitchen, you must consider the basic rules of window decor. In the presence of high ceilings, preference is given to curtains, the pattern of which has vertical elements or just stripes. The shade of the material may fully correspond to the design of the kitchen or radically differ from it. Often, curtains are combined with upholstery on chairs, a tablecloth and rug.

What to consider when choosing curtains for the kitchen
- The color scheme of the kitchen.
- The presence or absence of sunlight.
- The height of the ceilings.
- The main purpose of the room.
If the advice did not help, but you still have doubts, then it is recommended to give preference to neutral shades. They will fit into any interior and emphasize the sophistication of each apartment.
Curtains to the kitchen with your own hands from old curtains - convenient and economical
Sewing is saving time and money. The main decoration of the kitchen are the curtains. They fully convey the mood of the landlady of the apartment and complement the kitchen interior. To improve the external data of the room, it is enough to create unique curtains with your own hands.
For this purpose, you must acquire the following materials:
- A cloth of 1.6 meters.
- Reps in the box - 50 cm.
- Sewing machine.
- Reps in a cage and strip - 30 cm.
- Thread.
- With pins.
- A pen.
- Scissors.
The first step is to sew the loops. The material can be based on both new models and old curtains. Two strips must be cut out of the striped fabric, which then fold and grind. Next, you need to sharpen the edge, twisting it with a prepared handle. The second strip is processed in the same way.
The prepared fabric is cut according to the size of the window.
In this case, it is necessary to make a slight crochet of each side. Extra centimeters will go away when stitching the blinds. Then a strip is cut from the striped fabric, bent and ironed. The seamy side is applied to the front and is captured by pins. Excess tissue is cut off. All edges of the curtain are treated in the same way.
Ready-made original curtain is hung on the window. On average, work takes less than a day. Time-consuming preparation is during which a woman is determined with the material and type of future curtain.
Curtains for the kitchen with your own hands from the remnants of fabric
You can make beautiful curtains using existing photos. Each woman is capable of creating a unique curtain model. The main thing is that it will be equipped with the necessary materials. It is recommended to give preference to light tissues.
To obtain the optimal curtain width, it is necessary to measure the width of the window, and divide the resulting figure into three

The pattern is done on a large piece of fabric, after measuring the window opening. You can do all the work according to the old scheme, which was presented in 1983 in the magazine "Peasant".
To work, you need to choose:
- Material.
- Threads.
- Needles.
- Decor Elements.
At the top point, draw a semicircle so that it corresponds to the third part of the window opening. Then it is cut, leveled and processed. This allows you to get a smooth and beautiful semicircle.
An important criterion is the width. To determine it, you need to multiply the height of the window by 2, and then add two radii to it. The resulting figure is the optimal length of the future curtains. The pattern is made on the basis of these sizes. The curtain itself is cut from a fabric with a cape of 2-3 cm on each side, and then subsequent processing of the edges is carried out.
How to sew curtains in the kitchen (video)
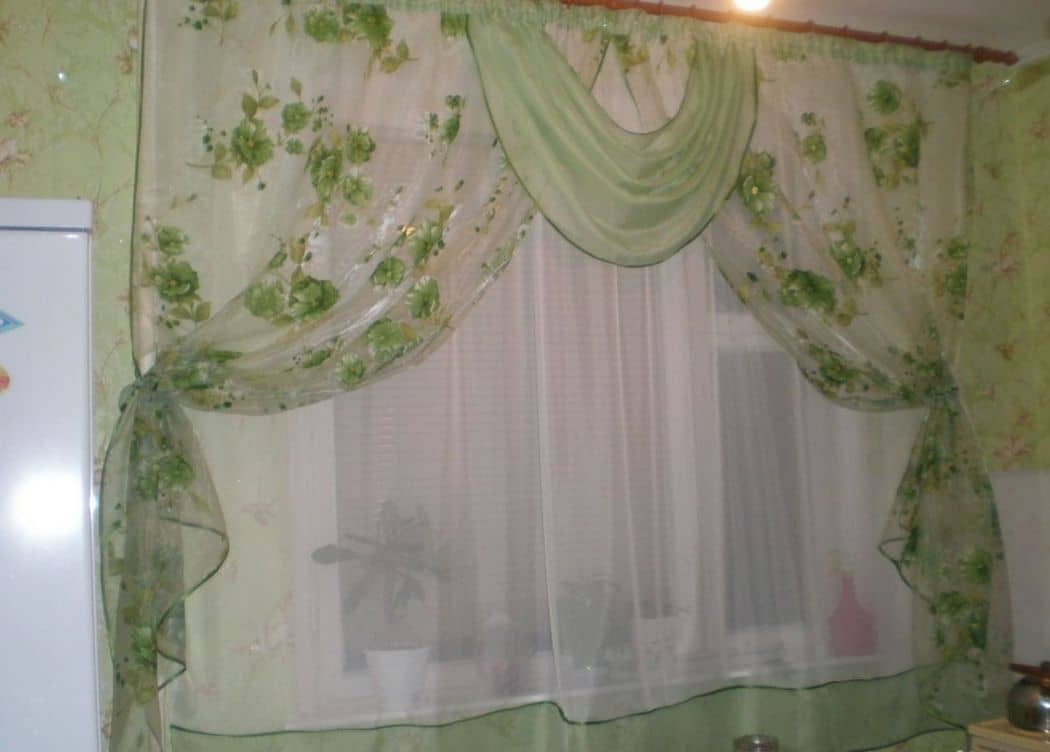
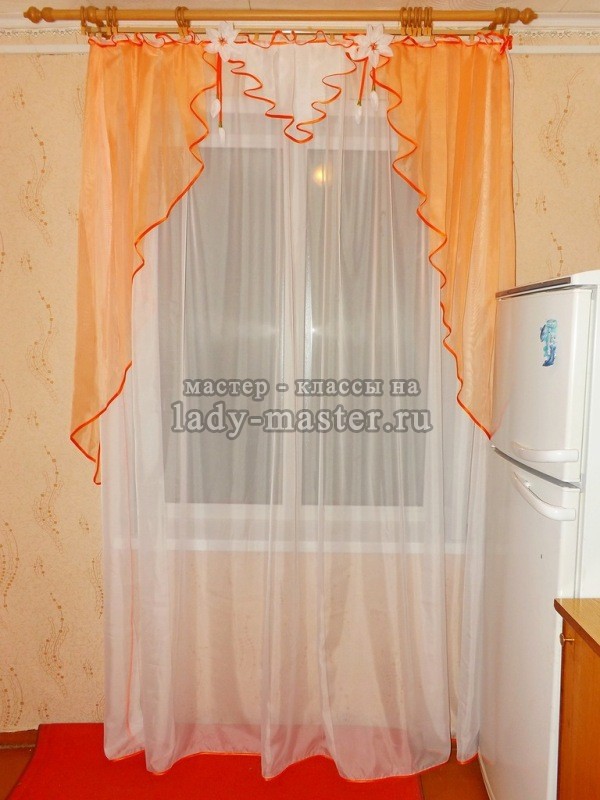
I thought for a long time what to give my mother-in-law for a birthday, because I wanted it to be necessary, and not just dust on the shelf, and the memory would remain, not just give and forget. And I ventured to show my handicraft abilities and sew a new curtain for the window for her entrance, as I knew the mother-in-law's indifference to such things. And so, what happened to me, by no means a professional, but an ordinary mom on maternity leave, it turned out. First of all, I measured the dimensions of the window, more precisely the width and height of the cornice - the future curtain was planned to be 1.5 m by 2.4 m.
Having scanned a huge number of samples on the Internet, I was horrified - it is not so simple as it seemed to me at first glance. Therefore, I estimated my capabilities, made up a picture in my imagination and went to the market for materials and necessary trifles:
- a white veil of 2.7 m (width 3 m);
- orange veil 1.5 m (width 1.5 m);
- bright orange slanting inlay 26 m;
- a tape for tightening 1.5 m;
- orange threads;
- scissors.

How to sew the curtains in the kitchen from tulle with your own hands:
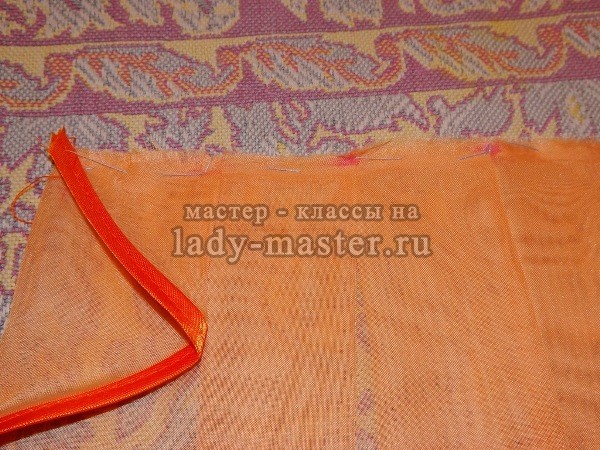
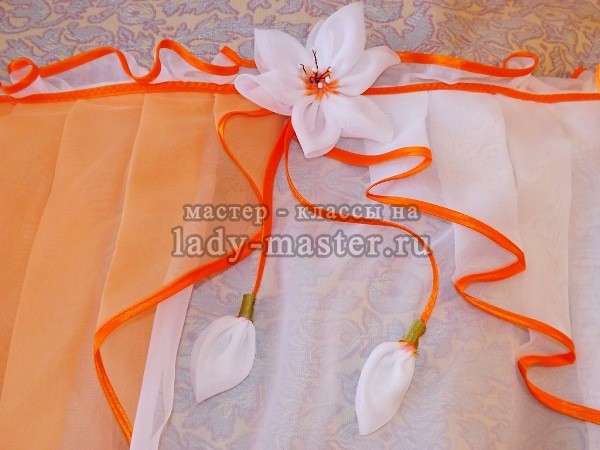
1. From the acquired material I carved out the details: a white veil measuring 3 m by 2.4 m; two isosceles triangles from an orange veil (cut diagonally a flap of 1.5 m by 1.5 m); and another triangle from a white veil, the hypotenuse of which is 1.5 m (i.e., I took a piece of a white veil 1.5 m long and 30 cm wide, folded it in half, and then cut diagonally - it made a wedge).

2. I trimmed all the details with an orange oblique bandage, more precisely, a large white flap completely, orange triangles have one leg and hypotenuse, and both legs are in the white triangle (I think that we still remember mathematics and will understand the definitions).

3. To collect the triangles into folds, the first thing I did was markup every 5 cm on all triangles on the non-sheathed side.


4. Now the most difficult thing, as it seemed to me: to collect the folds in a zigzag fashion (each fold will consist of three layers of a veil). Given that the orange triangles will be located on both sides, I collect the folds on both flaps in the opposite direction from each other, and sweep it by hand.

5. I also fold the white triangle, only starting from the middle, in the opposite direction on both sides, and also sweep it away.


6. For convenience, I prepared the triangles by smoothing them over the folds, and then sewed everything together with the help of a slanting inlay, sheathed the free sides of the veil - I got such a lambrequin.

7. Now a white veil with a side of 3 m has been strung on an ordinary thread of length 1.5 meters, retreating from above 5-6 cm.

8. Having thus reduced the width of the curtain by half, I sewed it on the tape for tightening.

9. In this place from above I found a previously sewn so-called lambrequin with a decorative zigzag.

10. I thought about it and finish it, but suddenly it seemed that we weren’t grabbing something and decided to decorate the curtain with flowers from the veil, because just a small piece of white remained. To do this, cut out (used a small saucer) and cut out circles with a diameter of 12 - 14 cm.
11.To make the flowers look realistic, they quickly twisted stamens from large white beads and copper wire (6 pcs. For each flower).

12. Now it was possible to collect the flower. To do this, I folded the circles of the veil two times in half (it turned out triangles). One flower took 7 petals.

13. Collected all the petals on one thread at the base of the triangles, tightened it, placing the stamens in the center, and the flower is ready. The middle was painted with an orange felt-tip pen. The second was made according to the same principle.
![]()
14. In addition to the flower, I decided to sew buds, two for each flower (it's just like one petal pulled together at the base). She connected the buds between herself with a stitched orange ribbon in pairs, sheathed at the base with a green ribbon, and sewn to the flowers.

15. The last touch remained - to sew flowers at the places of contact of the triangles.
17. And here is what I got, not having certain skills. My mother-in-law, of course, was delighted with my gift. I think in the near future there will be a proposal to update all the windows in her house.


- DIY sewing tulle instructions
- Rules for sewing curtain tape
If the side curtains in classic style ready, but no tulle, then this window decoration is not complete. Tulle is an essential detail of the classic window and an indispensable companion of curtains, which are selected in color matching with them. It is worth noting the fact that the cost of tulle is much higher than that of curtains. Therefore, sewing tulle with your own hands will be much cheaper, and at the same time, the product can be made in an exclusive version.
Many people are not familiar with the technique of tailoring tulle, although even a person who is ignorant of sewing curtains can do the simplest model. The main thing is to have at least a minimum of knowledge in the field of sewing art. If there is a beautiful fabric, then sewing tulle with your own hands is quite possible to master. And as a test, to sew tailoring for the kitchen, children's room. It is important to observe 3 basic principles:
- the model of curtains for tailoring should be chosen strictly in accordance with the style direction of the room;
- focusing on the characteristics of the current interior design, one should clearly determine the color of the tulle;
- be extremely careful while sewing.
Let us dwell on sewing a simple tulle with your own hands, which will decorate the window in the nursery. To carry out all actions will be necessary:
- sewing machine;
- fabric (about 6 m) - any lightweight material can be used instead of tulle (for example, organza);
- threads
- tape for curtains (6 m);
- roulette;
- scissors;
- ironing board;
- iron.
DIY sewing tulle instructions

The first step is to correctly calculate the length and width of the fabric. To create a beautiful drapery, on which frequent uniform folds will look original, it is better to take 2 width of the cornice. For example, the cornice has a length of 2.5 m, so the tulle is acquired at 5 m. Roulette is a good helper for making measurements.
The height of the ceiling is measured from the eaves to the floor line. It is important to take measurements in several places. Because at different sizes make a smooth bevel in the upper part of the tulle.
You can find out the required length for the finished tulle in this way: measure the gap between the cornice and the floor line with a tape measure. For an approximate calculation, we take this distance equal to 2.4 m. Then we subtract 2 cm from the obtained length, plus another 10 cm to the resulting figure for bending the lower part and 3 cm for bending under the curtain tape.
Approximate calculation: 2.4-0.02 + 0.1 + 0.03 \u003d 2.51 m.
Cutting of the side edges proceeds when the lengths of the sides of the tulle become known.
Tip: throw away the remaining pieces of fabric in a hurry. They can be useful in the manufacture of various frills for decorative elements of the interior in the house.
Bending the edges is performed no more than 2.5 cm and lay a straight line. A width of 2.5 cm makes it possible to hide any small irregularities. Regularly check the tension of the fabric layers from below and above so that the tulle does not go in waves.

On the surface of the floor spread tulle with the wrong side up. Since the fabric is slippery, it is advisable to put it on a catching surface (for example, on a carpet). Using a tape measure, determine the height of the future product.
If there are uneven surfaces in the apartment, the measurements will be performed and applied to the fabric uneven. On the marked down smooth the edge of the fabric from above. It is important not to confuse where the edge is in the measurement process.
Along the edge of the canvas from above, backing 0.5 m, mark a small segment with dots, then smooth it over with an iron and connect. The edges of the tulle are bent 2 cm and neatly stitched.
If necessary, access to the window, the canvas can be cut into 2 parts.
When attaching the curtain tape, maximum care should be taken so that the stitch never crosses with the pull cord. Otherwise, it will simply break off.
The word "tulle" as the name of a curtain made of tulle fabric without a lambrequin and additional decorative panels (swag, tie, scarves, etc.) has completely taken root in the language. In this article we describe how to sew a tulle with your own hands. This is simple, it will save a significant amount and give initial, but very useful skills in cutting and sewing. If you later want to sew a luxurious unique curtain ensemble, they will be very useful to you.
And what kind is it?
Tulle fabrics were born generally by accident. In the late XVIII - early XIX centuries. there was rapid mechanization of the textile industry. There were completely new products that could not be made manually. One of them was nodal-free fishing nets, which provide much less resistance to movement in the water. At a time when fishing was still conducted from sailing schooners and lugers, this was very significant and in demand.
The early days of what is now called the post-industrial or consumer society were regularly shaken by overproduction crises. Small enterprises, in order to survive, mastered the production of a thin fine knotless net from cheap cotton yarn and offered it for domestic purposes instead of expensive silk transparent fabrics. It is believed that for the first time, weavers of the French city of Tulle came up with this idea, hence the name.
The novelty was to the taste of consumers, and soon all translucent curtain fabrics began to be called tulle, and curtains and curtains of them - tulles. The names of tulle fabrics can be masculine and feminine, and tulle curtains are used in the language this way and that way. Therefore, in order to understand what is needed in tulle publications, one needs to read the context. Typically, tulle (m) refers to tulle fabric, and tulle (m / f) to tulle curtain.
Note: a similar confusion also exists with the veil and veil. The veil (m) is uniquely fabric, and the veil (m / f) is either she or a sewing product from it.
Where to start
Before you sew a tulle, you need to determine its place and role in the interior. The main factors determining them for tulle / tulle is the way the curtains are suspended and the fabric from which they are sewn. These factors are to some extent interconnected; the connecting elements are the size of the fold and its so-called. module; more about him - next.
Tulle suspensions
Tulle fabrics are thin, so hanging curtains from them is not suitable for any reason - they will soon wear out and lose their appearance. Curtains tulle suspend a trace. ways (see. Fig.):
- In the backstage;
- On the clips (clothespins) for the fabric;
- On clips or hooks for a curtain tape;
- On the rings for her;
- On grommets;
- On the hinges.

In the wings
Some consider the tulle in the wings creating a special cosiness; others - philistinism. One thing is certain: the suspension on the drawstring is laborious and requires very careful work - the sleeve under the eaves should be perfectly straight. The hidden disadvantage is an overspending of tissue. If, for example, the diameter of the rod is 4 cm (it is not recommended to hang the tulle on the drawstring with a diameter of less than 2 cm), then the allowance at the top will "come out" of approx. 80 cm; see below for more information on calculating tissue consumption. The curtain made of tulle fabric on the drawstring quickly wears out, it is difficult to push and push it. From modern interiors, tulle on the curtain fits only in art deco. The folds are only small, with a module of up to 1.5.
Note: it is better to push and pull the tulle on the curtain over the top with the help of a carrier - sticks with a blunt smooth hook.
Behind the fabric
This method of suspension allows you to get spectacular scallops at the top, but from the tulle fabrics described below, only crinoline is more or less suitable for hanging from the fabric. Stronger fabrics do not form a beautiful wave, while weaker ones break quickly. The folds are large, but of a small module, up to 1.5.
Per tape
Suspension for the tape is by far the best way for tulle fabrics. Details are described below. Depending on the type of fabric and the method of tailoring fits into any interior. Folds are possible from medium (approx. 5 cm wide in free form, i.e. on the curtain) to the largest. The fold module is up to 2.5-3, depending on which fabric.
On grommets
The difficult way, then only the suspension on the grommets fits into the interiors of high-tech and minimalism styles without any problems. The difficulty is in the installation of eyelets. Modern eyelets themselves simply snap their fingers, but completely round holes need to be punched under them, otherwise the fabric from under the eyelet will climb. This is done either by a special machine, or a pair of punch-matrix and a hammer. The latter requires perfect skills in mastering a plumbing tool: a blow needs a single, short, strong, accurate and sharp. Folds suspension on the grommets gives only large; module - how much tissue allows, see below. The top of the tulle under the grommets is pasted over with an adhesive cloth or non-woven is inserted into its undercoat (see below).Hinged
The method for a sufficiently skilled craftswoman is complicated and time-consuming. It has all the drawbacks of hanging in the wings, but allows you to get large folds and therefore fits into modern interiors. The only way to seamlessly write off tulle to the loft interior.
Another suspension

Any of the described fabrics is suitable for sewing tulle on a manual fold. In this case, the curtain tape or braid is not sewn into the upper doorway, and the elements of the suspension system are attached to pre-assembled and stitched folds. The money savings on the tape are small and the work is rather laborious. But, firstly, sewing on a manual fold is the best way to alter a new one from an old unfit tulle: tears from suspensions are hidden in folds. Secondly, tulle, sewn on the simplest hand fold, looks original, see fig. on right; how to sew a tulle on a simple hand fold, see the video below.
Video: sewing tulle on the manual fold
Secondly, fabrics such as a veil and crinoline (see below) can be gathered into very beautiful goblet folds; they are usually formed from dense curtain fabrics. For sewing curtains with goblet folds, see the following video tutorial:
Video: sewing curtains with soft folds-glasses
And finally, chiffon and kisei (also see below) can be assembled into spectacular bow folds. For calculation and assembly of bow folds, see the master class.
Video: calculation and assembly of bow folds
Fabrics
The most commonly used trail for sewing tulle. fabrics (see next figure):
- Grid;
- Organza;
- Veil;
- Kisei
- Chiffon;
- Crinoline;
- Semi-organza and other gas (calender) fabrics;
- Muslin.

Grid
Synthetic descendant of grandmother's cotton tulle. Tough, durable, not easily soiled, well blown and washed. Under local load, the overlay decor does not stretch or frown. It is possible to decorate the tulle from the net yourself with rhinestones on acrylic glue, appliqués from dense heavy fabric, bows, etc., etc. The folds are large, from 7 cm, with a module of up to 3. Available in different colors and colors, including with factory décor and metallic or metallic threads. The thread for marking for cutting (see below) is not stretched. You can’t hang in the wings.
Organza
It is lighter than the net, so the decor does not hold on, but it allows you to get folds from 3 to 15 cm. It is produced without metal strands. The disadvantage is low air permeability. The rest is like a net.
Veil
More dense organza, well suited for east-west windows. Laid on decor - only with embroidery, does not hold others. The marking thread is pulled. Folds - from 2 to 10 cm; module - up to 2. The rest - like an organza.
Kisei
It is lighter, but less transparent and blowable than the veil, so it is more suitable for southern windows. Effectively fluttering in the wind. Folds from 2 to 7 cm; module - up to 1.7. The decor is exclusively factory. The thread for marking is pulled harder than from a veil.
Chiffon
Substitute veil and kisei for the windows of the north and the balcony. Folds 3-15 cm, module up to 2.5.
Crinoline
Thanks to a special way of weaving, it holds well folds from 3 to 20 cm with a module of up to 3 (ballet tutus and upper skirts of wedding dresses are sewed from crinoline), but creeps under the overlay decor. Large folds are playful, finely textured. Suspension on the drawstring is possible. Depending on the color and density it is suitable for any windows and fits into any interior. The disadvantage is that it reflects in reflected light, so the artificial lighting of the room should be well thought out.
Gas fabrics
Silk gas, from which uniform caps of Chinese officials used to be sewn, is not used for roads and for tulle. It is replaced with calendaring fabrics - synthetics rolled between hot rolls. The most common semiorganza. Folds gives wide, but relatively low, module up to 2, and monumental-flat. However, if the fold on the half-organza is touched, a dent forms in it, which needs to be straightened, which can be seen in pos. 7. Hang tulle from a semi-organza in the rooms of a laconic and somewhat cold appearance. If you want your guests to always know their place, then a tulle from a semi-organza is yours.
Muslin
With high transparency for visible light, it reflects heat rays well and is easily blown. It does not hold a crease at all; the entire muslin tulle becomes a box. Also does not hold overhead decor, but the factory one is very diverse.
About fabric colors
Tulle fabrics shine through. Because of this, the psychedelic effects of their colors intensify. As a result, large monophonic fields of orange, as well as combinations of it and yellow with blue and blue, are unacceptable in tulles. Such colors can cause a short-term emotional upsurge and surge of strength, but their regular contemplation acts on the psyche, without exaggeration, destructively. Psychologists call such combinations the colors of madness. However, tulle décor using yellow and orange is appropriate in workrooms with oppressive effects, e.g. in a cramped kitchen. However, in this case, the main color accents should give red and light green, see e.g. track. Figure:

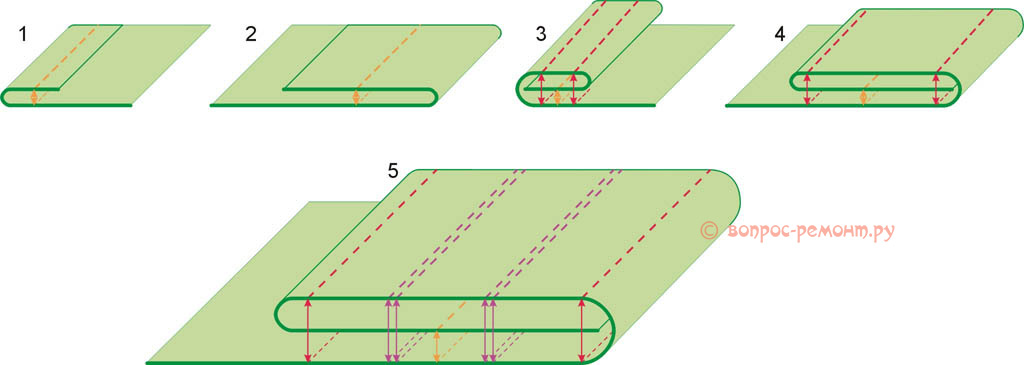
More about junk
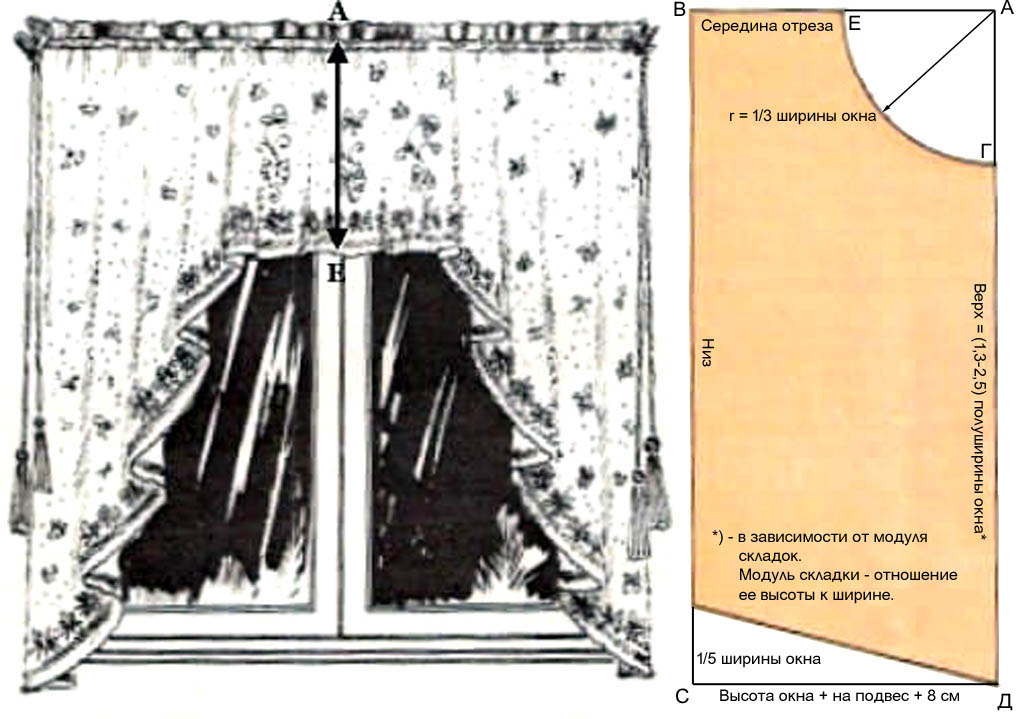
Another good way to give a new life to the old tulle is to alter it into a curtain arch for the kitchen. Arched tulles block the window a little, but provide enough space for the color decor. The old tulle with completely frayed bottom and top will fit on the arched tulle. Pattern of arched tulle in the kitchen is given in Fig.
Fabric and crease consumption
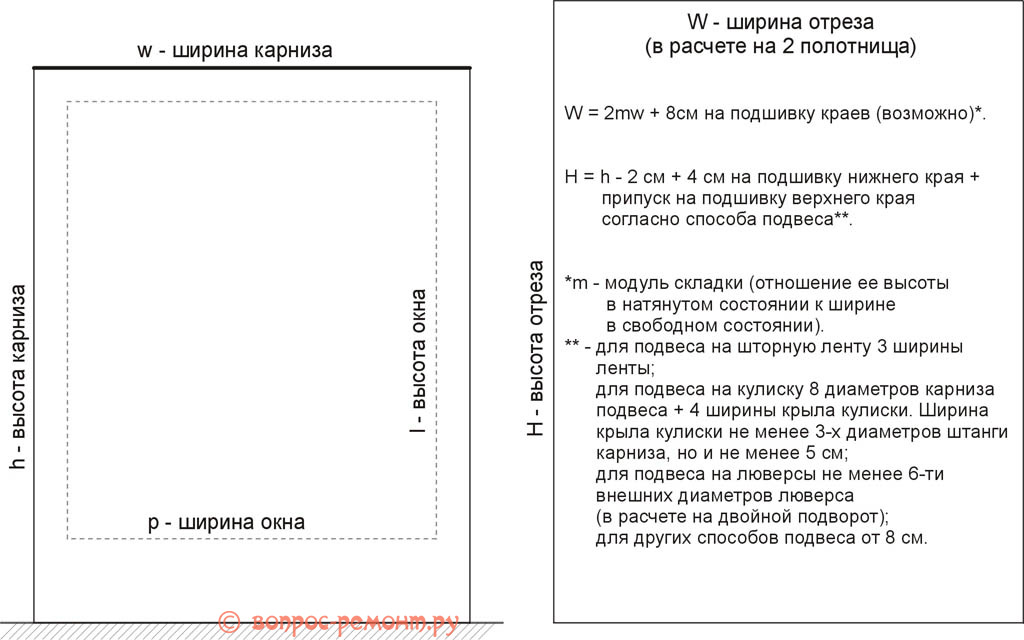
We will consider what is chosen - which tulle to sew. So, it's time to talk about useful little things needed to properly sew curtains from tulle fabric. The first of these is the calculation of folds and tissue consumption. The tulle pattern is built based on the width of the cornice (and not the window) and its height above the floor. The scheme for calculating the consumption of fabric on a simple straight tulle and instructions for it are given in Fig. What you need to determine on your own in place is the fold module, and select the fabric along with the design conditions.
Note: the height of the fold in the free state is also called its drill height.
The grade of fabric per tulle and its consumption are determined by the trace. way:
- We draw a sketch of tulle with folds of the desired free height and width. The folds on the entire cornice should be an even amount in the range of 8-40.
- According to the sketch, we also pre-determine the grade of fabric.
- On paper we draw in the scale 1: 1 the desired profile of the fold, such as those in Fig. below. For extreme profiles, you need a fairly stiff fabric: mesh, organ, crinoline.
![]()
- On the profile we lay out a piece of the cord or thin soft wire; micron accuracy is not necessary.
- Remove the cord / wire, straighten and bend in half.
- We measure the length of the resulting half-section L. Its relation to the width of the fold B will be the fold modulus m \u003d L / B.
- According to the technical data of the fabric, we check whether it holds a fold of such width and module. No - specify the choice of fabric.
Note: warp threads, if distinguishable, must be vertical!
Marking and cutting
Cutting the tulle fabric, like dress or upholstery, will not work - it will crawl, the cut will turn out uneven. Also, unlike dress fabrics, tulle is woven into pieces (rolls) not in length but in width; the length of the tulle is standard, 3 m. Therefore, halving the cut into curtains, like the seller in the store — notching and tearing — will not work. There are 4 ways to evenly divide a section of tulle in half:
- By smoothed fold;
- Following the thread;
- Arshin and scissors;
- Arshin and a cutter.
To cut along the bend at the edges of the cloth with the help of a tailor's meter or tape measure, marks are made, the piece is bent over them, the bend is ironed and cut on it from the inside with a sharp knife. The downside is ironing. It is impossible to iron tulles without an iron pad (a thin soft pad between the sole of the iron and the fabric), it is easy to burn or leave yellow spots. But from the shifting of the iron, the not yet smoothed fold creeps and the cut turns out to be crooked.
It is easy to cut the tulle along the trail of the thread if it is pulled out of the fabric and you can distinguish between warp and weft. How to cut a tulle on a trace, is shown in fig. A piece from one edge is cut and the cut is slightly stretched until wrinkles go (on the left). One, and only one, warp thread is “caught” in the notch and is pulled out (in the center). If it is torn, it is “caught” and the next one is pulled. From the elongated thread there remains a clearly visible trace (on the right), along which they cut with scissors.

If the threads from the fabric are not pulled out, you need arshin - an even piece of wood is heavier. Divisions, as on a tailor's arshin, are optional. For cutting with scissors, the fabric is spread on a flat surface and dots are set on the arshin with a marker, and they are cut along them. Do not lead a line with a pencil, it will draw a thin cloth!
A perfectly even cut is obtained for arshin with a roller cutter for fabric, but then you need a lining for cutting from a board, plywood or fiberboard, otherwise the cutter will spoil what's under the fabric. The fabric is spread on a lining, the arshin is shifted 6 mm from the cut line and is pressed from above for a while.
Edge processing
The lower and, possibly, lateral edges of the tulle are cut with a double winding: from the bottom / from the sides by 2 cm; on top - how much is needed by the suspension method. Cut in 2 steps: first do a single turn with one stitch (pos. 1 and 2 in the figure); then tuck again and sew twice (items 3 and 4). Sleeve under the bar for hanging on the drawstring is sewn from the sides with a double seam, pos. 5. Thus, on the front sides of the edges 3 seams will be visible, and on the wrong side 2.
Stretch the fabric when stitching is impossible, the seam wrinkles. They let her go freely, as the grab of the machine pulls. When wrinkles run ahead (after 10-25 cm of line), the machine is stopped, the fabric is straightened and scribbled on.
Ribbon stripe
Curtain tape purchased with a margin of approx. 5 cm in each direction, then it will be cut off. In the cheapest tape with a width of 5 cm 2, weft threads, but it is better to take at least 3-thread, the folds will be more accurate. The ribbon is sewn from the inside. The lines lead from 2 sides of each weights (red dashed lines on the left in the figure), but so as not to grab the sleeves with them (shown by blue arrows) and pockets for hooks / clips (green arrows). The sewn ribbon is cut flush with the edges of the tulle, and the folds are gathered by pulling the weights starting from the top (in the center). Elongated braids knot, excess cut off. If you take a 4-thread tape, you can get some kind of bow folds, on the right in fig. In this case, the tightening is carried out alternately from above and from below. Everything, tulle can be ironed and hung.

How to hang a tulle
If the tulle is hung by a fabric or on a ribbon without pockets, or instead of it in the upper back of the pants, then the tulle is hung first over the edges. Then pull on the middle and attach it to the suspension. The cloth is then stretched to its full length and the remaining suspensions are distributed. Are you done? We knock down the banner on one side and just hang the other - the tulle on the window is ready.
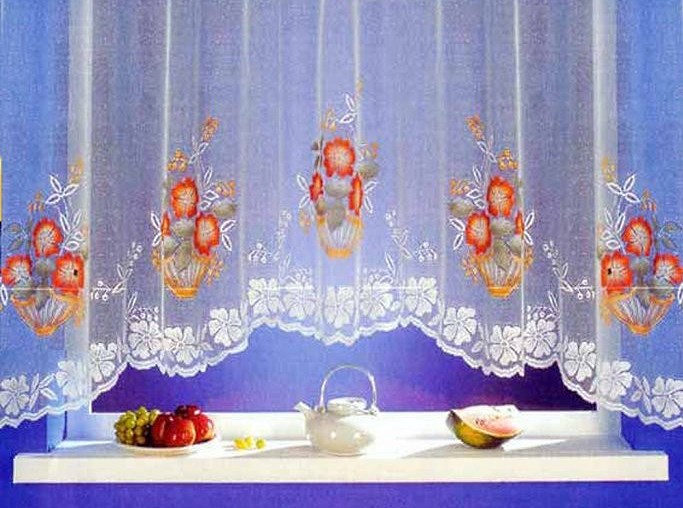
A fluffy cloud of thin transparent fabric covering the window allows you to feel the atmosphere of calm and push the small boundaries of the room. Such opportunities are provided by tulle for the kitchen, the species diversity of textiles for which has significantly increased and is not limited only to the usual grid.
Varieties of tulle
The diverse tulle for the kitchen makes it possible to tint a specific interior surroundings, if you carefully study its varieties.
- The grid is large, small, patterned, has a familiar image, referring to traditional types. She supports the noble restraint of the classics, becomes an expressive emphasis on retro styles. It can be made of yarns of different thicknesses and structural formulas: natural silk, linen, cotton, artificial nylon, lavsan, nylon or blended yarns.
- Tulle - noodles allows you to organize an unusual design with elegant exotic notes. The basic element is the thread, often supplemented with beads, strong enough and wide (≤ 0.5 cm), which form a different degree of density of the curtain, freely hanging from the cornice. The threads do not intertwine, remain smooth, do not lose decor. For washing, they are bound.
- An elegant veil in a wonderful way ennobles any style of the kitchen, it creates a complete image of the window, both in a monopoly version and in combination with curtains.
- Organza, used as a tulle, creates a mysterious flowing foggy light stream. It can be completely smooth or have convex elements of various shapes and colors.
- Due to its refined silky structure and transparency, chiffon often becomes an element of the original window decor.

Optimum length selection
Developing your own project for the future window decoration, choosing tulle for the kitchen in parallel with the curtains, you need to carefully analyze the arrangement of furniture and correctly calculate the size of the length of the product. There are three options:
- In small kitchens, it is advisable to design using tulle, slightly longer than the window sill. Such a product will not be an obstacle during movement, it is easier to care for. To maintain an impeccable appearance, the lower edge of a shortened tulle is treated with an inlay or decorative border.
- A long panel touching the bottom edge of the floor looks impressive, but only in large rooms.
- The most practical form of tulle, adding dynamics to the design, remains the arch. Its lateral sides usually fall slightly below the window sill, and the raised semicircle of the central part does not become an obstacle even if the window section is used as a dining area.
The problem of the length of the tulle is solved in parallel with the selection of the design of the main curtains, if their presence is considered necessary, it can be changing.
For example, in the corner where the table is installed, the tulle will have a height of up to the middle of the wall, and then it will gradually increase as it moves to another corner, free of furniture, where the canvas will touch the floor.
Often, housewives, solving the problem of which version of tulle is more practical, use a transparent transparent fabric, such as a chiffon or veil, gathered in lush ruffles, the lower edge of which falls slightly below the middle of the window.

Kitchen Tulle Design
The visual impression of the room develops in a positive way, if its design is created not only non-standard, but also harmonious. The most beautiful tulle will lose its charm if surrounding objects are not taken into account. The arsenal of experienced interior professionals has specific techniques for avoiding risks. Their use in practical activities will tell you how to design stylish and modern.
- In the presence of low ceilings, it is advisable to pay attention to the tulle with vertical ornamental motifs. It can be filament with elegant elongated curtain beads.
- It will help visually make the room higher fixing the cornice on the ceiling.
- Organza forms elegant waves if eyelets are used for fastening. The rings at the top of the canvas are made of light plastic or metal coated with a protective film. Such a kitchen tulle moves without problems, since the rings easily slide along the guides, exactly repeating their configuration.
- A combination of different textures, such as organza and exotic threads, can bring an unexpected effect.
- Once again, at the peak of popularity, lambrequins, which, when designing tulle curtains, take a variety of configurations. They can be strict linear or take lush, somewhat pathos forms that add the features of rich, elegant interiors to the kitchen atmosphere.
In the kitchen with oriental flavor, it is advisable to pick up a tulle interspersed in the form of ornate lines of shiny metallic threads. Such a kind of organza as a chameleon, enchanting with overflows of different color flashes when changing the angle of illumination, will help to support the magic of exotic countries. Its other variety resembles a rainbow, due to the smooth alternation of colored stripes.

Classics with plain walls will receive a worthy addition if a small, but elegant floral pattern decorates a beautiful light curtain. Democratic Art Nouveau accepts geometric lines. Availability in adds natural light. The translucent tulle in such an interior is often duplicated by lightweight blinds, allowing you to adjust the light flux.
Color selection
Solving the urgent problem, what color will the kitchen tulle have, it is advisable to take into account several factors.
- When dominating in the decoration of surfaces, shades of the warm range of the color spectrum and tulle should make a similar feeling.
- Creating a design with a sufficiently large number of textiles (sofa pillows, towels, upholstery, tablecloth, tulle), you need to combine all these objects with a single background sound.
- If it is difficult to decide on your own how to choose the color of the tulle, you should stop at the universal coloristic nuances (beige, white, gray).
- When designing windows, the orientation of the room should be taken into account. On the northern side of the almost sunless side of the tulle, yellow, milky, orange, and beige are selected in the kitchen to visually add warmth and add coziness. The south can be colored pink, pearl green, turquoise. The snow-white air cloud of a translucent veil or organza will look great.
If it is assumed that the tulle will play a major role in the decoration of the window, then variations with an expressive pattern or interesting overhead elements, inserts, embroidery are selected.
Sewing Tulle Curtains
Having skills, you can easily sew a tulle with your own hands, choosing the fabric of the desired shade and deciding on the length and configuration of the curtain. The width of the future product is calculated taking into account the folds laid. If this is a regular straight canvas, then when you buy, the size of all sizes is added to allowances of 7 cm.
If the created design in the design of the kitchen window involves the tulle to be fixed on the grommets, the upper edge, laid with a special tape, should have a margin of 5-7 cm for the rings.
Before starting to cut, the fabric is moistened and gently ironed. Regardless of which style is predicted, first we sew, after bending, the sides. During hemming, you can lay a cord that will keep a flat, aesthetic line. The top is reinforced with doubler for subsequent sewing on the tape designed for curtains, with loops. Threads are not acceptable contrasting, it is better to use colorless or in the exact tone with the fabric.