How to fix the oven in the headset. Connecting the oven to the mains: features and differences of the installation. Overview of ovens from renowned manufacturers
An oven is an indispensable thing in the kitchen. With it, we can cook tasty and healthy food. But if you do not already have such a technique, then it is worth purchasing and installing it in your home. But setting the built-in oven Do-it-yourself thing is not easy, so you need to know how to do it right.
How to install a built-in oven
The built-in oven can be of two types:
- Dependent (installed together with the hob);
- Independent (installed as a separate element of equipment that can be put anywhere in the kitchen).
Built-in gas cabinets that are installed in kitchen set, allow you to territorially distinguish between the upper hob and the oven itself. Almost all ovens have a touch panel and doors with a telescopic opening system.
Currently there are several different options for installing the oven. Usually, the cabinet was installed under the countertop, and a hob was installed above it. Today they prefer to install the oven just above the belt in a special cabinet. This installation method is quite convenient when using the equipment in the cooking process, as well as when cleaning the oven from contamination.
The independent oven is fully autonomous, and the dependent is electrically connected to the top hob. Also, some of the controls that are located on the oven panel control the entire operation of the hob. Usually a dependent built-in oven is sold in stores in the kit and is installed according to the classical scheme: at the top hoband below the oven.
Such a system does not suit everyone, so many people prefer independent ovens.
Before installing the oven, it is necessary for her prepare a convenient niche, which must be controlled by a special building level to avoid distortions. Distortions must not be allowed, as this can lead to an uneven distribution of warm air in the oven. As a result, the oven may malfunction.
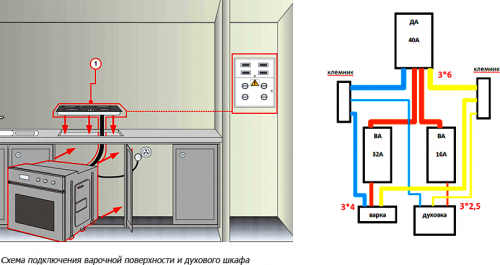
Since the built-in oven during operation emits a large number of thermocouples from the external surfaces (it can heat up to 360 degrees), so the gap between the walls of the niche and the oven should be such that there is good ventilation. Between the bottom of the oven and the niche floor there should be a gap of 85 to 95 millimeters. The gap between the side walls of the oven must be at least 5 millimeters on each side. A hood is installed over the oven and hob so that the hot air does not linger in the kitchen, without involving experts? The ventilation gap between the rear wall and the oven should not be less than 40 millimeters. Below is a diagram of the installation of an electric oven:
Gas oven connection
Work on the manufacture of a niche for the oven is similar to those that are carried out when installing an electric oven. The size of the gaps is also the same. When connecting a gas oven, there is only one problem - it is connected to the gas main pipe with a special flexible hose, but, most importantly, the complete sealing of all connections must be observed.
![]()
Also, the gas oven is connected to the main pipe through a separate faucet. So, if every man can connect an electric oven, then the connection of any gas equipment should be carried out only by official specialists of the gas company, therefore it is impossible to independently connect the gas oven, as this can be fraught with negative consequences.
Can I install an oven next to a refrigerator and dishwasher?
You can install electric ovens almost anywhere, he they must be at a certain distance from washing and. The outlet can be located to the right or left no lower than 10 centimeters from the floor. It’s best to buy a 40 Amp power outlet.
The gas cabinet should be at a distance of about 1.2 meters from the gas source.
You can install the oven near the refrigerator, but in this case, fat can get from it to its walls and thereby spoil the appearance, so it is best to install the oven at a certain distance from the refrigeration equipment.
For modern kitchens separate cooking systems are characteristic, that is, a hob and an oven separated in space. The reason for this is the fact that people who cook well prefer an electric oven and gas hob. Installation of an electric oven requires certain knowledge and skills. This article will help you figure out how to install a built-in electric oven.
Overview of ovens from renowned manufacturers
Ovens from well-known brands are by no means cheap, but they differ in excellent quality and excellent performance characteristics:
- Bosch - ovens of the highest quality, equipped with an environmental cleaning system. The temperature range is from 30 to 300 degrees. They are distinguished by a stylish design, ease of management and operation.
- Samsung - convenient ergonomic models with a convenient change of mode and economical energy consumption.
- Electrolux - ovens with built-in electronic timers and temperature sensors. Management - touch. Beautiful thoughtful design, a wide selection of colors.
- Gorenje - units are equipped with a steam cleaning system. They are distinguished by a stylish design, multifunctionality, a large number of heating modes.
Installation of the integrated oven
If you drive into a new apartment, best option there will be a purchase of a kitchen furniture set with a hob and oven already installed. Installation of the kit should be entrusted to professionals. If you decide to independently install a built-in electric oven, you must follow certain rules.
First of all, you need to know that ovens are divided into two categories:
- Independent.
- Addicted.
What to consider in the model of each of these types in order to correctly install the built-in electric oven:
- Independent ovens can be placed anywhere you choose. It is a fully autonomous construction.
- Dependent ovens are connected to the hob. Such devices are sold as a set, with the hob mounted on top and the oven below. This does not suit everyone, so autonomous ovens are becoming more popular.
Important! Before installing the electric oven, you need to prepare a niche for installation. In the process, it is necessary to control using the building level so that there are no distortions. Distortions are unacceptable, since this threatens an uneven distribution of heat and the failure of the oven.
How to install the oven yourself?
Since the oven during operation emits a large amount of heat from the surfaces, ventilation gaps must be provided between the walls of the cabinet and the niche:
- The distance between the floor of the niche and the bottom of the electric oven is 8.5-9.5 cm.
- The distance between the side walls of the niche and the oven should be at least 0.5 cm on each side.
- The minimum width of the ventilation gap between the rear walls of the niche and the oven is 4.0 cm.
Connection Order
So, the oven is installed. Now you can think about how to connect the oven. Since the oven consumes a lot of power, the most crucial moment is the laying of a three-core copper wire from the power shield to the electric oven outlet.
Important! This must be done if the house is old and the internal wiring is made of aluminum wire.
 What rules to follow here:
- With an oven power of 3-3.5 kW, the current consumption will be no less than 16 A. In the power panel, it is necessary to put a separate machine for 25 A. It works only to turn on the oven. The wire is laid in the cable channel. Type of wire - VVG-3X2.5.
- When the power of the built-in oven is greater than 3.5 kW, the current consumption will be about 32 A. An automatic machine designed for 40A will be needed using the VVG-3X4.0 wire.
Important! All electrical work is permissible only when the mains voltage is disconnected.
Additional rules and requirements:
- Install a three-pin socket on a 3-wire cable, stretched to the kitchen. The socket has 3 terminals: zero, phase and ground.
- If a two-wire circuit is used for wiring (there is no “ground”), it is necessary to invite a specialist to conduct “ground” on your shield.
- The electric oven, depending on the specific model, may have a 3-pin connector for connecting a power cable or a terminal block equipped with screws. The screws are labeled with zero, phase, and earth, but this work must be done with the utmost care.
Installation of residual current device (RCD).
Before you turn on the cable, you must make sure that it is able to withstand the current load. So, the connection power of the oven - what is it? Power parameters determine the speed and efficiency of heating, as well as the amount of energy consumed. But this factor will affect the features of the connection:
- With an oven power of 3.5 kW, a three-core copper cable with a cross section of 2.5 square millimeters is used.
- For electric ovens with a capacity of more than 3.5 kW, a conductor of 4 square millimeters is used.
Important! Electricity connection on the distribution panel is possible only after checking the correct installation and connection of the oven.
Features of connecting a gas oven
The procedure for arranging a niche is the same as in the case of electric oven:
- The size of the gaps in the standard is the same.
- The oven is connected to the gas line via a flexible hose.
- The most difficult moment is to ensure complete tightness of the joints.
- The oven must be connected to the mains via a separate faucet.
Important! If connecting electrical equipment is accessible to almost everyone, then gas masters can connect gas equipment.
As you can see, the oven is difficult to install. However, if you are not confident in your abilities, it is better not to undertake this work, but to contact a specialized company.
Today in many kitchens you can see the built-in oven. This is really convenient, practical and useful household appliances in any household, which allows you to significantly expand the list of dishes that can be prepared. However, cooking will only be a pleasure and no problems only if the owners have managed to properly connect the oven. And in order to prevent serious mistakes that can not only complicate the operation process, but also cause serious harm to equipment and furniture, you need to know a few nuances.
Types of Ovens
On sale you can see two types of ovens:
- dependent (set only with hobs);
- independent (set separately, as an independent element of technology).
Both the first and second are usually equipped with touch panels and doors, complemented by telescopic opening systems. In this case, the first are connected by electric cables to the hob mounted on top. The controls they allow you to adjust all the equipment - both the cabinet and the hob.
The cabinet itself is best installed under the countertop. The hob will be positioned right above it. This allows you to save usable space and just conveniently divide the entire room into functional zones. It is worth remembering if you do the work yourself, with your own hands, and do not trust it to specialists who will definitely take this into account.
Install the oven in such a way that its upper edge is at the level of the belt or slightly higher. In this case, the greatest comfort is provided during cooking. In addition, it is most convenient to clean the oven from contamination precisely with such contamination.
Proper location is the key to safety
Before installing the oven with your own hands, you need to prepare a place for work in advance. First of all - a niche where it will be installed. It is important to ensure that there is not the slightest distortion. To do this, use the level.
If you allow at least a slight bias, the device may fail after several years of operation - the heat will be distributed incorrectly and unevenly, which will damage the thin electronics.
When the built-in oven is operating, a large amount of heat is generated. Its accumulation can lead to a variety of problems. The product itself may fail from overheating. Even worse, if a wooden cabinet becomes smoldering and then lights up, it will cause a real fire. Therefore, to install such a technique yourself, you need to carefully calculate each step.
The risk of overheating and fire will be zero if you correctly position the cabinet in a niche before connecting it to the network. Experts set such a distance from its walls to the edges of a niche:
- 40 millimeters from the back wall;
- 50 millimeters from the left and right walls;
- 90 millimeters from the bottom.
At this distance, high-quality ventilation is provided, completely eliminating the risk of overheating of equipment.
Installation progress of the electric oven
Connecting an electric oven is much easier than a gas oven. Therefore, many people decide to do this work on their own, without overpaying to specialists. Yes, there are no hoses through which gas flows, but still you cannot relax, forgetting about the basic rules of electrical safety. After all, one mistake is enough for a short circuit to occur, which may well lead to a fire.
First of all, you need to seriously approach the connection of the cabinet to the network. An electric oven is a very powerful household appliance. Therefore, to connect it, you must use a separate branch of the wire. Moreover, its cross section should be at least 2.5 square. Throughout the wire there should not be twists (even very high quality connected) and any other damage. Otherwise, the risk of a short circuit increases sharply.
A branch designed to provide power to the oven must be equipped with a circuit breaker. The power is calculated for a specific model, depending on the strength of the current consumed during the operation of the oven. In most cases, this number ranges from 16 to 20 amp. In cases where the electric hob is connected with the oven, you should choose a machine, taking into account the total power consumption.
Grounding is an essential attribute of a modern oven. Only it allows you to ensure the complete safety of working with an electric oven. If we are talking about a private house, then there is no problem. In apartments, especially old ones, this is much more difficult - the wiring simply does not provide grounding. It is better to entrust this work to specialists. If you decide to connect the oven with your own hands, you need to stretch an additional wire from the kitchen to the common panel on the landing and connect it to a suitable metal object.
Only if all work has been done correctly and accurately can the safe operation of the new oven be guaranteed.
AT kitchen facilities modern urban apartments, their owners are increasingly abandoning classic electric and gas stoves, and prefer to use separate systems for cooking hot food. This is due to the great convenience of using kitchen appliances at home, when the oven is used relatively rarely, while the stove is prepared for multiple daily cooking of hot food.
Oven Features
Of course, no zealous housewife can do without an oven. It is its use that allows you to cook gourmet dishes, pastries, and other menu items that are not intended for everyday cooking at home. Today, the market offers a fairly large amount of this household kitchen equipment, which is distinguished by its constructive device, the principle of operation, functionality, capacity and other features. Therefore, before you stop looking at a particular model, and rush to adjust kitchen furniture for it, you must carefully study all the features of these devices.
According to the installation method, ovens (ovens) are divided into:
- Independent, which is fashionable to install in a furniture niche and is easy to move from one place to another;
- Recessed, which are installed in furniture niches on an ongoing basis and their dismantling is carried out only when replacing furniture or the cabinet is out of order.
According to the method of heating, the ovens are divided into:
- gas, the connection of which must be carried out by specialists of the relevant organizations;
- electric, which can be mounted independently.
In addition to the ease of installation, electric ovens have another advantage over electric gas cabinets:
- heating of the gas device is carried out by burning gas entering through nozzles - burners into the lower (bottom) part of the working chamber, which creates uneven heating of its entire volume;
- electric ovens have heating elements located below, above and on the sides of the chamber, which ensures more uniform heating, and, therefore, improves the quality of cooked dishes.
Niche Installation
When installing a built-in oven, installation work begins with the preparation of a niche where it will constantly be located and function. One of the main conditions for using a niche:
- lack of distortions of the bottom, walls and top panel;
- maximum parallelism of the bottom to ground level;
- perpendicularity of the planes of the walls, bottom and ceiling.
Failure to comply with these conditions leads to uneven operational heating, which significantly reduces the service life of the product.
Since cooking is accompanied by the release of a large amount of heat, a certain gap must be left between the walls of the oven and the niche itself, the value of which depends on the electric power of the product. For most household models, gaps can be selected from the following conditions:
- the distance between the back wall of the oven and the wall of the niche should be equal to 40.0 millimeters;
- the gaps between the side walls of the cabinet and the niche are within 50.0 millimeters;
- the gap between the bottom of the cabinet and the lower plane of the niches should be at least 90.0 millimeters.

Connection of an electric oven
To connect an electric oven in old-built houses, it is necessary to lay a separate line from the three-core cable with copper conductors from the meter to the installation site of the oven with a copper wire. To do this, a separate circuit breaker is installed in the switchboard, designed for emergency operation at a current of 25.0 amperes. The cable (for example, "VVG - 3x2.5") is most easily laid externally using a cable channel.
If the electric oven consumes more than 3.5 kilowatts, then the machine is selected at 32.0 amperes, and the cable is “VVG - 3x4.0”. The type of outlet depends on the plug selected. The most widely used are three-pin “plug-socket” pairs with phase connection (220.0 volts), zero and ground. All work on the connection is carried out in a de-energized room. The power cable, with an installed electrical plug, is connected to the terminal box located on the back wall of the electric oven.
Installation Features
The presence of an oven implies the use of a hob. Despite the fact that today there are three types of these devices on the market:
- electric;
- induction;
- gas.
On a note!
When installing an electric cabinet, it is advisable to install a hob, heated with the help of electricity. It can be either an induction or an electrical device.

Connection to the network does not differ from similar procedures in relation to electric ovens. However, installation in the countertop has its own nuances. First of all, if you intend to install the device in existing furniture, for example, in a curbstone, you must select its overall dimensions slightly smaller than the dimensions of the tabletop around the perimeter. Installation depends on the type of panel itself (induction or electric), and on the material of the countertop. Think in advance.
Installation Preparatory Work
Before starting installation work, make sure that:
- it is possible to lead an electric cable to the place of installation of the electric stove, by analogy with the electrical work when installing the electric oven;
- the distance from the outlet to the installation site does not exceed the length of the electric cord that are included in the kit.

Installation in a tabletop from MDF
When installing the device in a countertop made of the sequence of operations for embedding the following:
- according to the perimeter sizes specified in the installation instructions for a particular model, a hole is cut in the countertop - if the instruction is not available, the dimensions of the panel are drawn on the surface of the countertop, and then 5.0 ... 10.0 millimeters are taken from each side;
- to reduce chipping of the edge of the hole, when it is cut through by a jigsaw equipped with a fine-toothed saw, a masking tape or construction tape is glued outside the cut line;
- the sawn edge of the hole is treated with silicone sealant, which will prevent swelling and delamination when water enters it;
- an electric panel is installed and fixed in the sawn hole.
Attention!
When cutting holes, special accuracy must be observed. An error of 10.0 millimeters will cause permanent damage, which will require replacing the countertop.

Artificial stone countertop installation
The advantage of an artificial (acrylic) stone countertop is its significantly greater durability compared to MDF-LDSP parts - plates. Usually, when ordering this type of worktops, the hole for the cooking device is implied in advance. If there is no hole, then the optimal solution would be to contact a specialist who, for a small fee, will perform all the necessary work.
![]()
Which cabinet to choose
Some apartment owners proudly show their guests a cupboard in which an oven is installed, and a hob is mounted on top. Of course, such a piece of furniture looks quite modern. However, this violates the basic principle of shared cooking. In terms of functionality, this cabinet is a classic gas or electric stove, decorated in a more modern design.

However, the tastes and needs of each apartment owner are purely individual. When connecting a cabinet with a panel and an electric oven, it is necessary to provide for the presence of electrical wiring designed for the total power consumed by both kitchen devices.
Video
In the video review you can see how to install built-in ovens.
Perhaps, one of the best ideas that once came to the minds of home appliance designers can rightfully be considered the creation and production of brass electrical cabinetswhose installation allows you to integrate them into the kitchen. Such ovens look very elegant in the interior of any kitchen, and in addition, they are convenient to use, thanks to several heating modes, the presence of a grill and even, in some cases, skewers.
Electric ovens are extremely practical, especially if they are installed correctly, at the most suitable height. And they are easy to clean outside and do not need to be cleaned from the inside. By purchasing such a built-in wardrobe, many of us will prefer to use the help of professionals for its installation, not daring to install it ourselves, but in fact, almost everyone can do it with their own hands.
Things to consider before installing an electric oven
- The installation process of this device requires the presence of such a tool in the house as a cordless screwdriver, which will allow you to tighten the screws proposed by the manufacturers of the electric oven for its best installation.
Attention! All the screws necessary for embedding the furnace are included in its kit and there is no need to buy them separately.
- It is likely that before installing the oven you will have to put an additional outlet in the kitchen - the one into which the appliance wire will be connected. Please note that the outlet must be located on the wall that will be located behind the electric oven. If the wall outlet is already there, but it is old-fashioned, you will have to replace it with a new one.
- An electric oven can be compatible with almost any kitchen furniture, you only need to make sure that the materials from which it is made are able to withstand heating within 90 degrees, otherwise you will be in trouble. This may be the delamination of the materials from which it is made kitchen furniture, and the appearance of other visual defects on it, spoilage of products and other contents of cabinets and drawers adjacent to the oven, as well as the worst of all, their ignition.

- The furniture niche in which the oven will be installed must be metal outside, and its side parts must be insulated with glass wool and laid with aluminum sheets. The bottom panel of the niche should go strictly parallel to the floor level, and its walls should be perpendicular to the shelves.
In order to prepare as much as possible for the installation of an electric oven, it makes sense to ask experts questions in advance, discuss the details of this process with friends and acquaintances who have encountered it, and also study the general sequence of actions using photos or videos that are available in large numbers today. Then you can get to work.
The process of embedding an electric oven.
We take the device out of the box.Typically, boxes containing electric ovens and other household appliances of similar sizes have a convenient zipper, which can be easily handled alone. Before you get the stove out of the package, you need to grab it in the right way, as required by the manufacturers of the stove: you must hold the stove by the side recesses and in no case pull it by the door.
We mount the socket. Since the outlet is not included in the oven, you need to buy it yourself, taking into account the degree of protection of its housing from environmental influences and the type of wiring, as well as the power consumed by the appliance.

The power cable must be located on the back of the appliance, and when installing it, you need to make sure that it is not pinched or crushed by anything, and that it does not lie on top of the oven.
We put the device in a furniture niche.When the oven is put on the prepared place, you need to fix the grease filter, referring to the instructions and available photos of this model. Since built-in electric ovens have forced ventilation, otherwise called convection, there is no need to make any holes in the furniture and install ventilation nets in them. The stove takes air from the sides and pushes it into the duct.
Important! After installing the electric oven, you need to make sure that there is a gap of at least 2 mm between it and the walls of the furniture.
We fix the device using the screws included in the kit. To do this, we find the holes evenly distributed on it on the outer wall of the device and fasten the screws. We connect the device and make sure that it works.
On this, the installation process can be considered completed, and the next stage will be the long years of using the oven for cooking a wide variety of foods and enjoying this superbly designed appliance that conquered the culinary experts and just the hostesses all over the world.
Oven installation: video
How to install an oven: photo